Today I’m doing a blog swap with Kim from Seven Thirty Three!
If you’d like to see my tutorial on how to make some totally rockin’ fab decor balls using BEANS head on over to her blog and check it out!
Here’s a teeny tiny sneak peek of my decor balls:
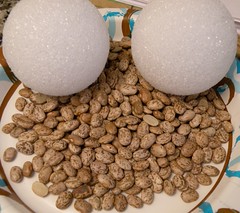
Just click on the image to go see my wicked cool tutorial on how to make some crazy decor balls!
Now for the par-tay!!! Here’s Kim, from 733 – – – A Creative Blog!
*******************
Hey HOH readers! I am Kim from
seven thirty three – – – a creative blog.
You’ll find a lot of crafty stuff in my little corner of the blogosphere – from fun tutorials, scrapbooking and other freebies to a some fun linky parties!
Our newest party is titled Sugar and Spice, so stop by and link up all your girly goodness!

And we don’t want to forget about the boys, so Thursdays are for the What are little boys made of? Weekly Party!

And of course I can’t forget Fun Feature Friday, where I feature fun creative items that I discover during blog hopping.
Whew! I told you we have a lot going on.
Today I wanted to show you one of my newest addictions:
Freezer Paper Stencil T-Shirts!
Ever since the first time I came across a freezer paper stencil project I have been wanting to give it a try. And now, I finally did!
It is SO simple and you can be really creative. I suggest you go grab some blank t-shirts, FREEZER paper, an exacto knife and fabric paint, because you are going to want to try this!
I started by making my son a GAP knock-off.
For $15.00 you could get this shirt from GAP Kids:
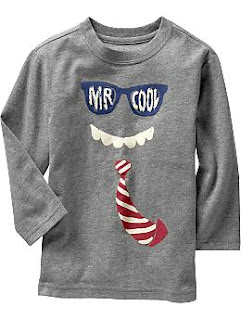
(Image courtesy of GAP kids)
With a $3.50 shirt and supplies I had around the house I made this:
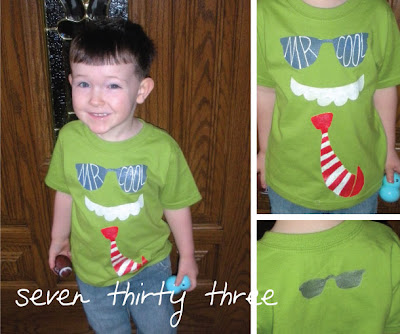
I free-handed the images directly onto the matte side of the freezer paper and then cut it out with an exacto knife (can also use your Cricut should you have a cartridge that matches your design!).
Iron it onto the shirt, paint, and Voila!
I used puff paints I had around the house and a piece of packing material (sort of a Styrofoam) that I used to sponge it on. It can be a bit tricky to think in reverse when you are drawing the design so take your time and think it out.
I didn’t follow a tutorial, just sort of winged it, but if you need more direction then this, check out this great video tutorial!
This second shirt is also inspired by, but not a direct copy of, another GAP shirt:
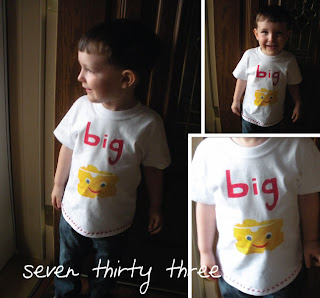
My son makes sure everyone knows that HE is the BIG CHEESE, not his Daddy!
I added embroidery floss X’s along the bottom of the shirt to give it a little extra flair.
I think I am addicted!
For under $5 I will be able to create some really fun shirts for all my kids!
My next venture? A first birthday shirt for my youngest, Olivia. Stay tuned as party details will be coming soon.
Happy stenciling!
And thanks to Allison for letting me visit today.

What a cute tutorial! And it does sound easy. Thanks so much
Hugs
SueAnn 😀
I love freezer paper. Mine lives in the craft closet instead of the kitchen. LOL I cut mine to 8.5×11 so that I can run it through my printer. Easy peasy.
Those shirts are really cute! I love they are so inexpensive compared to the original too!
Not sure what freezer paper is. Can you elaborate the brand and where to get it? I guess I’ve never heard of it…
Freezer paper is on my list of supplies to find ASAP. Cute shirts!!
Sarah,
Freezer paper is your everyday freezer paper you use to wrap meats and things in your kitchen to store in your freezer. I believe the brand I used was Reynolds Freezer Paper – located right next to the Aluminum Foil in the Grocery Store.
😀
Adorable! Those shirts are too cute and that tutorial you linked to cleared up a few questions I had.