I don’t consider myself a goodwill expert by any stretch of the imagination, but I do shop there frequently enough…
Read More
Helping you DIY your home one awesome project at a time
I don’t consider myself a goodwill expert by any stretch of the imagination, but I do shop there frequently enough…
Read More
I seriously scored the best deal at Goodwill last week. I really want to show you!! But that would involve…
Read More
Last October I found these brand new lamps from Target over at my favorite Goodwill. I’ve been using them as-is,…
Read More
Hi Friends! First off, thanks for voting for Lindsay. I have THE BEST readers. Srsly. You guys are amazing. I’ve…
Read More
I have a boyfriend. Shhhh, don’t tell Ben. His name is Craig. And he has the coolest list. Yes, my…
Read More
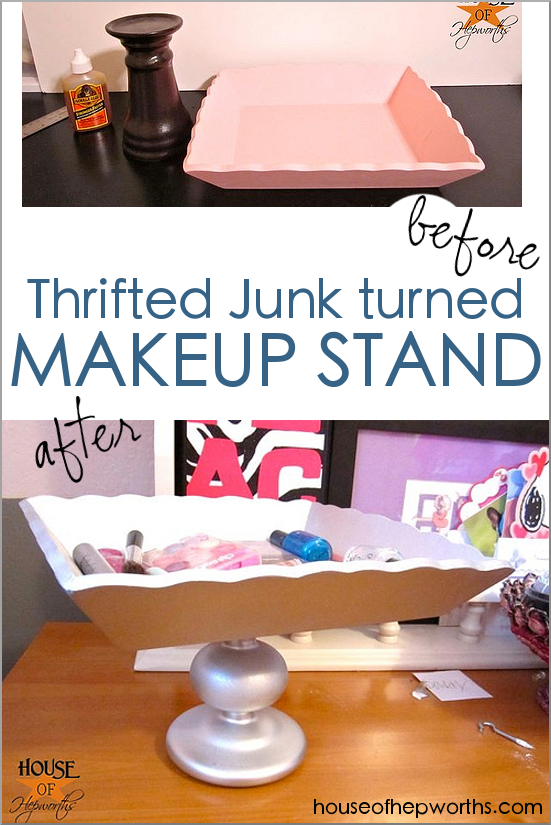
You guys. Today’s tutorial is so easy and so cute! Any tween or teen would love this cute thrifted DIY…
Read More
Every day when I’m sitting at my table, I stare at this blank wall… {Just ignore the orange around the…
Read More
The ongoing family room decorating saga continues! Last month I showed you some new pillows I found on Craigslist: That…
Read More
Goodwill freaking ROCKS. Yes, you read that right. Allison is actually saying something nice about Goodwill. I went to Goodwill…
Read More
My fireplace mantle has gone through several transformations since we moved in. First we had this… …which isn’t even decorated…
Read More