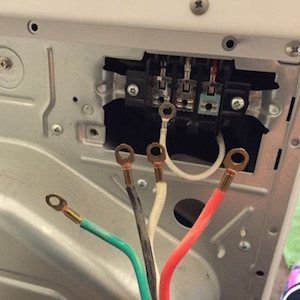
You guys, I am so close to being done with the laundry room renovation. And I am giddy with excitement over how it’s turning out. So. Much. More. Awesome. than I could have anticipated.

We’ve been using the laundry room while it’s in transition, and even with missing trim and much needed paint touch-ups, the room functions as a laundry-slash-mudroom perfectly. Definitely worth the hard work and time I’ve invested in it.
I started a few weeks ago by showing you how to hang beadboard and how to turn ikea furniture into a mudroom locker system.
Then I dove into showing you how to run a vent pipe through your new mudroom locker system.
Today I want to give you a basic update just to show you where I’m at now. I also will give some pointers on hanging wall hooks so they are level and spaced evenly apart.
Here’s the mudroom locker system almost totally finished. All it needs is a little bit of finishing trim and some crown moulding.

I finally hung that shelf across the top (I just followed the directions that came with the shelf from ikea). I also added a strip of MDF across the back and hung up 5 new coat hooks.

I chose to add a strip of MDF across the back before I hung the hooks for two reasons. One, I think it looks more finished and more “built in”. Two, it gives the hooks additional support. The screws had something more than beadboard and drywall to bite into.

I cut a strip of 4″ wide MDF the length that I needed it, and then before I hung it up (with liquid nails and a nail gun) I measured and marked five evenly spaced lines across the board.

Then I marked where each of the screws needed to go for each hook. After I hung the board to the beadboard I drilled pilot holes into each of the screw hole markings and puttied up all my nail holes.

By pre-drilling all the screw holes, you can now prime and paint your board and not worry about where to hang each hook. You will see all your pilot holes after the paint is dry.

By pre-measuring and pre-drilling before painting, once the hooks were hung I didn’t have any paint touch-ups. It was really nice. (The coat hooks are from Home Depot and were around $4ish each.)

Now that the top shelf and the coat rack are hung I can finally focus on adding trim around all the raw edges. I bought some quarter-round I’m going to add to cover those edges. It will help give the unit a much more finished and built-in look.

Here’s how the unit is currently looking. It is fully functional, just needs the basic finishing touches (trim).

I may even add some pretty knobs to the bench drawers. It would be purely cosmetic though since the drawers have a great tap function. You just barely tap on the drawer and it pops open. The kids’ socks are stored in the drawers (they each get a drawer).
And here’s a sneak peek of the entire room. I can’t wait until I finish all the trim and crown moulding so I can give you a full tour of the room.

Oh, and check out the “before” photo. What a dramatic difference!


I think I’ve been starved for some serious DIY projects after taking a break from big projects all summer long. I just love transforming boring spaces into super-functional and pretty ones.
For a source list, check out this post.
Part 1: How to install beadboard and turn ikea furniture into mudroom lockers


Welcome to House of Hepworths! This blog chronicles my journey from turning a cookie-cutter basic builder-grade house into our custom dream home. I do all the work myself so I can save a buck or two, and I share the process with you to hopefully inspire you to tackle projects in your home. I write about anything related to sprucing up our home, whether it be 


