%20to%20create%20your%20custom%20laundry%20or%20mudroom.%20%23ikea%20%23ikeahack%20%23laundry%20%23mudroom%20%23beadboard "Pin It")
You guys, I am so close to being done with the laundry room renovation. And I am giddy with excitement over how it’s turning out. So. Much. More. Awesome. than I could have anticipated.
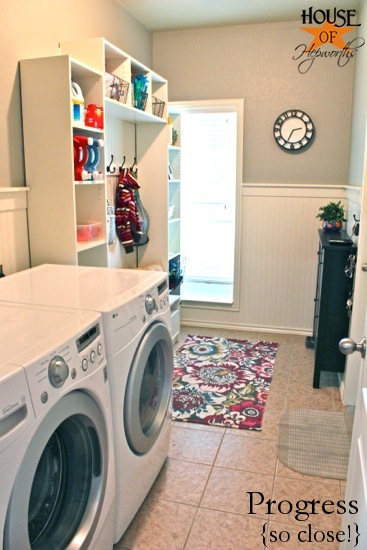
We’ve been using the laundry room while it’s in transition, and even with missing trim and much needed paint touch-ups, the room functions as a laundry-slash-mudroom perfectly. Definitely worth the hard work and time I’ve invested in it.
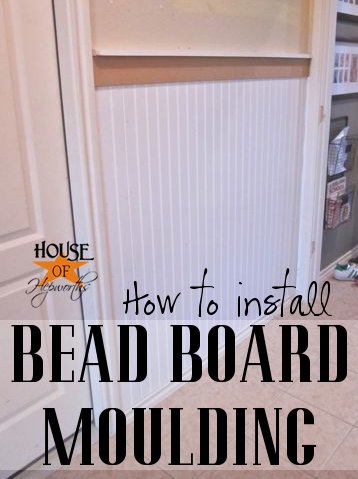
I started a few weeks ago by showing you how to hang beadboard and how to turn ikea furniture into a mudroom locker system.
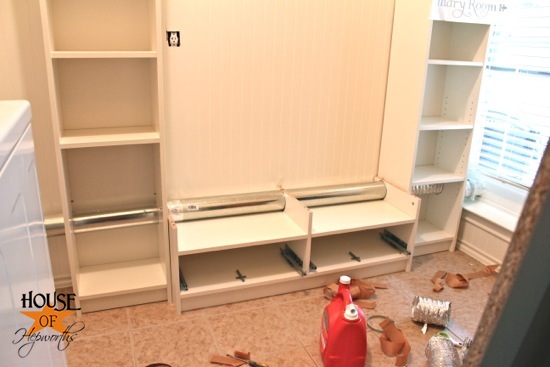
Then I dove into showing you how to run a vent pipe through your new mudroom locker system.

Today I want to give you a basic update just to show you where I’m at now. I also will give some pointers on hanging wall hooks so they are level and spaced evenly apart.
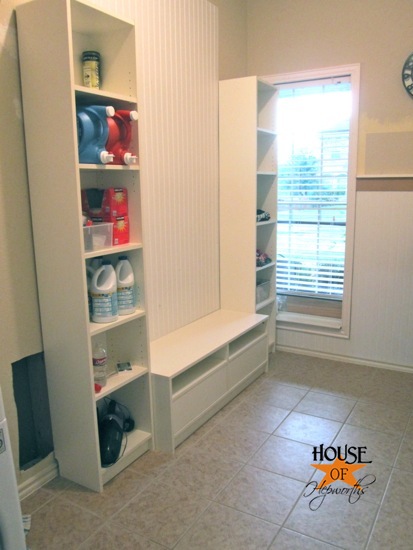
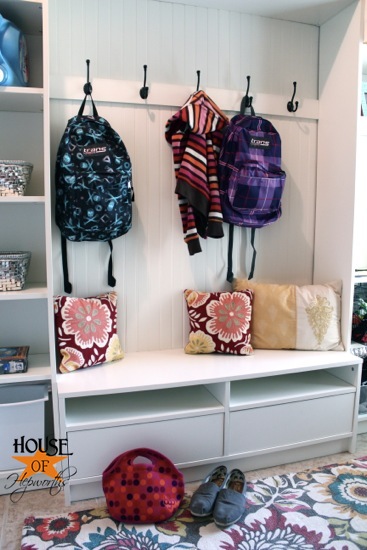
Here’s the mudroom locker system almost totally finished. All it needs is a little bit of finishing trim and some crown moulding.
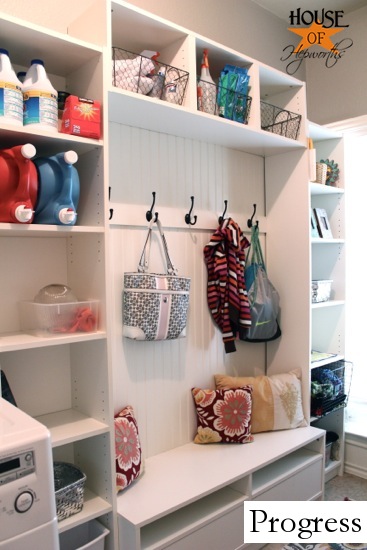
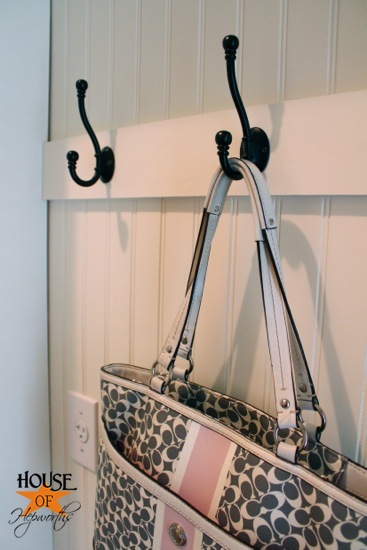
I finally hung that shelf across the top (I just followed the directions that came with the shelf from ikea). I also added a strip of MDF across the back and hung up 5 new coat hooks.
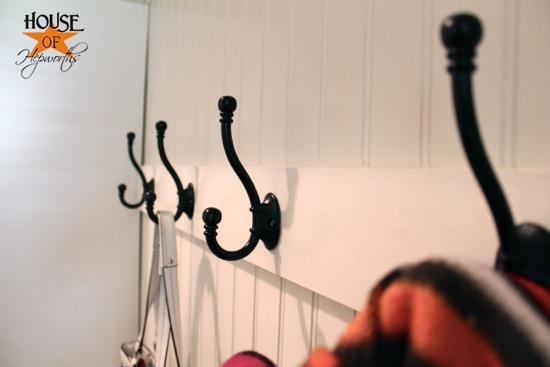
I chose to add a strip of MDF across the back before I hung the hooks for two reasons. One, I think it looks more finished and more “built in”. Two, it gives the hooks additional support. The screws had something more than beadboard and drywall to bite into.
I cut a strip of 4″ wide MDF the length that I needed it, and then before I hung it up (with liquid nails and a nail gun) I measured and marked five evenly spaced lines across the board.
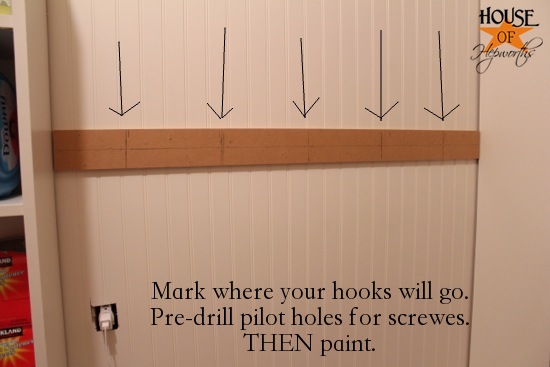
Then I marked where each of the screws needed to go for each hook. After I hung the board to the beadboard I drilled pilot holes into each of the screw hole markings and puttied up all my nail holes.
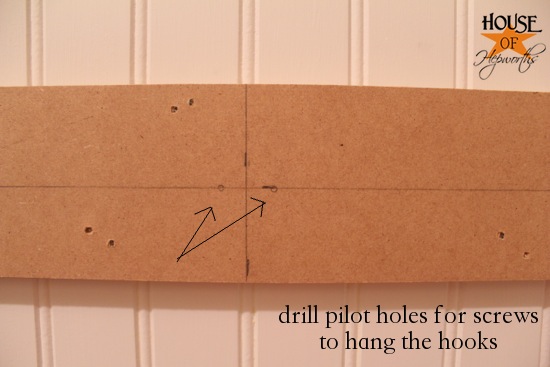
By pre-drilling all the screw holes, you can now prime and paint your board and not worry about where to hang each hook. You will see all your pilot holes after the paint is dry.
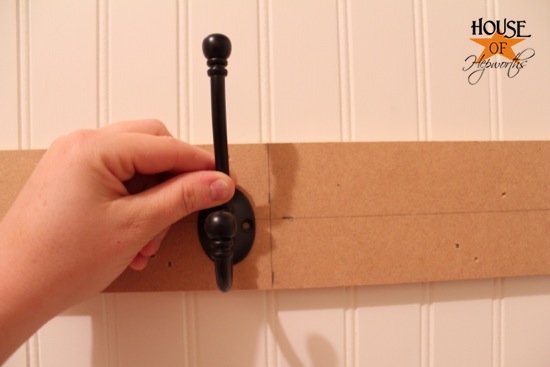
By pre-measuring and pre-drilling before painting, once the hooks were hung I didn’t have any paint touch-ups. It was really nice. (The coat hooks are from our local hardware store and were around $4ish each.)
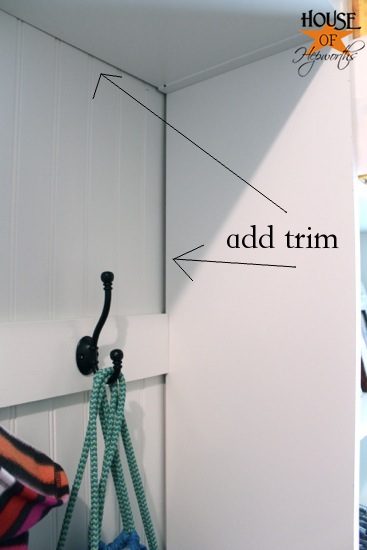
Now that the top shelf and the coat rack are hung I can finally focus on adding trim around all the raw edges. I bought some quarter-round I’m going to add to cover those edges. It will help give the unit a much more finished and built-in look.
Here’s how the unit is currently looking. It is fully functional, just needs the basic finishing touches (trim).
I may even add some pretty knobs to the bench drawers. It would be purely cosmetic though since the drawers have a great tap function. You just barely tap on the drawer and it pops open. The kids’ socks are stored in the drawers (they each get a drawer).
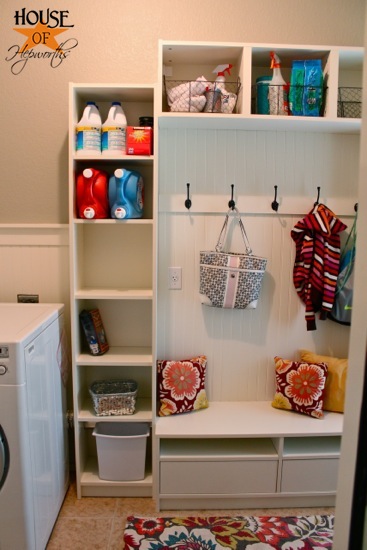
And here’s a sneak peek of the entire room. I can’t wait until I finish all the trim and crown moulding so I can give you a full tour of the room.
Oh, and check out the “before” photo. What a dramatic difference!

I think I’ve been starved for some serious DIY projects after taking a break from big projects all summer long. I just love transforming boring spaces into super-functional and pretty ones.
For a source list, check out this post.
Part 1: How to install beadboard and turn ikea furniture into mudroom lockers
It looks great! Yay!
What a lot of work…cant wait to see the trim details.
Love your mudroom…so organized! We need a new washer and dryer, yours are pretty. Do you love them??
I really do like my washer and dryer. They are front loading LG. You have to leave the washer door open though until it dries out, but that’s the case for all front-loading washers.
AMAZING!
Wow! It’s looking amazing! I love the ikea stuff turned mudroom organizational system! Great ideas.
Thanks for sharing!
Leslie
House on the Way
I love the idea of moving socks down to the mudroom! I can’t tell you how many mornings my son is running up the stairs looking for socks while the bus is honking in our driveway. I also love the look of the entire room. I’m thinking about turning out enclosed back porch into a kind of mudroom, but I’m nervous about covering up some windows.
I use to keep their shoes and socks in their rooms, but same as you – they were racing up there trying to get their stuff together. I don’t allow shoes in the house, so it just made sense to keep the shoes near where we leave the house. And once all the shoes were moved I just moved the socks as well.
It has been so nice having socks and shoes downstairs in the mud room. The kids get dressed up in their rooms but they just grab the socks and shoes on their way out to the car.
So great!! I can’t wait to add this to our basement which has a great wall next to where we come in from the garage…but since you can’t see it, it’s on the wait list…Thank you for the inspiration!!
Maybe someday, right?! It took me over two years of using this room every single day before I finally was able to tackle it. And I’m with you, I have several rooms that don’t get “seen” that might never get done. I’d rather get new floors in my main family room than do a master bath renovation that only I will see. 😉
Have you seen the movie Despicable Me? The little girl and her reaction about the unicorn? “It’s so FLUFFY I’m going to DIE!”. Ok, got that voice in your head now? Good. That’s me, only instead of a stuffed unicorn, it’s your laundry room rug, because just saying I loved your rug didn’t quite convey the sentiment! Did I miss you mentioning it? Would love to have one if you’d share details! I also love the way the laundry room is shaping up, just not in a fluffy unicorn kinda way. 🙂
It looks FABULOUS!!!! Great for me, since I walked into my laundry room Saturday morning to hang a strip of hooks, and ended up spending the entire day stripping wallpaper. Yup – full blown laundry room re-do is underway, and beadboard is going in, thanks to you! Sadly I don’t think I have the space to configure a mudroom area, but I will try my best!
I hope you post pictures when you are done!
It looks fabulous! Such an awesome and now organized space! Leading the dryer vent out was such a good idea!
Wow! This looks great…I love the idea of marking and drilling the holes before painting…makes so much sense! Don’t you also LOVE your W & D? I have the same set and love, love, love them!!!
Wow. It looks great already.
Just one thing you might want to consider about handeles on the bench: when someone sits on the bench the handles might interfere / one might hurt his/her legs on them when not being carefull, they might result in a damaged drawer front due to an uncareful sitter putting to much pressure on a handle…
Because of that I used recessed handles… http://heim-elich.blogspot.de/2011/12/schuhe-im-stehen-anziehen.html
Cant wait for you final reveal, I just know it will be fabulous.
Greetings from Germany!
Great tip! I probably wont add them now that you mention that. Knowing my kids they would be resting their feet on them daily.
first I have that same Coach purse 😉
where is this room in your house? I can’t remember? I know it is downstairs since you vented your pipes to your front porch. But do you enter through this room?
It is looking great, Allison! I can’t wait to see the bookcases all finished. And the beadboard and gray walls make the room! 🙂
I love my purse! I have carried it daily for over a year. I just can’t part with it. It needs to be cleaned though.
The entrance from the garage into the house is through this room. The door is in the middle of the wall, so it’s a really awkward area.
Is it bad that I want a mudroom just so I could build something this awesome? lol
Girl, that is looking so good! I so wish I had a mudroom type space by my back door!
xo,
Shannon
I gotta say, I love this room. It is beautiful and I can see that it is extremely functional!
The room looks great! I love how it turned out. Have you thought about framing in a long and wide mirror in the space above the coat hooks? It could be nice to be able to do a quick mirror check on your way out the door. And I don’t know your measurements, but one of those cheap-o 1 ft by 5 ft ones might fit…
I don’t remember where I learned this trick, but to make sure things are evenly spaced (I did this when I installed balusters on my parent’s deck) you can use a rubberband or a piece of elastic, mark how many hooks (or balusters) you need to mount (spaced evenly, but could be as little as an inch apart), then stretch the rubberband across the space you need to fill. It saved me a ton of time instead of having to measure each and every one!
All I can think of is measuring and drilling before painting – where have you BEEN all my life?
Haha you are funny! I’m glad you found my tip useful. 🙂