I have this window next to my front door:
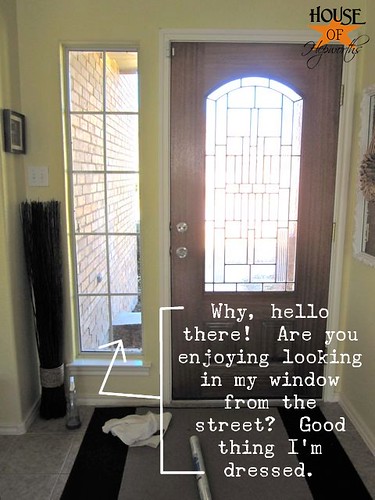
Yup, anyone and everyone can see straight to my back yard from this window. It’s the worst at night when our lights are on. You can see very clearly the contents of the inside of our home from the street as you drive by.
This. Drives. Me. Batty! I hate that everyone and their dog can see into my house. What if I’m not dressed?! What if it’s a potential burglar scoping out the place to burglarize us?! WHAT IF I’M NEKED?!!!!
So um, ya, I needed to fix this little issue.
I would LOVE a custom shutter, but for now my cheap @ss budget won’t allow for that. Actually, it will, but I have a laundry list the length of Santa’s Naughty List of things I need/want to buy, and a shutter ranks at about 1,042.
So I found a cheap solution thanks to my new IRL(!!!) friend, Sarah (we met at Blissdom).
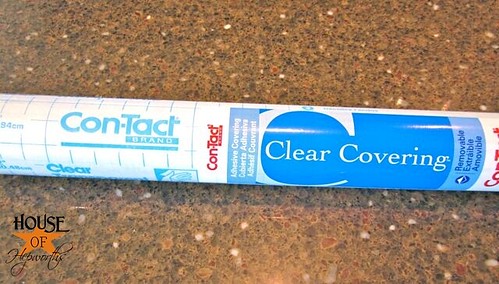
Clear Covering Con-Tact paper.
(Just stay with me here, okay. I promise this will work!)
Step 1: Loosely cut out the size you need (I made mine about 1″ wider and longer than the window. Lay it on the floor and peel the paper off it so the sticky side is facing up.

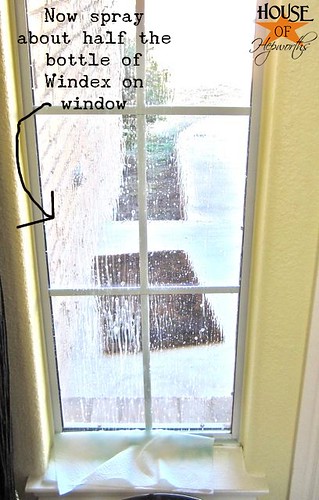
Step 2: Liberally apply Windex to the sticky side of the Contact Paper. APPLY TONS, PEOPLE. The wetter the better (that’s what she said. Ewww.)

Step 3: Now go ahead and soak the heck out of the window as well with the Windex. (Don’t make me say my Michael Scott joke again.)
Step 4: Stick the wet Contact Paper to the wet window. Slide it around until you have it exactly where you want it. I lined up the top and right side of the Contact Paper to the edge of the window so that I’d only have two sides to trim instead of all 4.

Step 5: Stuff a towel at the base of the window. Now start carefully and slowly pushing the air bubbles and Windex to the edges of the Contact Paper.
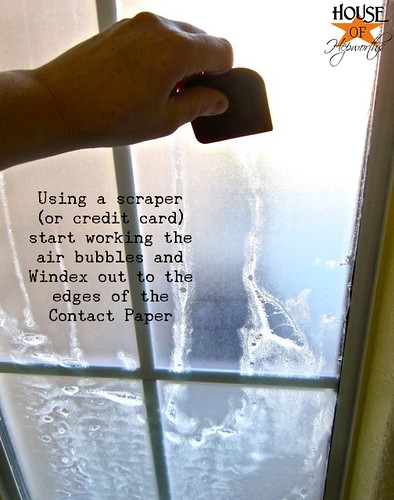
I’m serious about the towels. You will be sorry if you skip this step!
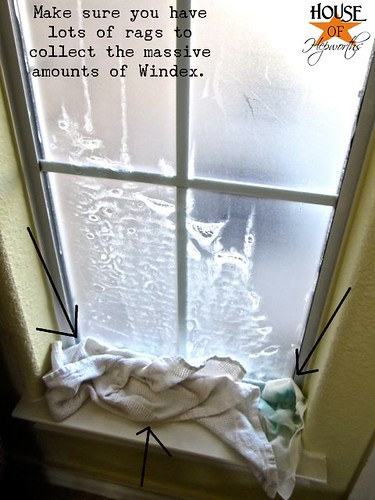
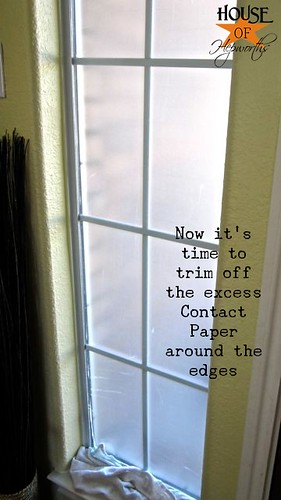
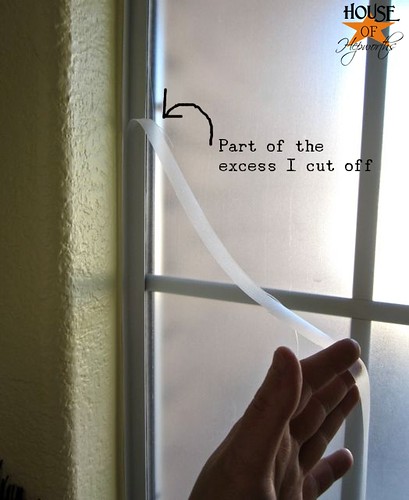
Step 6: Once you have squeegeed all the bubbles and Windex from the window, use additional towels to wipe away any excess Windex. It’s now time to trim the excess edge off.
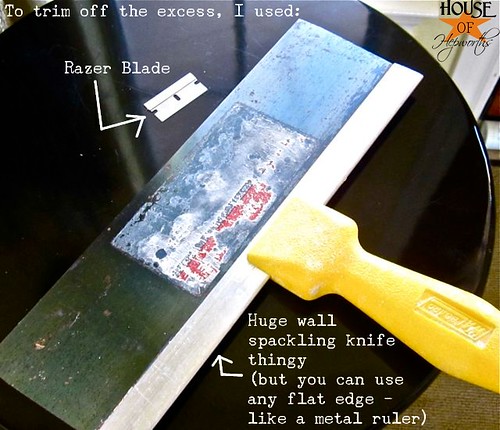
Step 7: For this step I got a razor blade (YES, I KNOW I spelled “RAZOR” wrong on my pictures, but thank-you anyway!) & a big spackling knife thingy. You don’t need a big spackling knife though. If you don’t have one, just use the edge of a metal ruler or something of the like.
Step 8: I crammed the huge flat knife against where I wanted to cut, and then cut carefully with the razor blade along the edge.
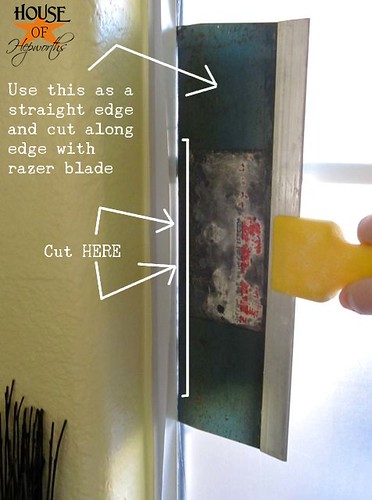
If you are careful you will end up with a nice perfect edge.
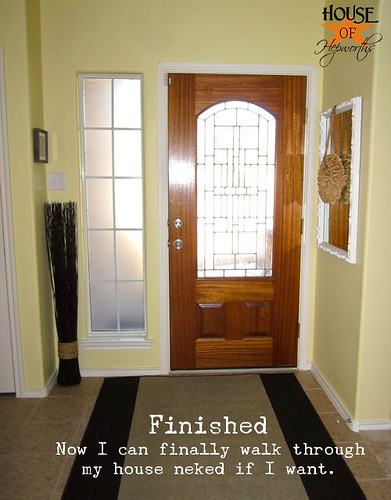
Step 9: Stand back and admire your work. And then strip down and run around the house naked.
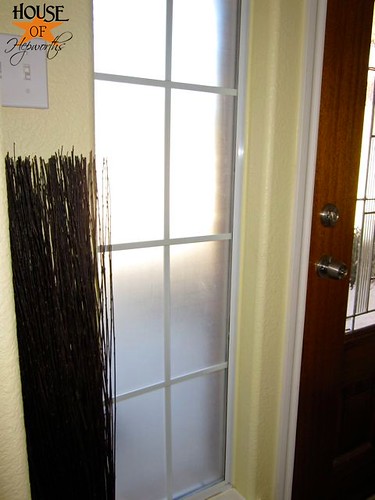
The light still shines in, but the Peepin’ Toms stay OUT.
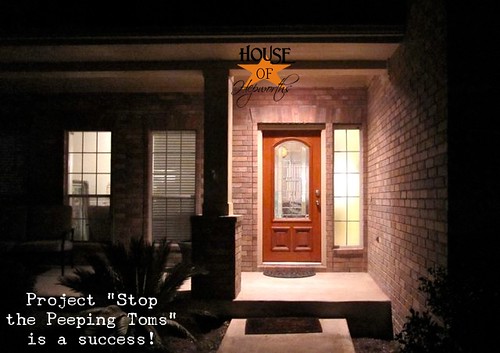
And here are two views: One with the porch light on & one with it off.

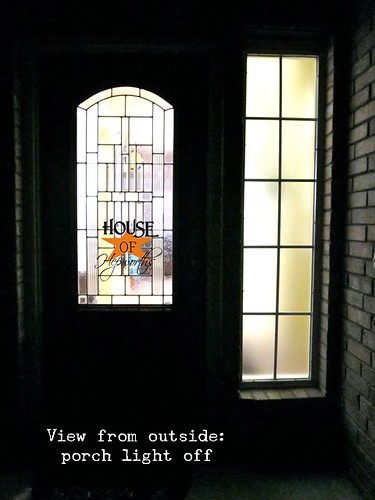
I’d say this project was a smashing success.
Funny side story: My little Yorkie likes to sit on the back of our couch like a cat. It’s the perfect look out post for him to see through the window next to the front door. He growls at any movement he sees, and when he sees a cat he flys off the couch, starts barking up a storm, runs to the window, & perches himself up on the sill like a guard dog. (Mind you he’s only 6 lbs.)
Our poor little neurotic dog. Since I put up the Contact paper he is just beside himself. He can’t stand that he can’t see out the window anymore! He’ll perch himself up on the couch for about 5 minutes, then he can’t stand it and will jump down, run into the piano room, check out the window in there, and if the coast is clear, he’ll run back into the family room and hop back up on the couch.
He does this all day long – every 5 to 10 minutes. In an effort to keep the entire block from seeing into our home, I’ve blocked his look-out post, and I may have to start giving him doggy xanax just to curb his anxiety (kidding, peeps, I’m kidding! No xanax for my dog, mmm-kay?!) How can he protect us from all the Ferrel Cats now? Of course, he loves people (and Peeping Tom’s!), but Ferrel Cats? He sees one of those and suddenly thinks he’s a Rottweiler.
Thanks, Sarah, for the awesome tutorial that I got my inspiration from! I’m strongly considering doing this to my bathroom window now as well. I want to “frost” everything in site!
And wouldn’t it be cute to cut out designs and stick them to mirrors and windows with this Contact Paper? I’m thinking huge snowflakes in the winter, or maybe a big Monogram “H” for the center of my mirror. The possibilities are endless!
Briiiiilliant (imagine my sing song voice while I say that) love it (and love running around the house nekked!
Okay, this is seriously amazing! I would never know to look at this that it is just contact paper and windex! Loved your Michael Scott joke…Diet Pepsi nearly came out of my nose. I’m okay though, thanks for asking.
It looks great…or rather, it doesn’t look great because I can’t see in! Ok, ok, it’s 11p and my humor isn’t in tip top shape, but nonetheless, your solution is awesome! But your poor dog 🙁 I hope he finds a new guard spot!
Okay, this is weird. I’m right with you on the peeping Tom thing. It’s always bothered me. SO when we moved into our house I put this stuff on the windows that are on each side of the front door ~ made me feel tons better!
Then I put it on the master bathroom windows, TOO! Loving it there since then I don’t have to have full curtains, can just have pretty valances.
I honestly was thinking today (I kid you not) that I should blog about it but now I don’t have to! 🙂
Kathleen
love it, at first i thought you were crazy with all the windex…but it turned out crazy…but you still might be a little crazy! nekked. lol
that should read turned out GREAT! not crazy, doh…
I’m especially liking the side benefits of this project…heh heh.
ah ha you are soooo funny! But so good! Awesome way to complete, “Project Stop the Peeping Toms” 🙂
fully awesome!!! love it and i’ll definitely try it in my new house
Couldn’t you cut out one square, at the bottom, for the dog? lol He’ll find a new spot. It’s funny how they have habits. Our dog, when I was growing up, knew that around 3pm my mom got home from work. When she went to Sweden to see her parents and sister, she would be gone for at least 6 weeks. Buffy would still sit on top of her desk and look for her. It blows me away that animals can sense time, but they can. I would go and pick Buffy up and say..sorry she’s not coming home today.When my mom would return the poor dog went nuts. lol My mom only did this a few times cause it cost almost 1000 dollars to fly there, even in the 70’s.
Ok – this absolutely CRACKED ME UP!!! Lo, came out looking great 🙂
yeah but; can’t they still see you running around nekked through the glass on the actual door? lol
It looks fabulous darlin’…just fabulous! Great idea!! Though I do feel sorry for your puppy!! Poor thing…gonna lose 4 lbs. with all the running around!! Ha!
Hugs
SueAnn
oh yes, I am so against those windows! Why are they like that???
Christine
greatoakcircle.com
I have 2 Shih Tzus with the same problem! I also have 2 of those windows, 1 on each side of my door. I put up shears with magnetic rods and the dogs kept pulling them down! lol I ended up taking them down because I was too frustrated by them. This is a great idea but my windows are the individual panes and it would take forever. I think I am going to get blinds to match the rest of the house. The dogs will HATE that. 🙂
going to do this in my bathroom today! Do you know if it’s removable?
That is fabulous! I am so filing this away for when I need it…I too am wondering about the removability of the contact paper…it would be great for seasonal decorations. Thanks for showing us how you did it!
Contact paper ROCKS! Our master bathroom has a huge picture window in it. With just plain old regular glass! Did I mention this was in the BATHROOM?? Contact paper to the rescue! Love that stuff!
what a great idea! when i was a kid, whenever i went to a house with this kind of window, the first thing i ever did was peer inside! they shoulda been smart like you 🙂
Whenever I get around to the upstairs bedroom this project is a definite must – thanks for the tute ^_^
also love the gimp-iness – what font are you using?
That’s amazing! I’m re-posting an old project on my new blog and linking to you! 🙂 4 months till I head down to Texas!
(Formerly Suzanne from Mommy Moves Again)
LOVE this! You are BRILLIANT!!!! What a great idea–and tutorial. 😉 I especially liked that you spelled it “neked” because that’s exactly how we say it at our house, too! =D
Great tut!
We have a similar window along side our front door but we live in the woods. I’d be diffusing the view if we didn’t live where we do. (Our big ole slobbering labs keep the dog height glass looking like wax paper).
How about a doggie curtain for the pooch?
Yorkies are intelligent k9s, I bet if you removed just a small section at doggie height (I know ya worked so hard getting it up there) hung a cute fabric via a spring rod to cover the “look out” your pooch would be able to peek under the curtain and keep ya’ll safe.
Oh my goodness you got me laughing!! We also have a little window like that next to our door! I got a cheap little sheer-ish curtain to put in the window. Thankfully the way our house is built, we are usually in the back of the house while the front “formal” rooms aren’t used as much. This is such a great idea!!
An awesome way to use up all the windex that you no longer need since you have Shaklee for cleaning now! 🙂
You did a great job! I think my dogs would also be beside themselves not being able to peek outside!
Thanks for the great tutorial!
http://www.youngnester.blogspot.com
Awesome idea!! Literally JUST saw this same thing done on HGTV “Get It Sold” but she used fancy “frost paper”. Yours was probably a lot more affordable and did the exact same thing!!!
Ughhh, side lights give me the heebs — for all the reasons you mentioned. (Esp the nekked ones.) This looks FANTASTIC!!! Now you have the best of both worlds, light AND privacy! 🙂
Okay, you’re awesome. I live right on a major road with my large living room windows facing out to all the traffic and passersby. This will revolutionize my space. Love it!!!! More light, less curtains!!!!
You do a really great job of showing pictures at every angle! I love that you shared a pic of the outside looking in with the porch light on AND off;)
Great idea! I have windows on both sides of my door. Right now I have them covered with a sheer curtain. I don’t like this look at all and would love shutters. However, this contact paper idea is awesome! Thanks!
Awww poor doggy, couldn’t you cut a little heart out at the bottom just for him 😉 This is just a clever idea!!!
I’m a little confused. Why did you spend the extra money for Windex when you could have purchased Contact Paper made specifically for windows that have beautiful etched patterns? If you don’t care for patterns, they also offer just a “frosted look” design. You must have passed it when picking up the clear Contact Paper.
what a great idea! I have a front door with a window like this too–and I always SPRINT past it in my skivvies to get to my clothes in the laundry room, lol!
thanks for another fab project!!!
xoxo,
ashley
So cool and so clever! You’re awesome! 🙂
You did an awesome job! Just curious, how long did you live with the peeping tom window before you changed it?
Allison-
I’m wondering if this comes off easily and if so, how? I have two french doors that my neighbors can see right in but I rent my house so I don’t want to do anything that would damage the glass permanently.
Thanks! I LOVE this idea and your blog!
Kristen
Do it to your bathroom window!! Do it!! Do it!! Your family will thank you forever! Our bathroom window is low and looks right out onto the front porch! It was the cheapest and easiest fix I’ve probably ever done in this house and I’d do it again in a heartbeat! I also did it to the big window in my daughter’s bedroom trying to block the sun so she’d sleep in longer. That one didn’t work like I’d hoped, but it still looks pretty! Great job!
Now the fun as gone out of life…..
I tried this following your directions and it looks crappy. The edges look foggy and the whole thing is sloppy. It has streaks from trying to remove the windex
Is this permanent? I live in a rental and would so love to try this fabulous idea of yours on windows in my newly repainted bedroom but don’t want to ruin window should I ever decide to move.
I tried this and mine did not frost at all. I put ALOT of windex on just like you said. Mine was just clear paper on the window. I wonder what I did wrong?
That is weird. If you use the clear drawer liner it should look frosted after. No idea!
I just did mine and there are lines where I used the credit card to get the windex out- any idea why that is??
It takes a few day for the windex to dry behind the new contact paper. Let it sit there for a few days and before you know it, it will look flawless.
I have the same problem as Barb from her 1/7/16 post. I used the exact clear contact as you pictured above, TONS of windex, slowly squeegeeing, and it looks fogged around the edges and really crappy in the center, all streaky. I tried doing it three times to no avail. I wonder if they have since changed something in their manufacturing process to where this simple fix no longer works. Unfortunate as I really wanted this to work 🙁
Mine looked streaky for several days. You have to give the windex under the contact paper time to dry. I’ve done this process multiple time and have never had any issues. I’m not sure what to tell you.
We just installed a window in our back door last year ( yay! Let there be light!!) but now on occasion I have people at my back door looking right in to my house ( very open concept mobile home) I installed window film on my front windows last year for light blocking/ cooling purposes and learned the spray water on window trick, but it never occurred to me to do this with contact paper!!! This is on my list of things to do today! Thanks for the hilarious post…dogs are so funny. My Westin thinks he’s protecting us from those pesky dreaded squirrels!