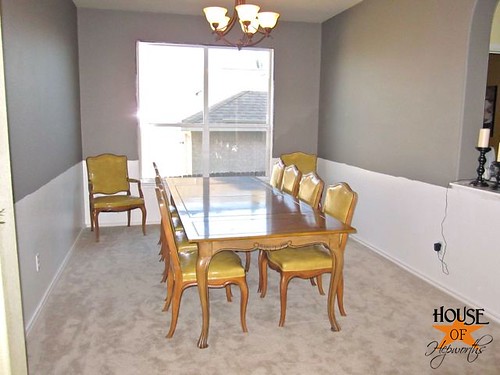
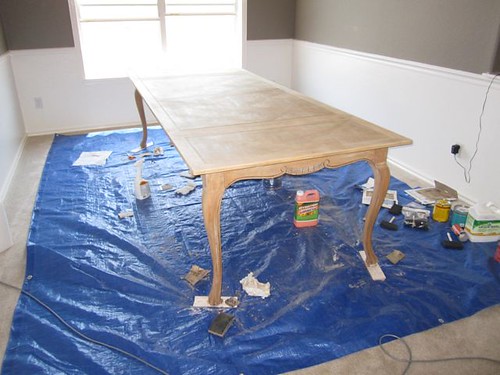
Last time I left you with a dining room update, I was about… oh… here:
Basically, I went went temporarily insane and purchased a dining table off Craigslist thinking, “Oh, no biggie, I’ll just refinish it.”
What was I thinking again? I was blinded by the price.
Have you ever actually refinished furniture? I had, but only smaller items. A 10 chair dining table set?! YIKES.
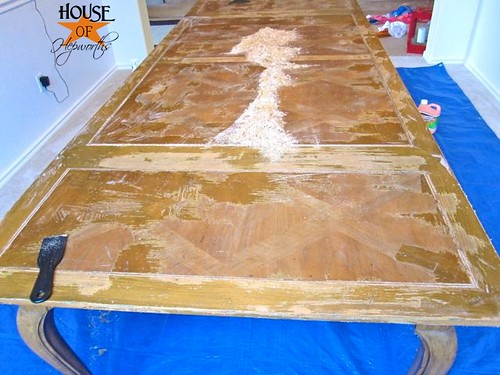
Okay, so last time I showed you how I stripped the top of the table:
Well, after himming and hawing for weeks, and changing my mind about 1300 times, I FINALLY came up with a plan…
I know you don’t even believe me. But I swear, this is the real for real plan from here on out. Maybe.
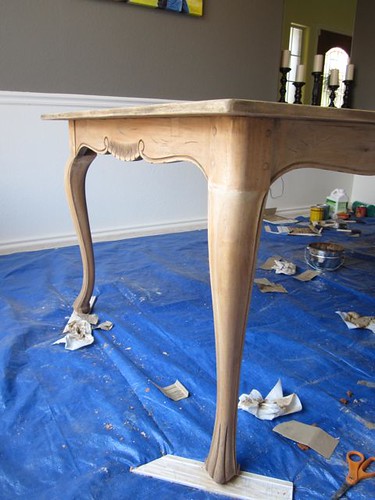
I spent a day thinking about what I really want with this table. And ultimately, I want it all stained a really dark ebony color. It meant more work for me because up until this point I was only going to stain the top, and now I wanted the whole thing stained, but at the end of the day, I knew I needed to just suck it up and do it the right way so that I’d be happiest with the final result.
Well, that involved more stripping. And not just an easy-to-strip flat surface like the top of the table. It meant stripping the legs and sides of the table as well. This table has lots of curves and grooves that just made this project 10x more of a pain. But I did it. And I bitched about it the whole time. And now it looks amazing.
I made a video on my macbook photo booth, so it’s pretty crappy & it’s mirror image, but basically (with no makeup!) I give you a run down on all the products I’m using and the steps I’m using them in.
Here’s a quick video I made about the products I used:
Can you tell how tired I am in that video? My eyes are sagging! Oh man, sorry about that.
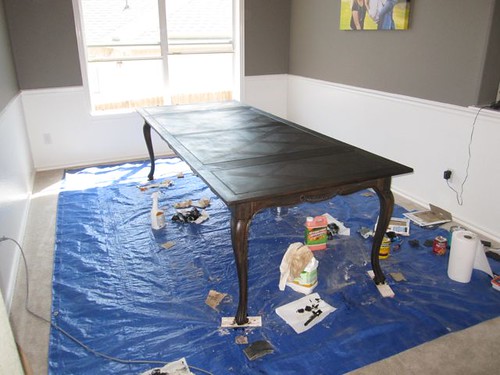
So, fist things first, I had to get that gross poly off the sides and legs of the table…
I put the stripper on everywhere and let it sit for a few hours. Now the fun begins. It’s easy to paint the strpper ON, but removing it? Disgusting.
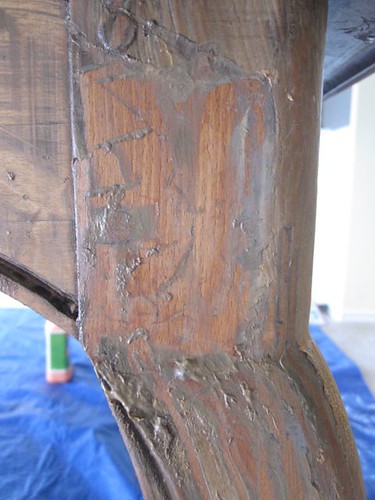
It involved lots of paper towels, lots of scraping into a bucket, and even more rags and soapy water.
Once that discusting task of stripping the table was complete, it was time to clean the table really well.
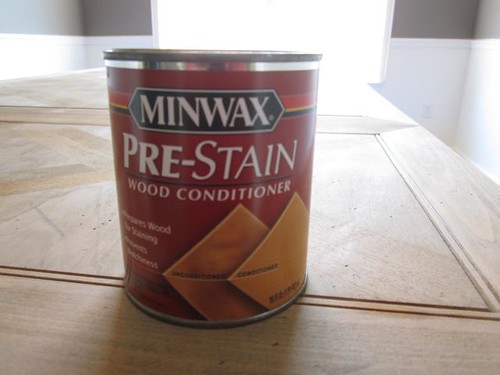
Honestly, when I got to our local hardware store and picked out my stain, I read the back of it and followed their directions. It said to clean the furniture with Mineral Spirits, then use a wood conditioner before you apply the stain. So that is exactly what I did.
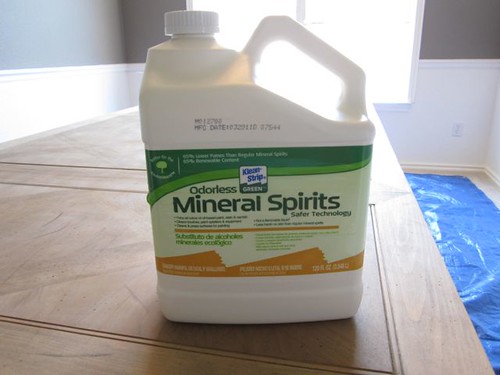
I cleaned the table really well with the Mineral Spirits which surprisingly resembled skim milk.
I just poured a little of the spirits into a rag and rubbed the table really well. It actually did a great job getting all the gunk off. And as a double bonus, it also can be used to clean any stain that gets onto your skin.
I used latex gloves when I applied the Mineral Spirits which was totally useless because the Mineral Spirits ate through the gloves in about 2 seconds. It was like pouring acid onto them or something. They literally just disintegrated on my hands. Fortunately the Spirits didn’t hurt my hands at all, but the back of the bottle does say to promptly wash with soap and water after touching the Spirits.
Okay, so anyway the table is now clean, so then I took some wood filler and fixed a few spots on the table that were chipping.
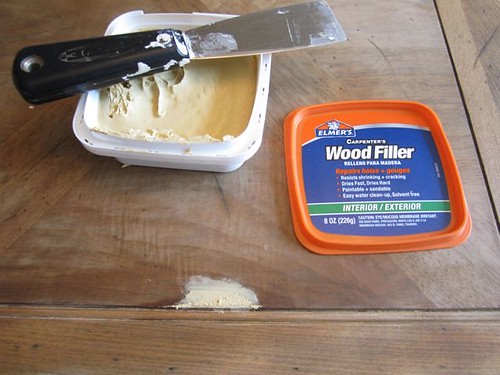
I put it on as smoothly as possible, let it dry, then sanded it flat. Worked like a charm.
By this point I think I’m on like step 426 or something, right? I lost count. This table was a beast.
Next came a round of sanding with 250 grit paper. In hindsight I should have used at least 300 grit, but the 250 was good enough for me.
I conditioned the wood as directed on the back of the jar. Basically paint it on, let it sit for a bit, wipe the excess off, then stain the table within 2 hours. I knew once the conditioner went on there would be no turning back, so I made sure I had several hours ahead of me with nothing to do.
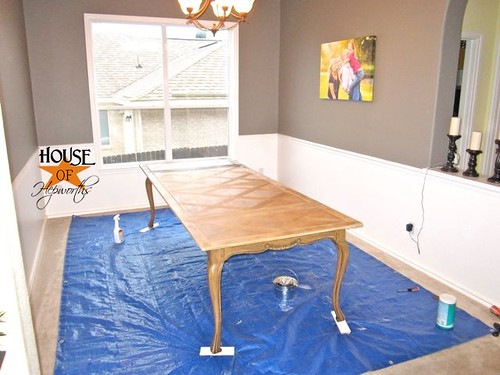
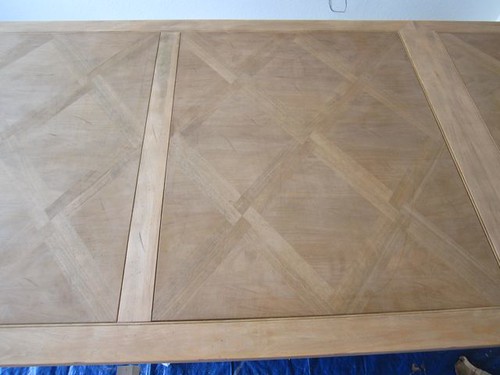
Just adding the conditioner made the table look 100x better than before. Just look at how rich it looks after:
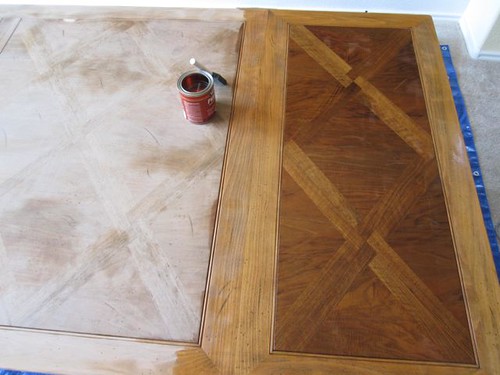
FINALLY, time to apply the stain.
I used the color Ebony. Here she is after the 1st coat of stain:
I’m going to add one more coat of stain to make it just a hint darker, then I’ll poly it all, and I’ll be DONE! {Let’s not talk about the chairs right now while I’m enjoying the thought of being done with the table.}
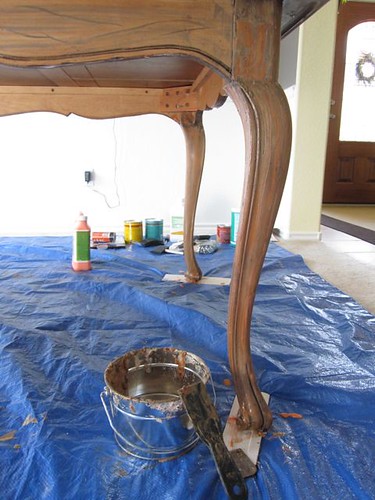
Here’s the legs after one coat of ebony stain:
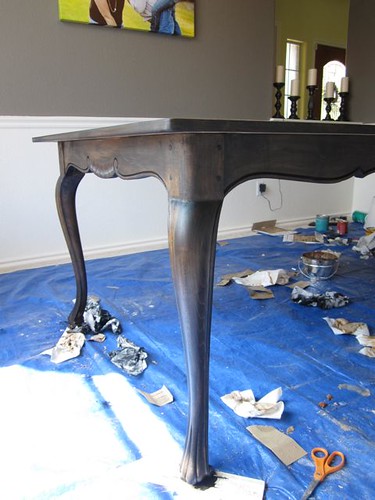
Maybe I’ve breathed in too many fumes lately, or maybe I’ve just wiped and rubbed and sanded those legs way too many times, but goodness, are those stems sexy or what?!
Meow.
And check out the pretty table and THAT MESS! This mess on the floor is from only one day of work. I’d already cleaned up all the previous days’ work.
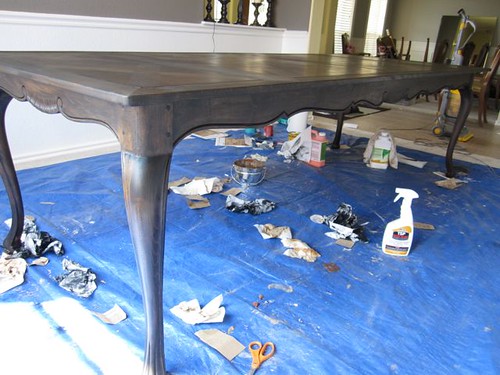
I’m just giddy with this table. All the hard work is actually paying off.
It’s going to look even better with a 2nd coat of stain on it.
And that, my friends, is the latest update to the dining table.
I’m sure in this fast-paced world that is known as blogging, everyone wants a before and after, like, yesterday. But I can’t move that fast. And this blog is my real life, peeps. So whether I move like a Tasmanian devil, or work painfully slow on a project, I’m just here to give you the real life play-by-play.
Hopefully I haven’t lost any of you to sheer boredom over yet another dining room table update. One day, I’ll be totally done with it, and you’ll never have to hear about it again! Of course, at that point you’ll probably be getting the play-by-play from some other wacky project I’ve gotten myself into!
I hope you each have a fun weekend!
wow that is amazing! Very inspiring and intimidating all at the same time!
It’s going to look great! Can’t wait to see what you have decided on for the chairs!!
It looks great right now and with 1 more coat of stain & some poly it will look amazing!
I was dying laughing at the gloves disintegrating… thats some potent stuff!
Cant wait to see the finished product.
Perfect transformation … the table regained her beauty.
I love the design on the top of the table, and I think the stain looks great! I’m glad you went with stain instead of paint even if it is a pain. I was going to refinish and stain some nightstands once…then I chickened out and went with paint. Kind of wishing I had gone the staining route after seeing how good your table looks! Thanks for sharing!
Looks good so far!! Can’t wait to see how it comes out when it’s finished! I always way underestimate the amount of work that goes into refinishing a piece! so I feel your pain with all the work you’ve put in, but it’ll be so worth it when its done!
I just have to say, THANK YOU for going through all of this. Really. My husband ruined the stain on my dining room table by CLEANING HIS GUNS ON IT (idiot!) and it stripped the stain in a few places. I was so mad, but since then, the table has gotten all kinds of scratches, water rings, and…what I believe to be honey…stuck on it. I have been wanting to refinish it, but I had no idea how to tackle that task. Fortunately for me, it’s only the top of the table, but…even that scares me. What if I don’t get the color exactly right!? What if I TOTALLY screw it up and I can’t even sell it on Craigslist because NO ONE wants it? Thanks to your whole dining room table experience (and your fantastic documentation), I think I can do it! So thank you. :]
I feel like a blogstalker. Seriously. I feel I ALWAYS need to read and (maybe) comment! But you never disappoint! Love the table!
That table looks Amazing! You have patience for days – I am envious
Great job – it looks fantastic!
Emily
GASP! It is so beautiful I can’t breathe! So worth all your effort
I LOVE it! I’m so glad you went with stain instead of paint. It is lovely! And I don’t see a single Dr. Pepper can!
I am so glad you posted this, and I have to echo Brittany! I, too, have a few wood pieces waiting for some love and this is immensely helpful. I’ll refer to this post several times! Take as much time as you need! 😉
Wow!! I love how the pattern on top still stands out! It looks so good! I can’t wait to see the final product!
so much work!!!
oops, I meant to say: it’ll look good when it’s finished!
seriously, i don’t know how you do that in your dining room and don’t manage to make a flippin’ mess on your gorgeous white molding. i stripped a tiny plant stand and it was like a murder scene! i’m talking across the entire tarp. kudos on that, and i’m loving the dark color. tho it isn’t black as my set is, your room is reminding me of my dining room. i’ve got gray on the walls, chair rail, and darker gray on the bottom, and then black furniture.
LMAO I was thinking the same thing earlier about the lack of Dr Pepper cans LOL
Oh, Allison that table is looking GOOD!!! That is how I felt about my wing chairs. The kicked the crap out of me. I am so proud of you!!!
The darker color goes so nicely in your dining room with the paint color you have on your walls. So much work! I’m right there with you though, might as well have it be something you really love than going halfway and not being happy with it. – and I marvel, also, at how none of the stain or mess has gotten on your walls at all! You are just THAT good! 🙂
Wow! It looks great! All your handwork is paying off! Good luck with the chairs!
What a trooper! Looking good, you are almost there.
I am amazed that you are refinishing in your dinning room. I am way too messy, how do you do it?
Oh my she is purdy! I love the pattern on the top but I can only imagine the amount of work. It sounds like a character building experience. Just picture a family holiday around it and you will be so glad you did it. Beautiful job!
PS–I agree about blogging about projects in real time. That’s real life.
Great job! The first coat of stain looks beautiful! Can’t wait to see it and the chairs all finished 🙂
Wow! Lots of hard work! You are rocking it!
you are brave! I see things like that all the time but, don’t have the patience that you evidently do to restain it! It looks great! AWESOME job!
Awesome! Great job…inspiring that you are sticking with it even though it is painful. It is looking great!
The table looks fantastic!! I am loving the color you chose. Years from now when you are serving the family Thanksgiving on your table you will be so glad you did this! I love the legs and top – they are gorgeous!
Allison,
I loved the play by play on this project. I’ve never done any furniture refinishing and this really helped me to understand the entire process. Your table looks GORGEOUS!!
Amy
You are kicking that table’s butt girl! I’m so happy you decided to just do it right, how you really wanted it and hammered down! That table is going to be a show stopper for generations to come! 🙂 Keep it real darlin, that’s why we’re here 🙂
AHHH… I can’t tell you how REFRESHING it is to hear that I’m not the only blogger on earth who gets bogged down in these loooong projects and struggles to produce the flashy before-and-after shot immediately. Story of my LIFE, my friend! 🙂
I think the ebony is going to be gorgeous!
YOU GO GIRL!! The transformation already looks fantastic – can’t wait to see it all done!!
That is AMAZING!!!! I just finished up my dining room set, it was a beast as well. It got me in the mood and I’ve already picked up another one (just the table this time) and it’s primed and ready to go. Good job!!!! It looks beautiful!
Wow. Seriously? You are the awesomest lady ever! And here I am eyeing the little side table that I picked up (for free!) and thinking how much work its going to be to paint the spindly legs…I am definitely inspired and impressed! It looks so gorgeous!
One of the things I love most about bloggers are the REAL steps involved in a process. But too many of us are guilty (me, too) of just quickly doing before & after shots.
Thank you SO MUCH for detailing this process. I’ve stripped a couple of pieces and dread the thought of ever doing it again. Kinda like kitchen cabinets. Blech! I’m so glad I’m not the only one that goes thru the whole scraping-wiping-scraping-wiping thing.
It’s just beautiful! And while I know it’s worth the effort, I don’t think I’ll be strippin’ any time soon. 😉
Love! Love! Love! I got to the picture with the ebony stain, and was so surprised by how great it looks! I am the proud (?!?) owner of my mother in law’s old dining set, and it is so in need of a makeover. Your honest, funny, step by step instructions may have inspired me. Now, I just need a few extra hours in my day…
I have been following the table transformation and WOW!!! That looks amazing already! Great job and choice! 🙂
Wow, Allison, the table looks AMAZING! Sometimes the very best way to achieve a look is the slow, painful way, but boy does the hard work pay off! I have stripped tables before and yes, the removing stripper stage makes you want to just chuck the whole project, it is just that tedious, time-consuming, and frustrating.
I really liked the raw wood look! But then that conditioner just brought out the beauty of the wood top so well. I think you got a very well made piece of furniture there (that top is just amazing with all that inlay) and yeah, those legs are the bomb (and yes, a total PITA to strip!).
The whole set is going to be stunning when you are done with it, if you can keep your sanity! I’ve got a very similar project ahead of me, but my table only seats 6 (12 with the 2 extensions put in, and I have actually sat that many when I made Thanksgiving dinner one year for a bunch of friends, but I only have 6 chairs that match the table), so mine will be a lot less work, especially because I am going to paint my set. I have procrastinated for 3 years or so on even getting started, so I am duly impressed by your sticking with this project until it is finished. I’m proud of you, lady!
Best,
Kimberly
That is going to be one totally gorgeous dining set, when it’s all completed. I admire your perseverance with it and attention to detail. It is definitely going to be worth the sweat, blood and tears (and the dissolved gloves!) 😀
WOW!!!!! Absolutely amazing work!!!!!! I just would not have the stamina t get that done!
It looks great! I just recently stained a kiddie table from Ikea, and even that was more work than I expected. Nice job on such a large dining table!
I have refinished furniture before and swore after each one…never ever again! Looks like you are doing a fantastic job.
While I thoroughly enjoy reading your blog, I don’t mind if you take your time on a project. It means a) you’re doing it right so you’ll end up with a result you LOVE and b) you’re like the rest of us! 🙂
I love how this table is looking…the ebony stain is fab!
lovin’ that big canvas on the wall!!!
woman! you are one HARD worker! LOVE the ebony stain and it ain’t the fumes, those stems are sexy! haha!
Ok. I’m at work reading this (cause i need to do this to my cabinets) and I read threw it. It sounds like a fun project my husband and I can do together. And by the time I got to the MEOW I hit the floor laughing so hard and I’m still laughing but at least I’m standing. Just thought that was a funny add in. Loved it. And I love the step by step tutorial on how to redo your furniture. (our kitchen cabinets have a lot of grease on them and I’m just tired of looking at them. They have 3 layers of paint that I can see with my naked eyes. They’re so incredibly gross. Just wrote this to say thanks.
That looks amazing! I am getting ready to refinish my mother-in-law’s dining table, which has square patterns throughout. My question is, since sanding is supposed to be done in the direction of the grain (this one is actually 4 triangles that make up each square, so you can imagine how many ‘grain changes’ there are), how did you tackle sanding over the inlaid design on your table? I am afraid to ruin the grain on this one by leaving scratch marks over the pattern that changes grain direction…(does this make any sense? Lol) I would TOTALLY appreciate any feedback/help on this!!!!!