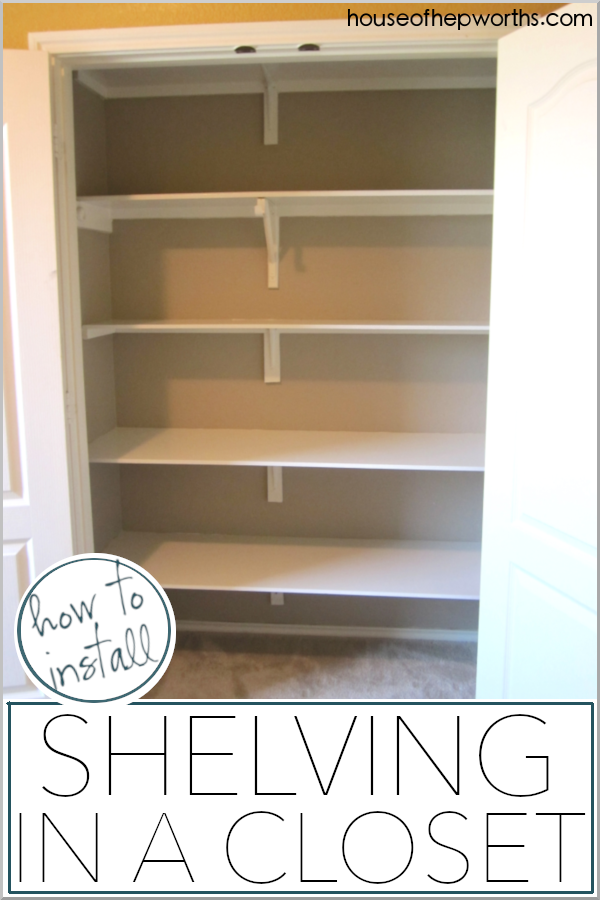
As a follow up to last weeks post, installing shelves in our guest room, today I’m going to show you how to install shelves in a closet.
It’s pretty simple but there are lots of steps.
First off, you need to figure out how many shelves you want and what size they need to be.
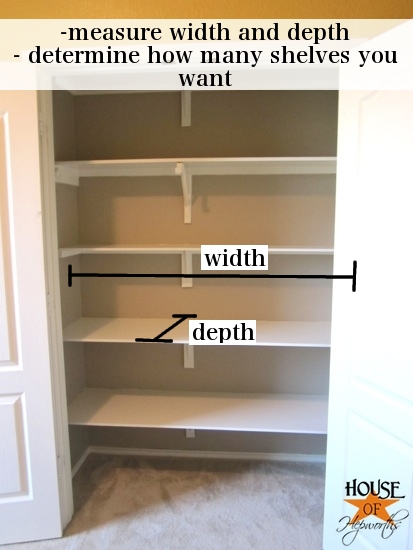
I settled on 4 new shelves, plus the original one already in the closet. I chose to leave the original shelf and the clothes rod hardware in the closet, just in case we ever want to convert it back to a clothing closet.
I wanted two additional shelves that were the same depth as the original shelf, and then two lower shelves that were deeper.
So I needed 4 shelves, all the same width; two of them 11″ deep, two of them 18″ deep.
I also needed a bunch of 1x2s to support the shelves, and 4 metal “L” brackets to support the center of each shelf because the shelves were so long I was afraid of bowing.
Sheets of MDF are significantly cheaper than pre-cut sheets of MDF or wood, so I chose to purchase two sheets of MDF and have our local hardware store cut it for me.
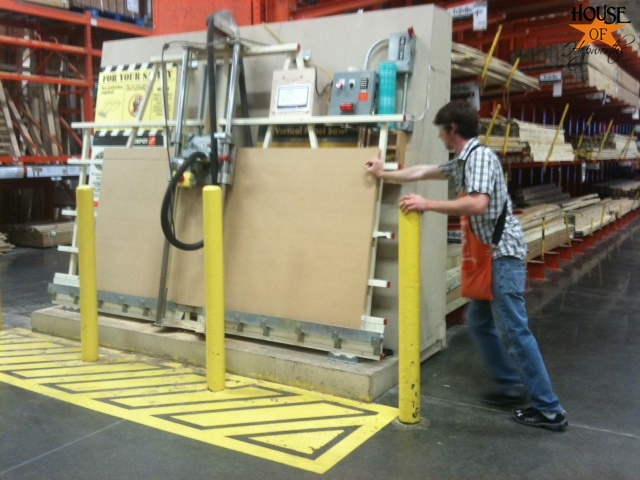
*Note: I had our local hardware store cut the MDF into the right WIDTH but I left them 8′ long until I got home and cut them to length myself.
Once I got home with my pre-cut MDF and all my 1x2s, I laid them out in the garage so I could prime them. I learned the hard way while doing K’s board and batten that it’s easier to prime MDF before you install it.
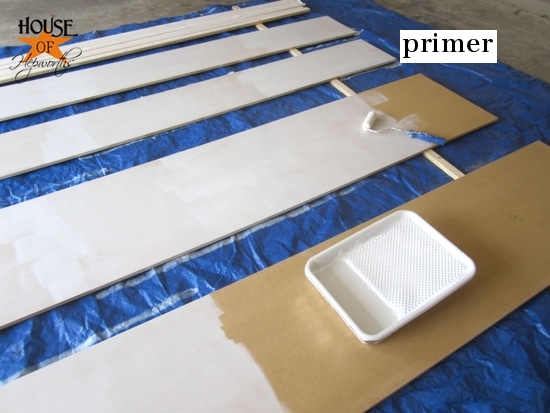
I primed each board with two coats. Make sure you prime the front edge of your shelves as well.

When the primer was dry, it was time to begin the install process.
This may sound strange, but you MUST insert all your boards into your closet BEFORE you start adding all your 1×2 supports, like this:
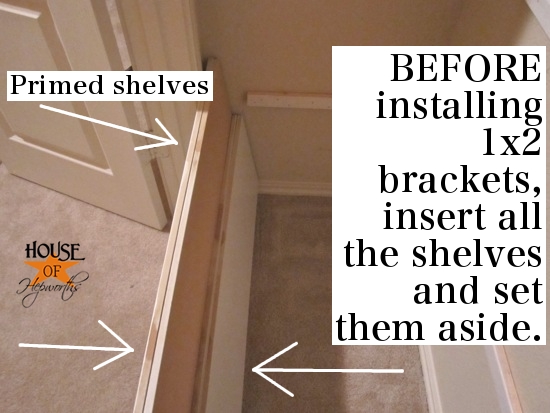
If you add all your 1x2s first, it will be impossible to get the shelves into the closet because the opening of the closet is smaller than the actual closet.
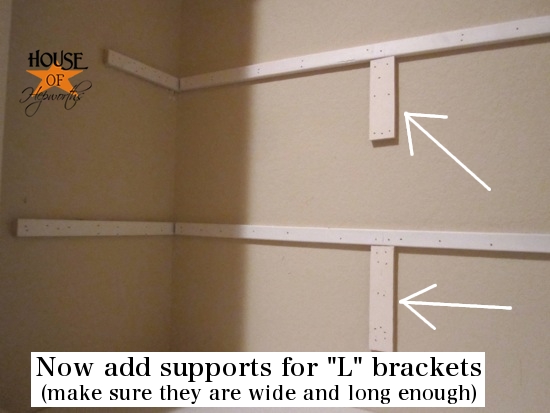
Once your shelves are inside the closet, start adding your 1×2 supports. I added them all equal distance apart, so a little math was involved. 😉

I used my nail gun to attach all the supports, but you might want to consider adding a few screws into the studs for additional support.
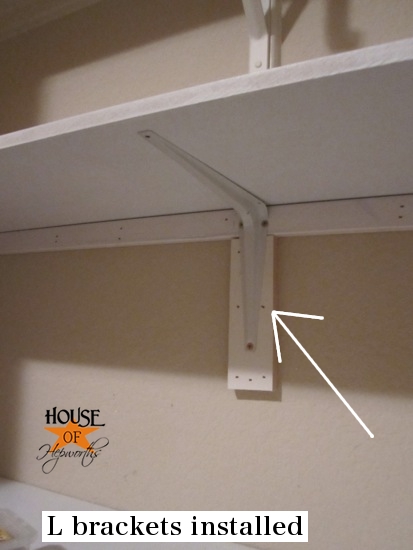
Now I know you are itching to put those shelves up now, but you still have to get your center bracket into place.
First, add a board a little wider and longer than your “L” bracket. The “L” bracket will screw into this board.
I added mine slightly off-center so they would line up perfectly with the bracket from the original shelf.
Now it’s time to add the “L” brackets. Use some heavy duty screws when you attach the bracket to the support board.
And now, finally, you can pull the shelves up one at a time and plop them into place.
I added several nails into the top of each shelf, down into the 1×2 supports below. You don’t want your shelf to budge, so adding nails to secure it is a good idea.
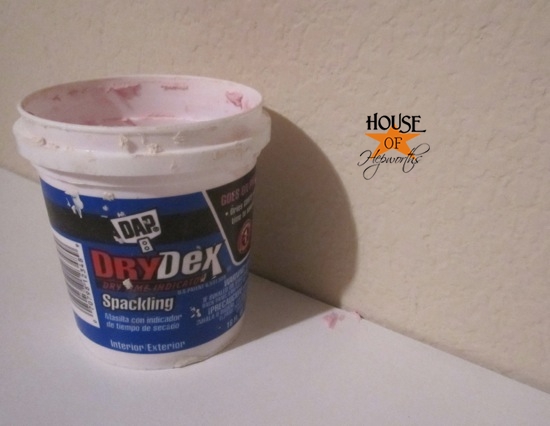
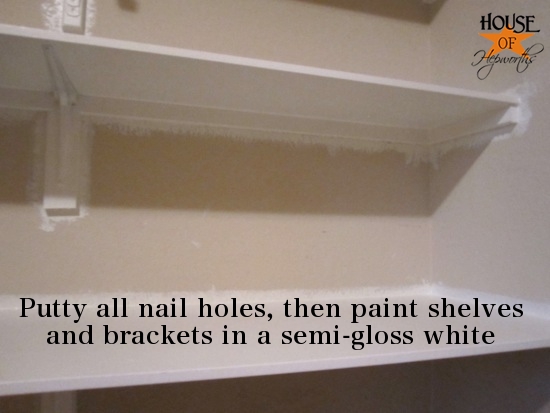
If you noticed, there are lots of nail holes and uglyness with my shelves. I filled all the nail holes with spackle and then I used caulk around all the exposed edges of wood, just to give it a more polished look.
Once everything was puttied up and dry, I used a small foam roller to add two coats of semi-gloss white paint (Alabaster from Sherwin Williams) to the tops and fronts of each board. I also used a small angled brush to paint all the 1×2 supports.
I really wasn’t concerned about getting paint and caulk all over the walls because once the white shelf paint dried, I planned to paint the walls.
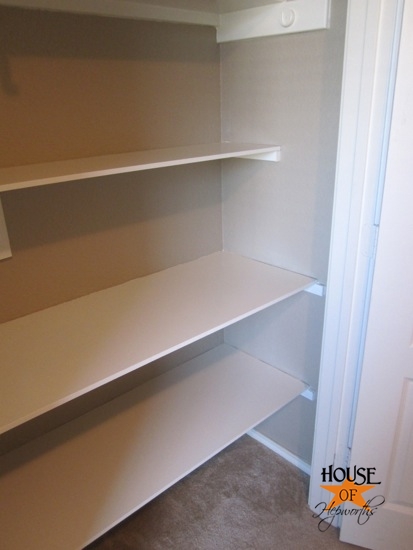
And here it is now that the walls are all painted:
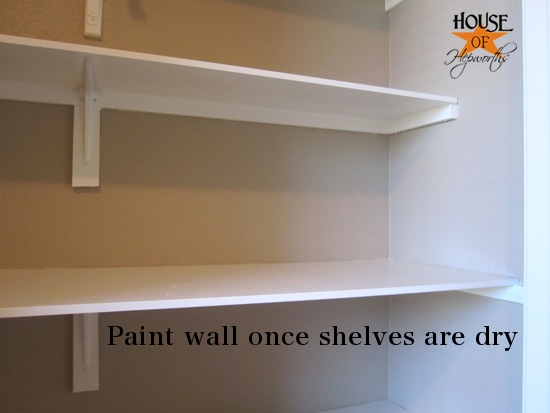
I used some leftover paint in my garage that my friend gave to me. She had it color matched from somewhere so honestly, I have NO CLUE what color it is. It’s a dark taupe color with a gray undertone.
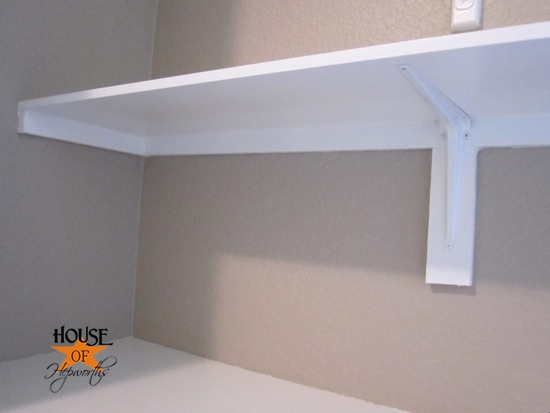
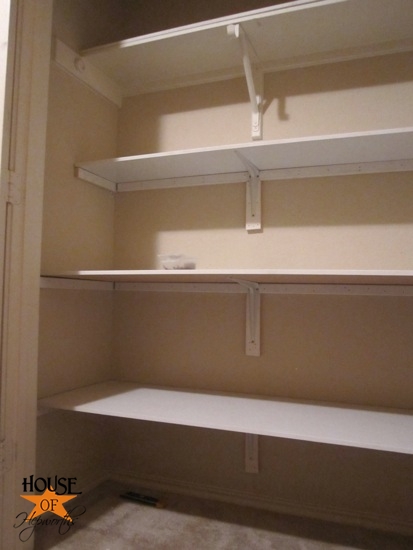
Here you can see how the bottom shelves are deeper than the upper ones.
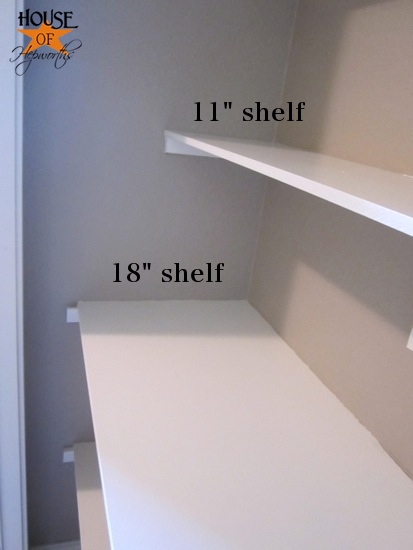
There was so much additional room in the front of the closet that I didn’t want to waste, so I’m glad I made the shelves 18″ deep. They hold a ton!
And THAT, my friends, is how you install shelves in a closet. Not too hard, just a lot of steps.

If you have any additional tips or pointers that I missed, I’d love to hear them.
A few thoughts about my shelves now that I’m finished:
- I used 1/2″ thick MDF. In hindsight I should have used the next size up (7/8″ I think?) so the shelves would be even more sturdy.
- I nailed all the 1x2s into the wall & studs. I may go back and add a few screws into the studs for additional support.
Hopefully this helped you realize that you can do stuff like this. Don’t get overwhelmed with the entire project, just take it one step at a time.

Instagram || Facebook || Pinterest || Youtube
Thanks for reading! Have a wonderful week!
I am literally doing this right now to my guestroom closet, and I would NOT have thought about putting the shelves in first. You saved me!! It looks so great, Allison. Now if I can just finish mine… 🙂
Girlfriend, you are amazing! I seriously feel like every single day you have some sort of incredible tutorial or project up. WHEN the heck do you find time to do all of these?! Talk about inspiration!
<3,
Adri
Dream Book Design
Shelves in a closet, a happy thought indeed!
(name that movie!)
They look really nice, good job!
Rachelle, I love Pride and Prejudice! Now, if I can get some happy thoughts about shelves in closets at my house, I’ll be all set. Great tutorial, Allison. You make it look easy.
Looks GREAT!….thank you for sharing…smiles
Fantastic project! We just had our basement finished and the contractor put shelves in one closet just like this. I would love to be able to try it myself sometime. Thanks for the instructions!
Love it! I really want to do this in one of our closets, but I’m worried about when we have kids and having to take the shelves out… I guess it would be worth it for the next 2 years…
…and now what will you fill them with???
This tutorial came at a purrfect time for me since I’m planning on adding extra shelves in 3 of my closets (thanks!). I also never would have thought of putting n the shelves first. Good tip! I have a few questions. 1) Why didn’t you paint the shelves out of the closet first and 2) Why didn’t you paint the walls, in the closet, before installation. It seems like that would be easier. I never would have thought of caulking the whole project. It looks so professional!
Thanks for sharing! Katharine
I have the same question! I love your tutorial, thanks for doing this. But is there a reason you didn’t pain the shelves & closet walls first before you installed the shelves? Really curious about this… I would love to hear your thoughts on this. Thanks!
I didn’t paint first because I knew I’d have to just paint again after all the caulking around the shelves. It seemed redundant to paint twice.
Shelves in a closet, a happy thought indeed!
They look really nice, good job!
I know it’s really late on your post, and I didn’t read all of your comments so it may have already been mentioned….
I would attach a small piece of trim to the front lip of each shelf to make it look more polished, and it would also give it a bulkier look…more “heavy duty.” Something similar to the look of door facing, but a little smaller.
Just an idea!
Hi,
Great tutorial! I’ve moved into a new-to-me relatively new apartment building. I appreciate that they want to save money when they build but these cut-backs are bad for us tenants. Same as you over half of the space in my closets and under-cupboards are wasted so I’m in the process of making them wider.
Totally out of context but what’s with no lights in the centre of the ceilings in any of the rooms (in particular the bedrooms). Very annoying!!!!!
All the best and keep up the great tutorials! Very helpful!
Cathy
Wow! So impressed! I was on Pinterest and noticed ths was pinned. I will need to spend some time on your site for inspiration. I don’t know how you and Ben do it, but you all are inspiring! Take care!!
What a great tuitorial! I’m putting that on my list of projects I hope to accomplish this summer. We have the wire type shelves and I hate them, along with the floor to ceiling sliding doors that were installed by the builder of these homes in 1977. I want to have my handyman remove those stupid doors, he’ll have to fuild like a header and buy some nice bi-fold doors to put there in my linen and laundry room area. I would have never thought of MDF but that is strong. My husband was always good at doing stuff like this but he can’t pysically do it anymore so I have to figure a way to hire it done or learn to do it myself. Could I ask what you use that 11 in. shelf for?
So we just cleared out the closet and took the basic measurments to get started on this project. I do have a question, how deep was this closet? Ours measures two feet deep and 18″ shelves dont seen deep enough for us. Or was it an issue of support?
I can’t wait to start this project and make this closet more useable. If its easy enough we might do this to all our closets!
If my DH was physically able to install these shelves himself, the only thing he would have done differently is install more support brackets under the MDF board. I’m looking at a closet here in the home office that he installed shelves when we moved in 8 years ago for all my genealogy notebooks and office supplies. I have 27 3 ring notebooks full of genealogy research material that I’ve worked 30 plus years on, plus office supplies and some storage boxes that have scrapbooking supplies that needs to be “weeded through” this summer and merge it with other scrapbooking supplies that are stored in another closet or give it away. I tend to spend all sorts of $$ getting started on hobbies that I “think” I can do to find out I’m not creative or don’t have the patience, so there it sits, taking up space. Sure others have done the same thing. I think if you installed another L bracket support under each shelf, it would give you adequate support. My DH has a tendency to “overbuild” because he never knows how much weight will be on there. I wished he were physically able to do all he used to do 8-10 years ago. We used to do all our own painting, wallpapering, lawn mowing and maintainence; we built ourselves a large deck and a screened-in-porch on top of that, we built a storage shed, he refinished a neighbor’s basement, he built that same neighbor a lanai for them to be able to sit out on their patio by their pool and enjoy, he helped a neighbor remodel a kitchen plus a bathroom and screened in porch. We both miss those days. He wanted to give away his “chop” saw and I wouldn’t let him because I wanted him to teach me how to use it this summer so I could learn to do some projects for myself. Oh, when we moved here, we lacked storage and he and our son-in-law built storage cabinets that cover almost one wall of the garage. The son-in-law built the frame and helped him stabalize it on the wall and left to go finish some of his projects he had started at own home. My DH and I finished those cabinets. They are so sturdy, even an earthquake probably won’t move them! He had built himself a workbench years ago for the basement and refused to leave it for the buyers of our house to use but we heard a lot of gripping and grunts from the professional movers when they had to move that workbench up stairs and into the truck. They asked him what kind of wood he had used!
So come summer, I hope to accomplish what you have done in my linen closet and get rid of those wire shelves that I hate.
This is AWESOME-sauce!! I love this tutorial because I have been wanting to install shelving like this in two of my closets and I’ve been trying to figure out how to do it. It’s so awesome to have this tutorial. Thanks so much for sharing!
I plan on doing this real soon as we have a huge closet in the basement that I want to make into a closet office and I want to try it all on my own……….
Great tutorial. I would like to add a suggestion given to me by a painter. ALWAYS paint the inside of all closets white. For one reason, it makes it brighter, and for the other, you don’t have to worry about repainting to a new color if you change the outside room color. I took that advice and have been so thankful every time I have repainted a bedroom and changed colors!
This is basically what I want in the closet that will be in my sewing room!! Except, I want the shelving to go across on both ends too~!! I was hoping for something more adjustable, but this will work! I don’t want any wasted space, the room is small and I need all the storage I can get for my fabric, books and tools!!!
Excellent job of explaining how to install these shelves. You made it look easy. Thanks for a great post.
HI there, GREAT tutorial! Did you have any issues with the brackets on the 18″ wide shelves? When I read the find print on those things at home depot they said the shelf width shouldn’t exceed 10 inches. Or maybe I just didnt find the right ones?
liz
I apparently did not read the fine print. LOL. I never had any issues with them though.
Good idea and very clear instructions. I may add shelving to my hallway closet. It’s very deep and short at the end (it’s under a staircase). You made it look easy!
Thanks for sharing your experience! I’m hoping to do this soon and was wondering how your shelves worked out regarding the paint. Specifically, did you find that the items you put on the shelves would tend to stick a bit, because the paint was so new and fresh? If so, would you recommend adding a coat of polyurethane on top of the paint? Perhaps it was a non-issue since you said you used a semi-gloss paint?
I remember a long time ago that I had painted shelves in a closet, and even though I waited a few days before loading it up with stuff, some of my items would stick to the paint and even took some of the paint off the shelves. Would love to avoid this from happening again! 🙂
Thanks! I hope mine comes out as nice as yours did. Cheers!!
I love this tutorial! I plan to use L brackets and melamine 3/4′ melamine board so I don’t have to paint and sand, just apply the adhesive edging strip. I went to Home Depot and had them cut a sheet of 8′ x 4′ melamine to fit my shelving size. However, I didn’t realize that my closets were 1/2″ to 3/4″ smaller in the back than at the front of the closet. It was so frustrating to pull everything out of the closet and the shelves didn’t fit. I recommend measuring the FRONT and the BACK of your closet to make sure the shelves will fit lengthwise. Maybe I was just being lazy because I didn’t measure properly the first time. I was trying to avoid making cuts at home. Oh well, now I will just have to go out the the garage and make the cuts to the width of the shelves (It’s cold outside… damn). Thanks for a great inspiration to add more storage to my closets!
I went with 1/2 in. plywood. It comes sanded in 2′ X 4′ sheets, with a nice finish side. It is plenty sturdy, but l lighter and much more durable. The big box store will still cut it to size for you — just pay attention to which side faces up or down relative to the saw blade!
Hello! I love this and I’m working on gathering materials to do something very similar – the only difference with yours and mine is I’ve chosen 15” for the deeper shelf where you chose 18” deep. I’m also nervous about doing this and decided on brackets for this shelf – can you tell me the measurements of the brackets you chose for the 18” shelf? I know my comment is like 7 years late haha! I appreciate any advice you can offer!
I love this idea and it will definitely be my next project. How much did the materials cost?