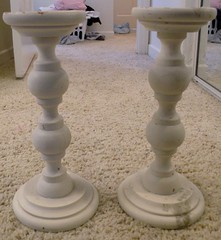
These candlesticks came from Goodwill (gasp! Shocker… I know). I think they were $3 for the set.
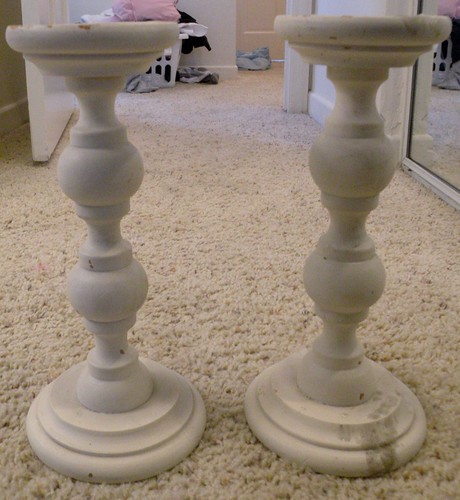
(Please try really hard to ignore my laundry in the background! I’ve got to be more aware of things like that before I start taking pictures. Oops.)
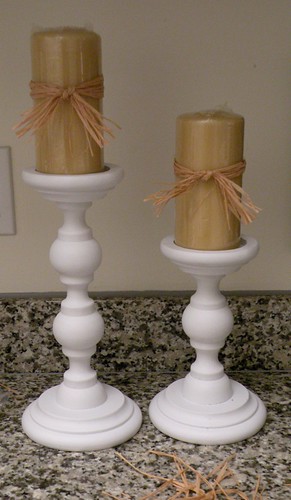
I really liked the shape of them and I liked the price even more! However, I did not like that they were the same height.
*Having the same height candlesticks (or any accessory) is not visually pleasing to the eye, so I decided to cut a section out of one of the candlesticks.*
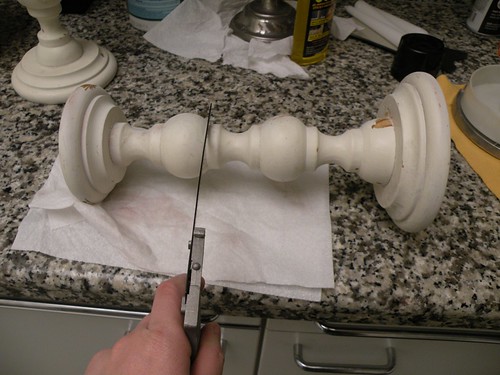
If I were at my real house I would have used my miter saw and been done in less than 10 seconds, but since I’m not at my “real house” and I’m too impatient to wait until July to update these candle sticks, I decided to buy a hand saw. It took about 250x longer, but it got the job done and I’m happy with the result.
I reattached the top with a nail and Gorilla Glue, used painters tape to hold it tightly together, and let it sit over night to dry. I also put a dab of wood putty in the nail hole in the top to cover the hole.
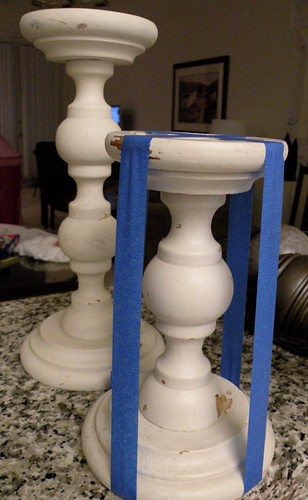

I glued this project together with Gorilla Glue.
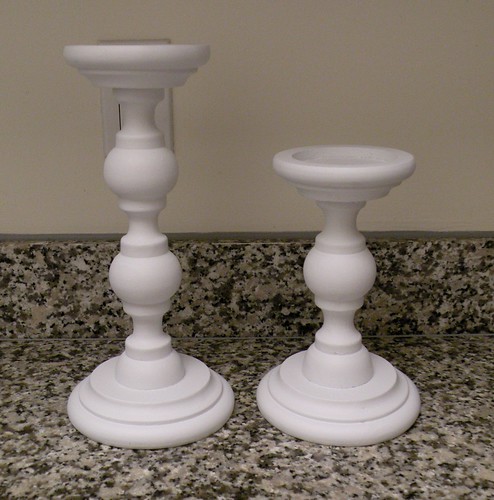
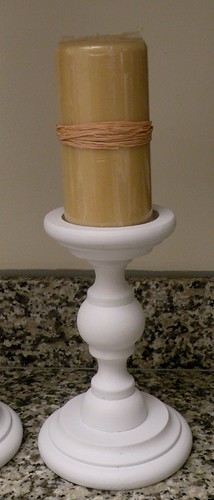
The next morning I lightly sanded the candle sticks, primed them with white spray paint primer, and then I spray painted them flat white.
Love it!

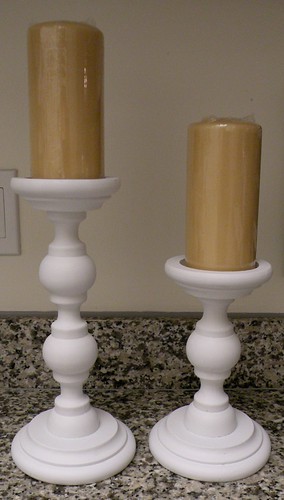
Here’s the before and after side by side:

Cutting that chunk out and painting them white made such a huge difference!!!
(Oh, and I’ve got a serious surprise in store for that extra chunk I cut out. Did you really think I’d throw it away?! Check back next week to see what I did with it.)
~*~*~*~*~*~*~*~*~*~*~*~*~
So this is really a two-part post because what good are candle sticks without candles? I know right?!
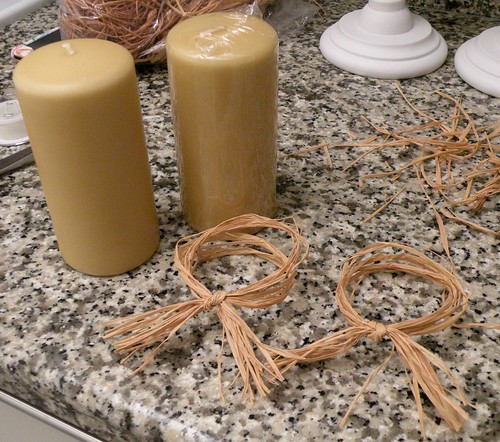
I went to Michael’s and bought the cheapest candles they had that were a height I liked in a color I could tolerate. I think they are Sugar Cookie scented.
Um, hmmm. These are just… boring.
Maybe some jute leftover from my mat decor ball would be cute.
No, I’m just not feelin’ this look. FAIL.
Next…
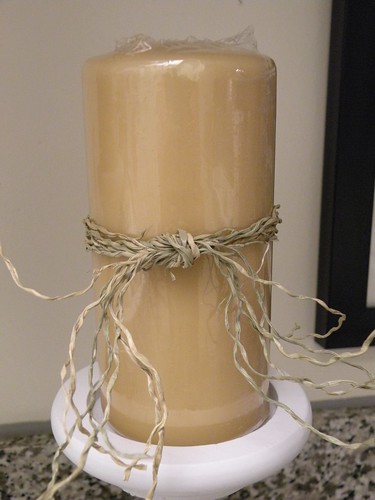
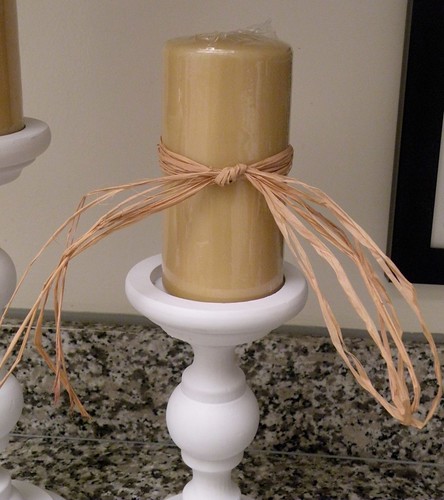
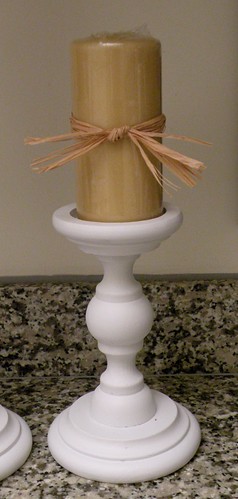
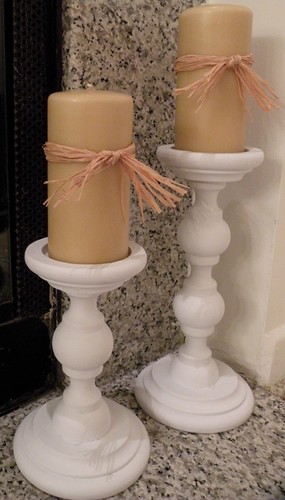
How about a raffia bow?
Oh God NO! Get it off! Get it off!!! Waaaaay too Kountry Kitchen for my taste. FAIL.
Next…
Maybe no bow at all?
This is *almost* as boring as the candles with nothing at all… FAIL.
Next…
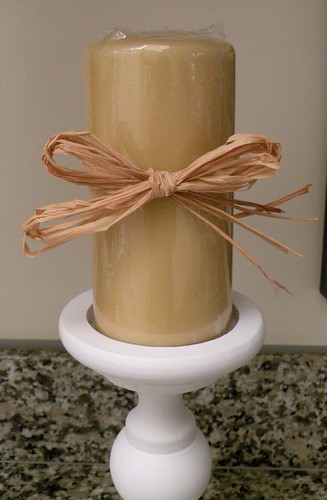
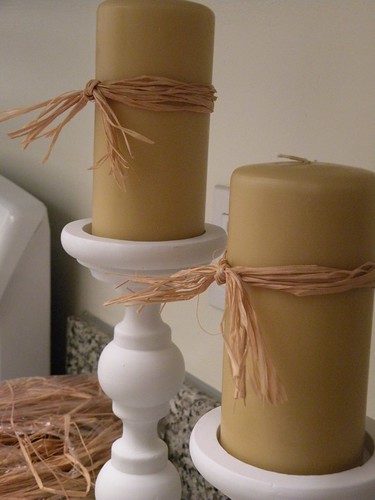
Just a knot?
It’s gettin’ there. I’m liking the knot but the ends are way to friggin’ long, dontchathink?
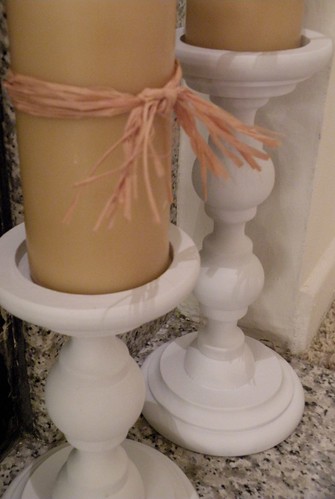
Okay, now we’re getting somewhere. I’m liking this Much.Better. You likey?
I can definitely live with this look… But the plastic around the candles has got to go!
You don’t have to untie and ruin your cute new knots. Just slip them off, remove the plastic from the candles, and slip the knots right back on. I left the plastic on until now so the candle wax didn’t get nicked or chipped while I was messing with them.
These things are lookin’ hawt!!
Now, where to put them… Ah! I have just the spot…
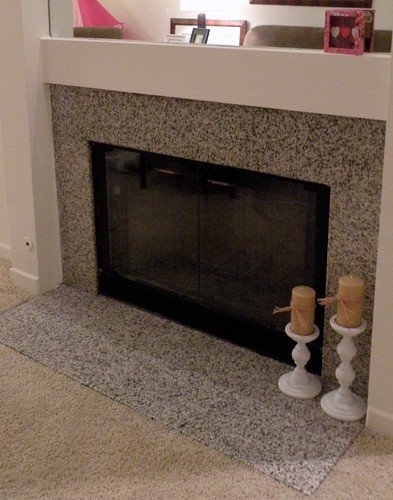
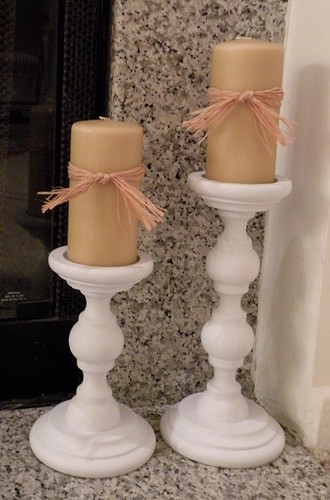
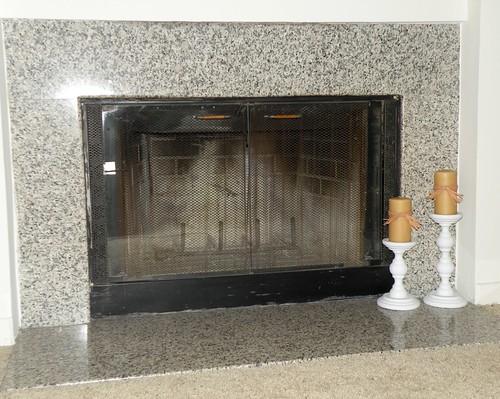
Love it. Love it. Love it. Now if only I had a mantle to put them on… It’s okay, I’m kinda liking this hearth look…
This project wasn’t as easy as some of my others, but it is still doable. The hardest part is just being able to see an objects potential.
And the saw. The saw was kinda hard too. But! You can do it. And if you totally ruin them? Oh well, they were only like three bucks anyway, right?
WOW what a great idea! They look so beautiful on your hearth
*hugs8Deb
I really like this! Very cute!
Very nicely done! They look so crisp and clean now!
They turned out great! I wouldn’t have thought of cutting one down….
This is way cute!
As far as the laundry – I didn’t notice it at first, but then I read it and I had to go back and look! ha
Sorry, I know you don’t know me from anywhere – but I thought that was cute of you – I would have done the same thing…
Those look great! I really like that you made them different sizes! Great find!
Hello! Stopping by from SITS! I noticed the name in roll call and had to come and visit as my maiden name is Hepworth. Fun, fun, fun! I love these candlesticks and the white definitely makes a difference. Have you thought of giving them a washed looko? I think that would look cool too 🙂 Have a wonderful day!
Very nice!The cutting made such a difference…can’t wait o see what you do with the left-over piece:)
Those turned out great, what a good idea to cut one down!
They look great Allison! You never cease to amaze me. I would have never thought to cut out the center of the candlestick. brilliant.
I loved it! Thanks for sharing!
I have a great interview with a savvy blogger on my blog right now with great tips on how to help your blog grow.
Come check it out http://bloggerchixdesigns.blogspot.com/2010/04/aprils-featured-interview-april.html
Also a giveaway for a Trendy Diaper Changing Pad if your interested 🙂
Nice job and taking a hunk out of the candlesticks, now the candle wraps look kind of like whiskers! 🙂
Very clever! i would never have thought to cut a section out of the candle stick. They look just great!
Cuteness — total cuteness!!! I love them next to the fireplace! Nice find!
I’ve never thought to cut them down to make them varying heights…thanks for the tip! They look great.
😎 I really Like them and they look so good on the fireplace! Blessings, Vicky
This is just too pretty. Wow!!! What a buy and such a redo..I love what you’ve done. I even like the soft pink of the candles..and I vote for the twine. The raffia is so pretty,but I’m just a twine girl. I’m really liking them 100% better a different heights..not sure I would ever have thought of that. Now,I’m off to see what else you’ve done. I should have visited back sooner.. 😀
Such a great idea to cut a piece out. I love the final look. You could also get away with a small silver/pewter charm to hang from your raffia. Might be a nice detail.
Thanks for sharing.
I TOTALLY likey! hehe I like that you made them your own…I like that they look so great with the fresh coat of paint, I like the knot in the raffia…and I even like them sitting by the fireplace! Its all PERFECT! Thanks for linking up to Anything Related!
~Bridgette
Cute Cute! I wish I had a Goodwill close to me…
I love your idea of shortening one of the candlesticks to add more dimension. What a great idea! I wonder if I should try this with an old set of mine…
Love the candlesticks! Great price too.
Thanks for leaving the laundry in the background. That’s life. Makes the rest of us feel human. 🙂
This is so pretty. I love everything about this project.
Thank you for linking this up to A Little Craft Therapy, as well!
Very pretty. I like the size variation!
I love them sitting there on your fireplace!
I LOVE it! The candle, the “ribbon”, and the new height! Perfect!
They look great in 2 different sizes & creamy white you can’t go wrong with. LOVE it.
What a great idea! I really like the colors of candle and holder you chose.
Have a great weekend.
Sincerely ~ Trish
Sooo pretty! Love them. Your Goodwill must be much better than ours! Ours is AWFUL!!
Great job! I plan to go to Good will tomorrow although I doubt I will score as you did.
Super cute! I’d love for you to link up to my party.
http://iheartnaptime.blogspot.com/2010/04/sundae-scoop-link-party.html
Oh how I love the Goodwill. Always a great project waiting to be discovered. Love this idea. turned out great!
Cute, cute, cute!
If your home is anything like mine, paying too much attention to the background in blog pics definitely limits where you can take pics.
What a really cute idea. We actually did something similar with two end tables. My husband cut off the legs of one of the tables so it would be shorter and no one has ever noticed. You did a fabulous job and I love the raffia ties!
Very cute and what a deal!
Thanks for joining Get Your Craft on Thursday! Please join me next week for another great party!
Turned out so cute! Be blessed. Cindy
These are very cute! I love how they turned out. Thanks for sharing at ‘Look at me, I’m SO Crafty!’ at Fun to Craft!!
Now see… I wasn’t looking at the laundry until you pointed it out. Then I had to check and see if an embarrassing item could be seen! lol Those are so cool and you madam are too funny!
ur writing style cracks me up. i like the mix match height mucho better.
JUST READING YOUR TUTOIRALS MADE ME SMILE! YOU ARE TOO FUNNY!
Awesome…you’ve done it again…! Thanks for sharing!
Ginger
SSB
Love these! I’ve done similar things when I’m in the creating groove….just cut and go for it! You are a very clever lady.
Allison…they look great…love the different heights….so much more interesting! They are perfect in that spot! 🙂
Oh my. I love your candlesticks! How creative. And I am feeling you on the saw. I have used that saw, and it is SUCH a pain!!! I actually use this hacksaw, and it is SUPER fast and easy to saw things. http://www.tomboytools.com/itemdetail.aspx?id=1007 ( I have the pink one, but the blue one is cute too :D)
Love your blog!
That’s a really great idea! I never thought to cut a matching candlestick down to give them more dramatic effect. You’re so creative! Great job.
Blessings!
-Sarah