Hey y’all! How the heck are ya? Hopefully not freezing to death. Even in Austin, where it’s usually H-O-T, it has been so fr-fr-fr-freezing cold I can hardly stand it. I’m so used to hot weather that I pretty much just shut down and hibernate if the temps get below 50 degrees. I seriously cannot stand cold weather! Well, fortunately Saturday the weather gods shined upon us for one glorious day and we had temps in the high 70s. As soon as I felt that warm air, it light a fire under me and I started a project I’ve drooled about for 9 months now.
The last time I mentioned our living room it was because I had finally painted it.
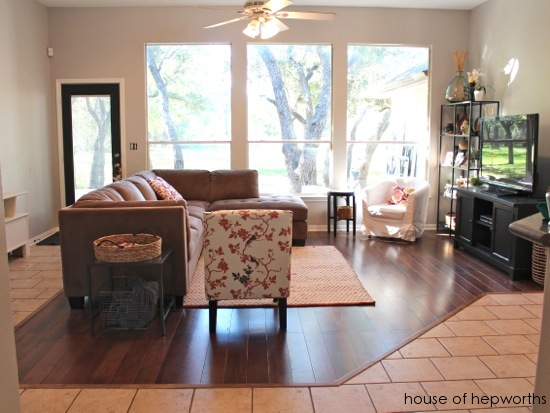
On Saturday I got the DIY bug something fierce and after a quick trip to the hardware store I was loaded up and ready to go with a stack of whitewood. I put up (most of) the craftsman-style moulding around the windows and the door!
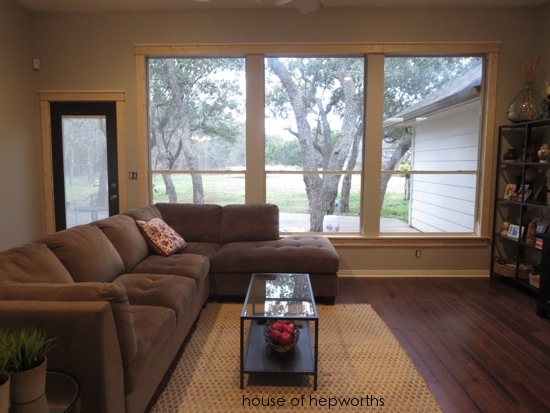
To say I am smitten would be an understatement. It is exactly how I pictured it in my head, but at the same time it’s a thousand times better too. I obviously have a lot more work to do including caulking all the seams, filling all the nail holes, and painting it all white. But let’s not focus on that right now. Let’s just focus on how much I freaking love this moulding.
I have been pinning and researching craftsman-style moulding for probably a year now. I just love the look of it. My goal is to craftsman-up this entire house, one 1×4 at a time. It’s a clean square look that is traditional, will never go out of style, and will always look great.
So, want a tutorial? Okay then, coming right up! I used Sarah’s tutorial as a guide (let’s be honest, I pretty much copied her).
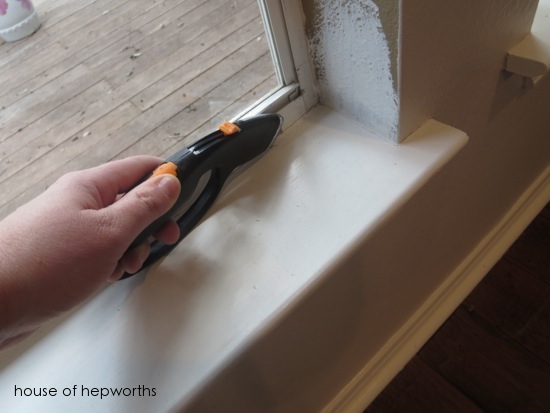
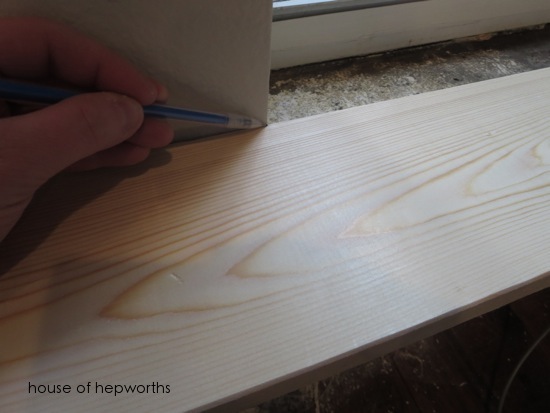
Start by cutting through all the caulk of the previous window sills and moulding.
Now it’s time to start prying off all that old trim. I used a chisel and a hammer to get it started and it worked great, though I’m pretty sure that’s not an official use for a chisel.
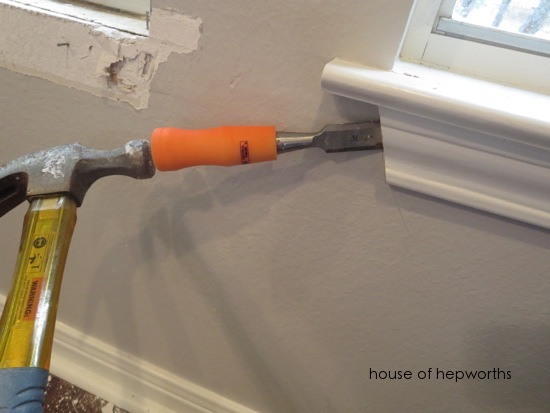
Slowly pry off the moulding being careful not to damage the walls.
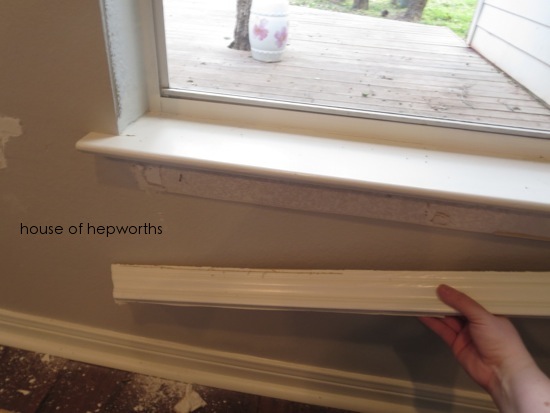
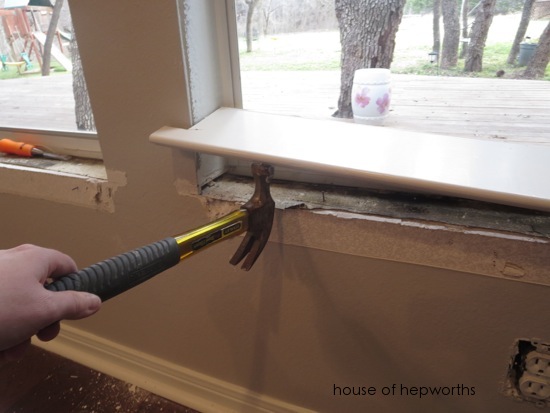
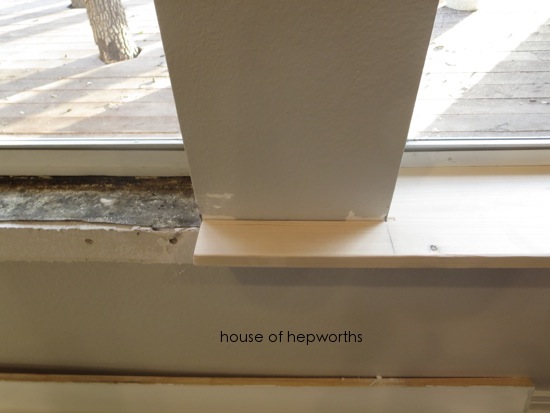
To get the window sill off I used a hammer to bang under the lip of it until it was loose, then I pried it off too. The reason I removed the sills is two fold. For one, the sills were not square or blunt along the edge. They were rounded. Craftsman style moulding generally uses a more square or blunt edge. And reason number two, the very outer edge didn’t stick out far enough to accommodate the new wider trim I was about to hang up. If this is confusing, stick with me and I’ll explain in more detail soon.
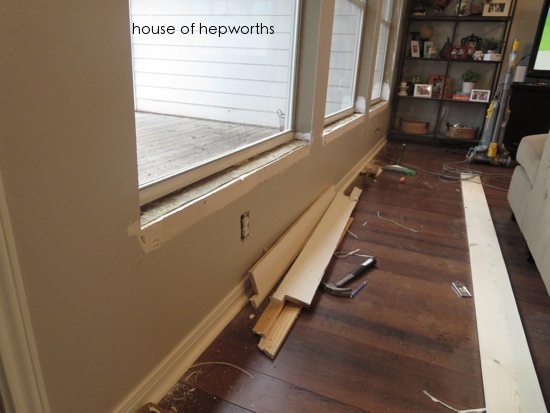
Here’s a very messy shot once the trim and window sills were removed.
The sill was the hardest part to calculate because I wanted one sill spanning all three windows (instead of three separate sills). I simply held the long board up (with my son’s help) and marked where all my cutouts needed to be.
I set up a very trashy (lol pun intended) and makeshift cutting area over two garbage cans because I don’t have sawhorses (those suckers are expensive!). Using my jig saw I cut out the sill. For the far right and left overhang, I wanted the overhang to be the width of my trim plus 1″.
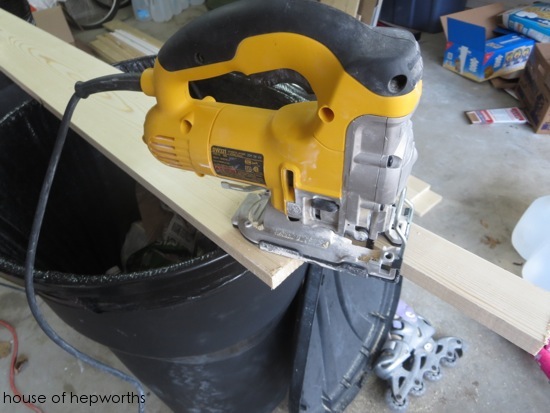
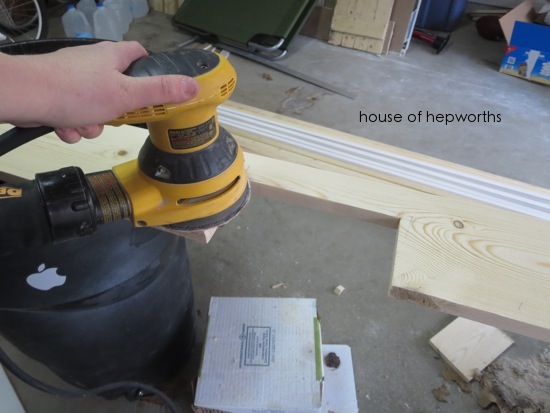
Once my sill was cut I gave it a good sanding. I also sanded every other piece of wood I used on this project. Not a ton of sanding, but just a light once-over. I also knocked down all the edges of the boards so they weren’t sharp – not rounded or anything, I just took the edge off.
Because my three sills spanned a total of 13 feet I had to use two separate boards to complete my sill.
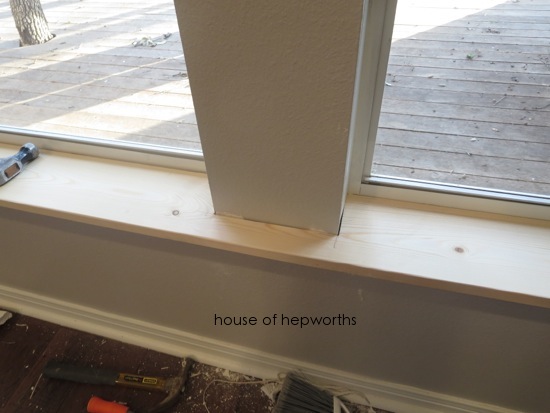
Here’s where my first board ended. I purposely ended it right at the edge there because I felt like it would be the easiest place to put a seam that I can fill later.
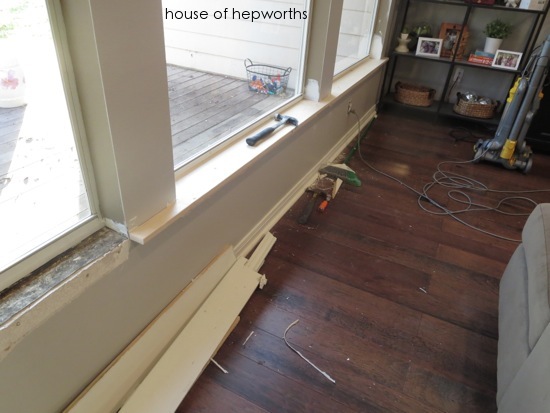
Here’s what the sill looks like around one of the walls between the windows. Also, please note, in all these photos I’ve left the two middle walls between the windows bare. They will have wood over them as well, but I picked up the wrong size and need to go back and purchase the correct piece.
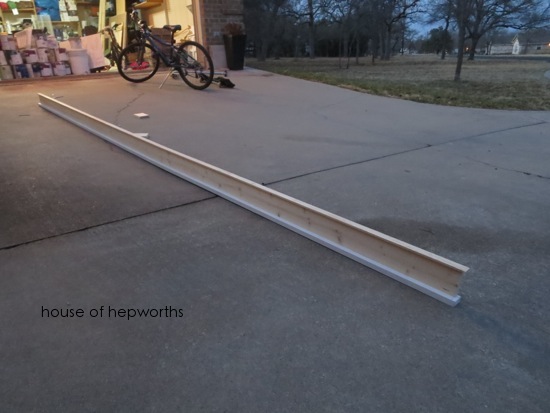
For the header across the 13 feet of window, I actually made the entire thing in the driveway. Once it was assembled my son helped me hoist it up and nail it in place with my nail gun.
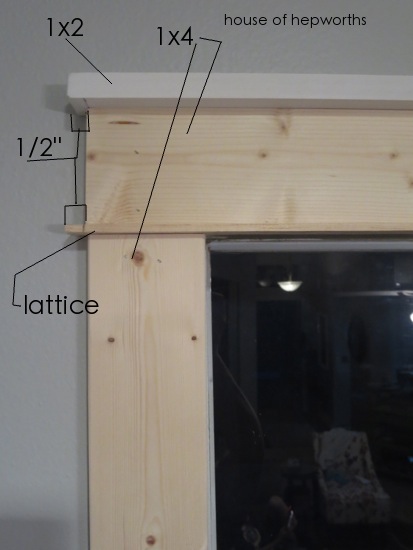
Before adding the header I added my side boards to trim out the window. Once they were nailed into place I hoisted the header (pre-made) on top and secured it. The sides, middle section of the header, and the skirt under the sill are all made using 1x4s. The remainder of the header is a piece of lattice, then the 1×4, then a 1×2. It’s much easier to build these before you install them.
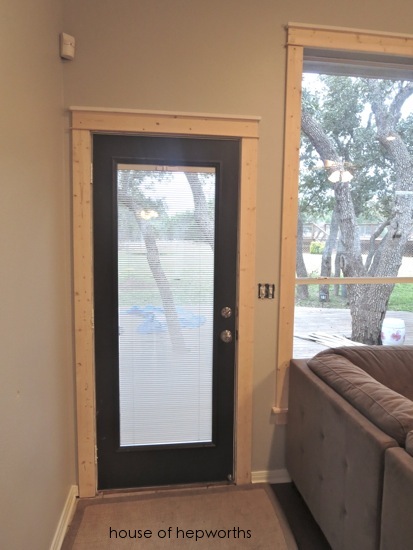
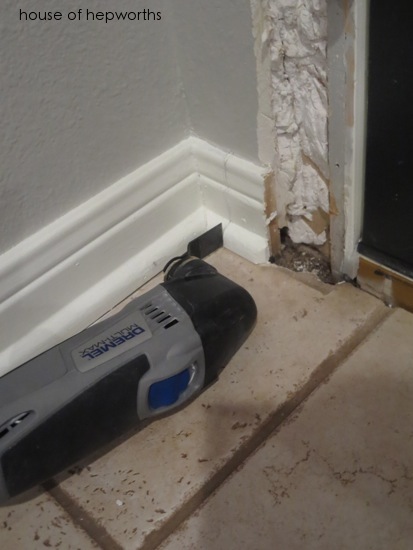
Once the window was done I was still feeling ambitious so I tackled the door as well. I started by removing all the trim.
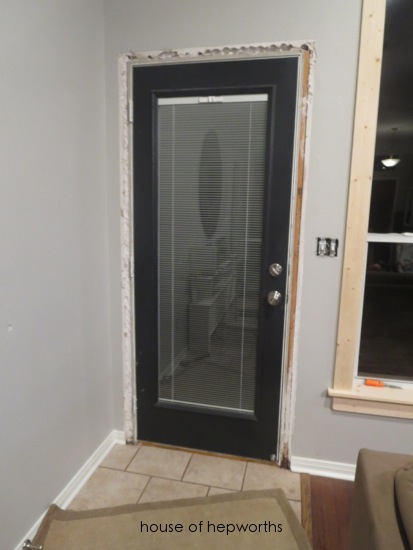
The previous trim was more narrow than the new trim so I had to cut away some of the baseboard to accommodate it. I used the dremel to easily cut away the excess baseboard. I wasn’t overly careful though because (spoiler alert) we are replacing the floor and all the baseboards within the next several months (fingers crossed!).
And yay, it’s done! I trimmed out the door the exact same way I did the window – sides first, then the header last.
Hopefully I’ll get these guys caulked and painted before long so I can show you a final reveal! This new trim makes me so giddy-happy. I can’t decide if I should finish up these guys first, or go do more trim around more windows and then finish them all up at once.
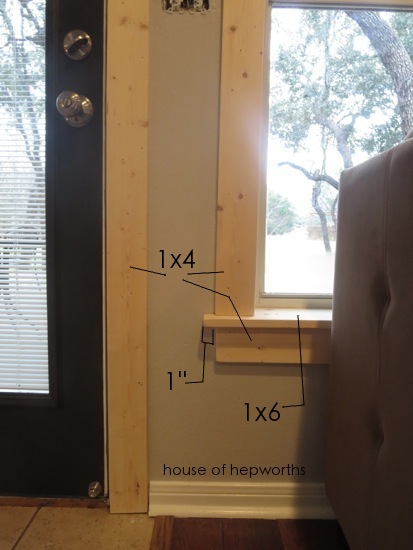
Here’s a quick and easy guide for measurements. I had a really hard time finding any information online about certain overhang widths, so after much googling and sleuthing around online I determined that
* The 1×2 and lattice in the header should overhang approximately 1/2″ from the center 1×4.
* The 1×4 in the header and the 1×4 on the side of the door or window should line up perfectly.
* The sill should overhang an additional 1″ from the side trim.
* My new sill is a 1×6, but yours may vary depending on how deep your windows are set.
Awesome job!!!! I love the look. You did great work.
Dear Allison, you are the best! Thank you for posting this…guess what I’m doing this weekend? All because if your ready to follow tutorial. You rock! Quick question…would you ever consider doing this with mdf?
We have a similar type of ugly molding in our “new” house and I hate it!! I’ve been wondering how to replace it to make it look more modern. Thanks for the inspiration and keep up the great work — pinning your project now! You make it look so easy… can’t wait to see how it looks all painted 🙂
Now that really makes the room, I absolutely love the look! Hmmm, maybe I can talk hubby into doing this at our place! Can’t wait to see the final reveal!
oh it’s looking so good! love that style.
Man, I can’t stop staring at it. The moulding looks so awesome, Allison! I’m always super impressed at what you are able to do. Keep up the great work – you’re really making our home look better every day!
The molding looks great, I love chunkier molding. And I love the new arrangement of the living room furniture. Makes it feel more open.
Allison, that trim is looking gorgeous! Can’t wait to see it all white. Your comments on the cold made me remember our first cold day in Texas. My husband and I moved to Austin in our twenties and one Sunday on the way to church it was in the low fifties (possibly high 40’s) and most everyone was in full on winter coats. It just cracked us up at the time. After nine years of living in the good ol’ lone star state we now live in Utah and I miss plenty of things but not that summer heat that made me wilt! Okay, I guess I have a lot to say, but I also loved your makeshift sawhorses. When I was building our chicken coop, I asked my husband where ours were and he said he’d taken them apart one time when he needed the 2×4’s. So, I used paint cans. And then cut through the top of one! (http://hedengrens.blogspot.com/2013/07/chicken-mansion-revealed.html) Anyway, way to go on your gorgeous trim. Our windows have no trim as in not even a window sill. All drywall. I’ve come to accept it and like the modern look, but my trim just makes my heart happy so maybe I’ll just have to rework it a room at a time. Someday…
Looks Fantastic! So very Impressive! You Go Girl!
I have been wanting to add trim to my windows for so long!! I have been looking for someone who had to remove/rebuild the window sills as well since I will have to do that too. I’m pinning this for when I finally get the courage to start. Thanks for sharing… can’t wait to see the finished product!
*drool* THAT is going in our next house! Thank you!!
I love it! I have three windows too, but they are arched at the top. Is there any way to add moulding with curves?
We have one arched window and I will be adding moulding to it soon so keep checking back!
Wow I love it! It adds so much character!
Works of AWESOME! Love it.
It looks amazing, Allison! Now I’m dying to do the same!
Great job! I love the craftsman-style, too. But I have a couple of questions: did you leave a reveal on the window frames or did you just line the boards up with the edge? Also, how did you get the 13′ board home?
I bought 10′ boards and pieced them together at home.
I love this! It looks SO great! I can’t wait to see it all done and painted! You’re a rock star!
Wow, you got some cujones! I would be scared to do alot of the stuff you do, hacking away at your house like this. My new husband, who built a real workshop and has done alot of stuff in his house, uses 2 big rubbermaid trash cans instead of saw horses, he thinks they work better and they are so cheap and easy for him to store. (He throws them under the deck.) I used them also when I moved in and started cleaning out his (our) flowerbeds. This looks so beautiful, you are so creative!
So nice! I envy you. This would look bad in my house, but I love that style! I guess I have to view my house as giving me freedom from having to put pretty woodwork up, right?
Allison it looks fantastic!! Great JOB!!!!
I understand this a post about the moulding, but as a first time visitor to your blog, this is the first time I have seen your flooring in your living room. I absolutely LOVE the juxtaposition between the hard wood and tile. It’s so unique and eye-popping. Oh and the moulding looks good too 😉
Cheers
Victoria
That kind of trim makes me happy, too. Looks beautiful!! 🙂
Can I just say this has made me see my plain old boring living room windows in a new light – and in an Oregon winter that’s sayin’ something! Thanks for the great tutorial!! °Ü°
I, too, lust after everything craftsman. My mountain house is furnished in that style, but the structure is not craftsman. I am interested to see/hear what other projects you have in mind to,craftsman-up your home. So get going girl, so I have something to emulate!
Great job with the mouldings. It definitely adds character to the room. Will check in to see the finished project.
Allison, It looks absolutely amazing. Great job! One question, what would you do if you had one side of a door or window that was really close to a wall, less than four inches from the corner? Would you trim just one side down and leave the other side at 4″ wide, or trim both sides so they are the same width?
I actually watched a video because I have the same problem. You do one side normal and you do the smaller size to fit. The header will extend to the wall on the narrow side, and hang over on the normal side. I hope this makes sense.
Thank you! I have been searching for this answer for awhile. Silly builder put my windows too close to the fireplace.
Looks great I did the same except I went with a 1 by 8 header the larger header really makes it pop
great job-an alternative could be using hardwood instead of pine like oak,birch,maple or walnut (very expensive).hardwood because of its eye catching grain SHOULD NEVER BE PAINTED stains are
available from very light to dark-easy to apply.Apply to wood before its cut with the option of using
a top coat of clear urathane or shallic. I also like using the larger 1 by 8 header or maybe a 2 by 8.
Thanks for the measurements. I’ve seen several other how to start on doing this, but they generally used a thicker piece of lumber where you used lattice. That thinner profile is much closer to the trim on some friends’ 1917 home.
My husband and I are doing almost the exact same project with a few differences. We have five windows and are doing all you are doing but we are trimming the outside of each window and wrapping each column. We enjoyed looking at your project. My husband is great with this stuff and he said for a novice you did a really good job!! How come this blog ends in 2014. Looks like you have a lot to offer people. Thanks Laura
Thank you! The blog didn’t end in 2014. I’m still going strong in 2017!
Love your trim! Thanks for clear diagrams with measurements. I did exactly this in my bathroom in my 1974 ranch home which has 1 1/4″ trim around all the doors and windows, which I don’t like and plan to replace. My living room is similar but wondering what you are doing for window treatments? I will be removing pinch pleated draperies with sheers and an old traverse rod. In my former 100 year old craftsman home I made custom roman shades installed inside the frames of 3 windows that were all connected like yours. I don’t think I want to put that much work into roman shades again but I loved how the beautiful trim was showcased. So I am looking for ideas.
It looks really good! Are you planning to stain it? Did most of my windows and sills, but still need to do living room. I want to have an edge on my windowsill for the living room. Any suggestions for a bit?
Hello. This is absolutely amazing. I have a question though. My windows are already trimmed out on the inside of the pane with pvc. So what would you recommend for the bottom of the window sill? I can’t explain it to make sense. You have the 1×6 on the bottom of the windows that is cut out to fit into the window pane (I hope you know what I mean) however I don’t need to do the cutout 1×6 bc there is white pvc around the window already. So what would you recommend on the bottom of the window? A 1×2 or a lattice for the bottom of the window?
You mention you used “lattice” for the bottom of the header. Would you show a pic and share where you got this please?