Let’s talk Curtain Rods. More specifically, let’s talk about how to make a DIY curtain rod.
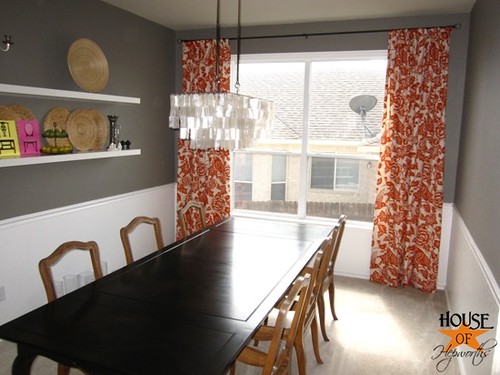
Before I begin, thank you so much for being so kind about my new curtains in the dining room! I am taken aback daily by how many genuinely nice people there are in this blogging community. Thank you for loving the curtains along with me, and also thank you for just being plain ol’ nice.
Now, shall we get down to business?

I should dedicate an entire post just to curtain rods, because after this experience, I think I know every single option of inexpensive curtain rod options in the greater Austin area. That post is for another day though. Let me just say that the cheapest options I found were Wal-Mart and IKEA. But my DIY curtain rod version is significantly cheaper than both of those.
How to make a DIY Curtain Rod:
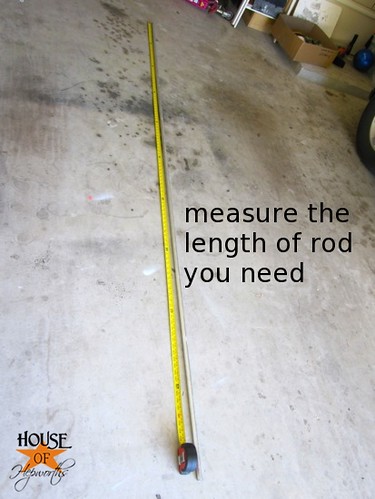
I headed to our local hardware store on a mission to find a practical inexpensive solution to my curtain rod dilemma. Part of my problem is that I needed a VERY LONG curtain rod; 113 inches to be exact. You can’t exactly buy rods that are almost 10 feet long at Wal-Mart. Trust me, I tried. 🙂
At our local hardware store I found a variety of objects that could work, but in the end the heavens parted and I stumbled on Electrical Conduit.
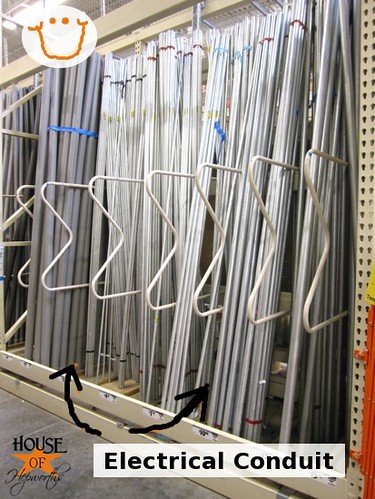
Bless the person that invented this light weight, sturdy, and extremely inexpensive product!
It was exactly what I was looking for; 10 feet long, light weight, metal, and the best part, only TWO DOLLARS.

But let me back up for a sec. I first considered PVC pipe. I’ve seen it done before, but I was worried that the weight of the curtains would eventually make the PVC bow or sag. Also, PVC is plastic which would require an additional step to paint. I considered buying a wooden dowel rod, but scratched that plan because I just didn’t like it. I also strongly considered plumbing pipe, which I almost bought before stumbling upon the Electrical Conduit. The plumbing pipe was very heavy though and was significantly more expensive.
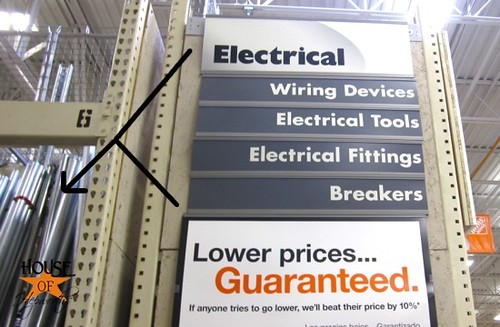
In the end, in my humble opinion, if you need a custom DIY curtain rod, Conduit is 100% the route you should go if you don’t want to spend fifty bucks. It can be found on this isle:
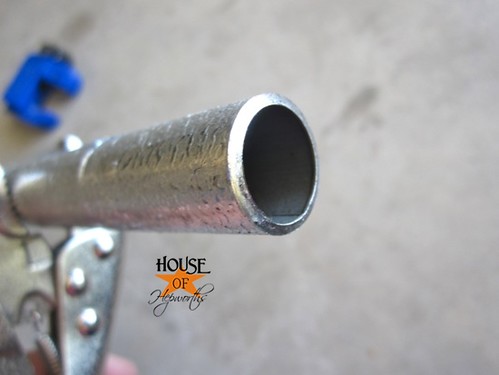
I bought the conduit that was 1/2″ x 10′.
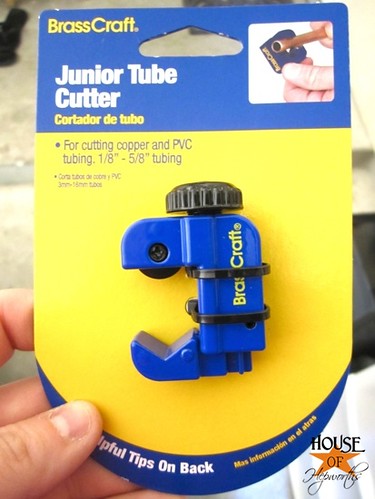
To cut conduit to size you’ll need a pipe cutter. I bought the absolute cheapest one I could find. It was $6, and worked about as well as you’d expect a $6 pipe cutter to work. The job got done though, and I’m not complaining!
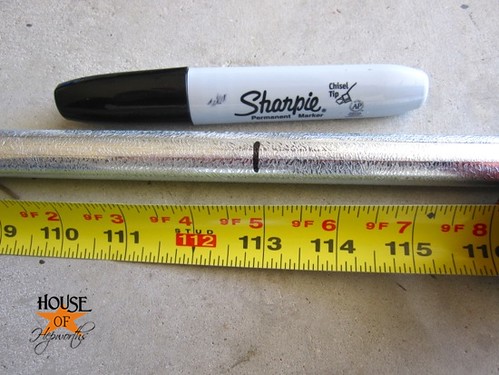
To create a custom DIY curtain rod you’ll need to figure out how long to cut the rod. Don’t forget to keep in mind the width of each of the finials sticking out on either side as well. My rod needed to be 113″.
I just measured the pipe and marked where I needed to cut with a Sharpie.
Now just attach your pipe cutter and follow the directions on the back. Basically rotate it around the pipe one full rotation, then tighten the knob. Do another rotation. Tighten. Repeat until the pipe snaps in half.
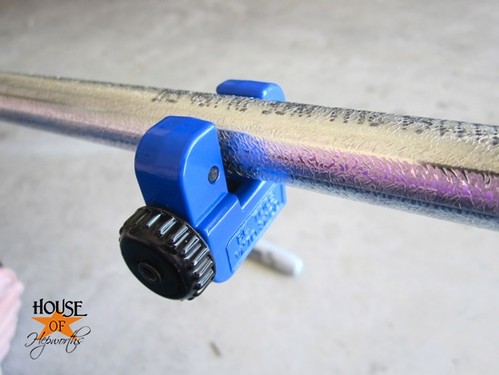
I ended up using pliers to tighten the knob each time and vice grips to hold the tubing while I forced the cutter around the pipe.
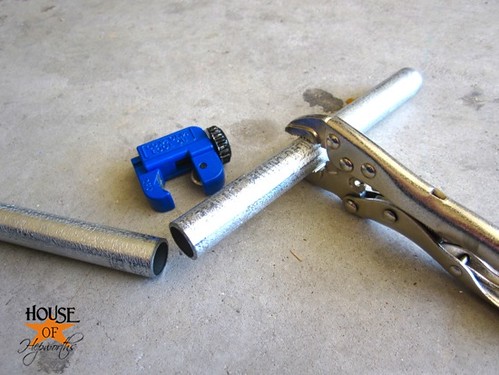
The pipe cutter made a very smooth cut. I was actually impressed that the edge of the pipe wasn’t sharp at all. Double bonus for not slicing my finger on the end of a sharp pipe!
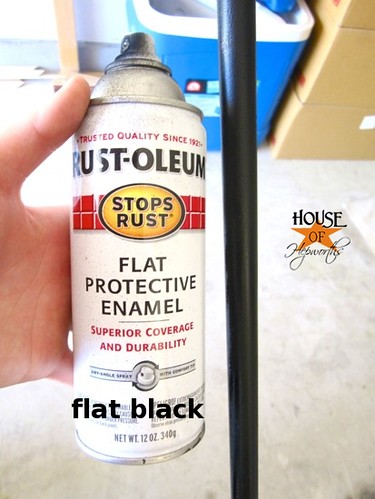
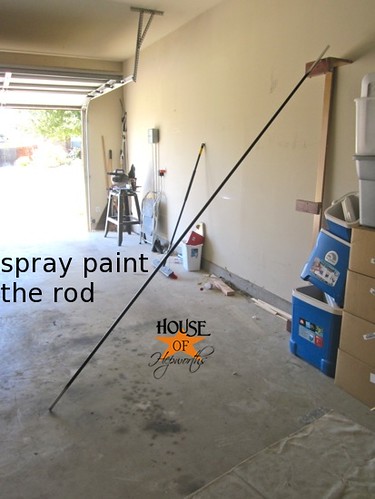
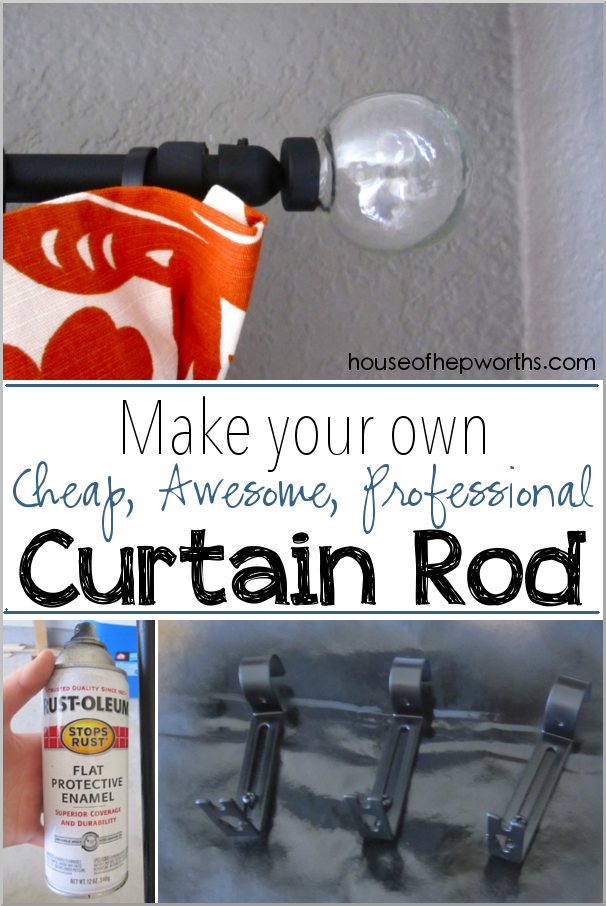
Once the pipe was cut to length I just propped it up in the garage and spray painted it, as well as all the DIY curtain rod hardware. I considered my favorite color, Oil Rubbed Bronze, but I decided on flat black so that my curtains would be the focal point, not the rod itself.
I like to spray paint IN the garage so that no debris blows into my object and sticks to it. I just propped the pipe up against the leftover feet from my sofa table project.
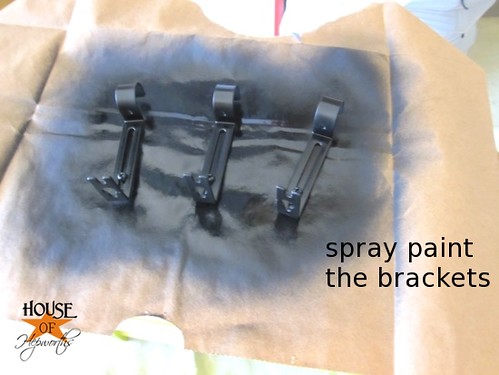
I already had the brackets for the rod (I’m a hoarder… lol) so I just spray painted them black as well. I’m pretty sure you can buy just brackets at most stores, and if not, I see them at goodwill for super cheap all the time.
I also dug out some anchors and screws from my screw and nail stash, stuck them into a used-up sanding block, and gave them a good coat of spray paint as well.

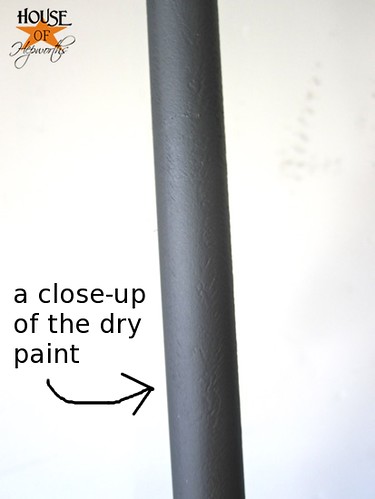
Here’s a good close-up shot of the rod once it was dry. I didn’t prime any of this stuff before I painted, but after doing this project, I recommend you prime your conduit with automotive primer (it’s for metal) so that no paint scratches off.
Once everything was dry I installed it and then got to work on hanging the curtain.
Curtain Rings and Finials:
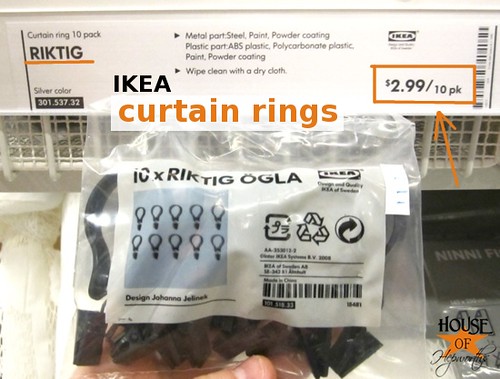
I found these curtain rings at ikea for only $2.99 for 10 of them, which is the best price I found anywhere. The next cheapest option was Wal-Mart. Their rings were $7.99 for a 7-pack, but they were metal, not plastic.
If you are going to have your rings show, I’d go with the nicer ones that are metal (or wood if you are going that route), but my clips were going to be hidden, so the plastic ones were great.
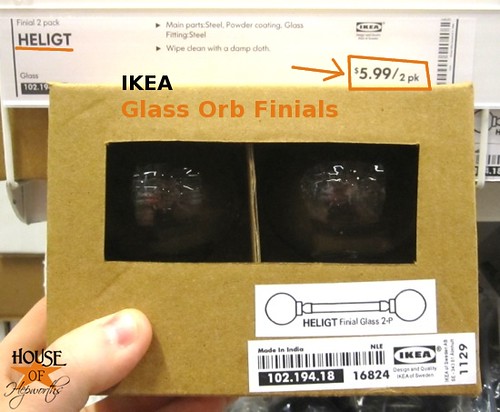
Also, I totally scored on finials at ikea. I’ve never seen finials there before, so I guess they are a brand-new product. They have two options, a solid metal curvy one, or clear glass orb ones. I chose the clear glass ones. Both options are only $5.99 for the 2-pack. The next closest thing I found was at our local hardware store for basic round unfinished wood ones (ugly) for $10 for a 2-pack.
Attaching the Curtain Rings:
I originally saw this idea over at Thrifty Decor Chick, but I can’t find the specific post. So anyway, this was her idea, I just copied it.
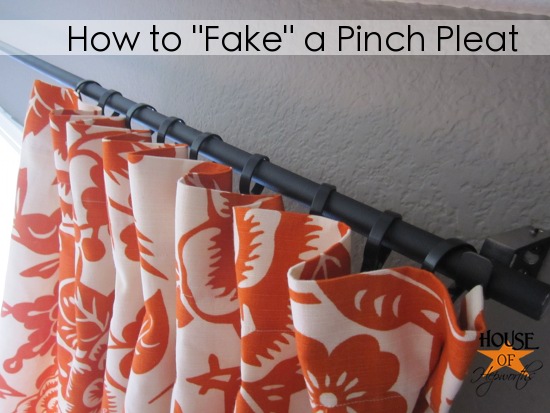
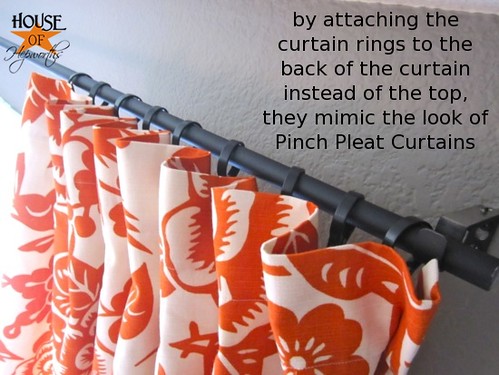
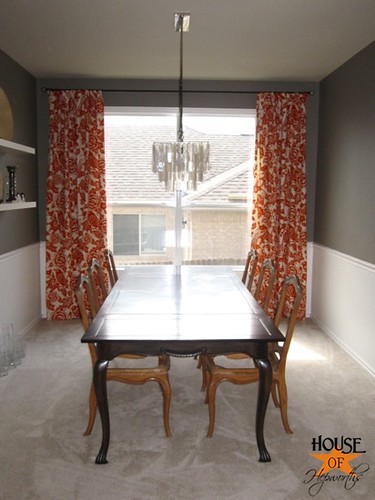
I want Pinch Pleat Curtains for my dining room, but they seem like a whole lot of hassle to make them, so I just “faux” made them. So easy! Here’s the final look, and then I’ll show you how I did it.
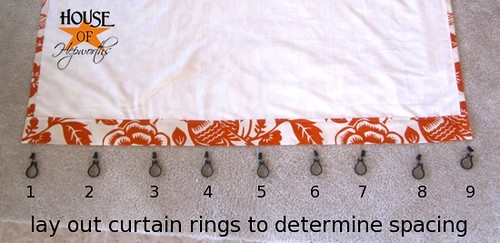
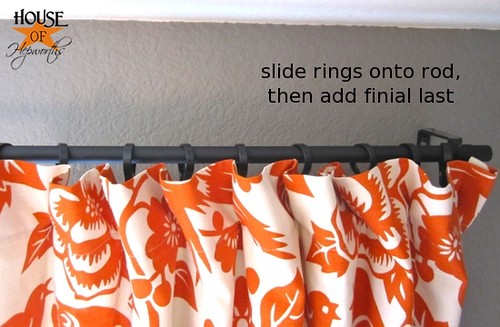
First, lay out your curtain flat on the ground and lay the rings under (above?) it. You want to make sure you get the spacing even. I eye-balled this step. You don’t need to be totally precise here.
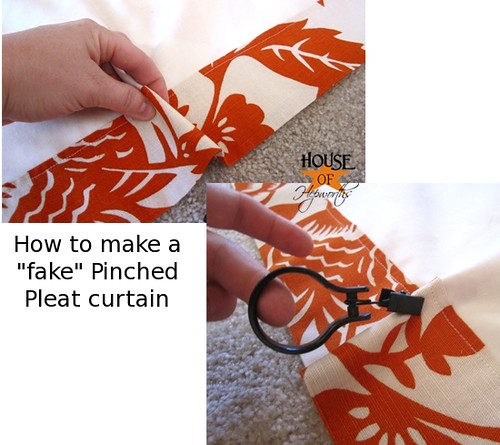
When you attach the clips you are going to clip them on the back of the curtain, not the top edge. This creates the pleat look.

To attach the rings, pinch the section of curtain you want the ring to be attached to, then just clip the ring right onto the pinched fabric. Make sure you set your rings low enough that they will barely show over the top of your curtain.

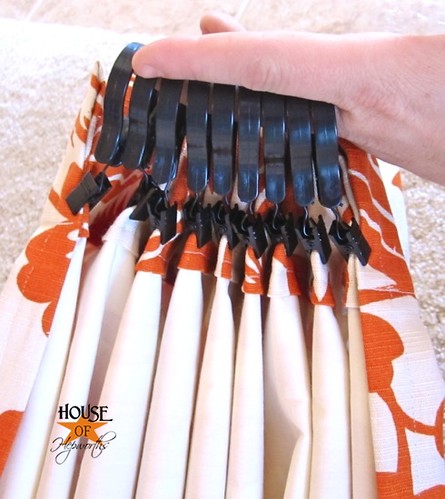
That’s it. It’s so easy. Now just gather them all up and slide them onto your rod that you’ve already set on top of your brackets.
You are almost done! All you need to do now is add your finials on either end. Because I used Conduit and not real curtain rod, the conduit was just slightly too small for the finials. It was really no big deal. I just grabbed some black electrical tape (I used this solely because it was black, not because it was electrical) and wrapped it around the tip of the pipe.
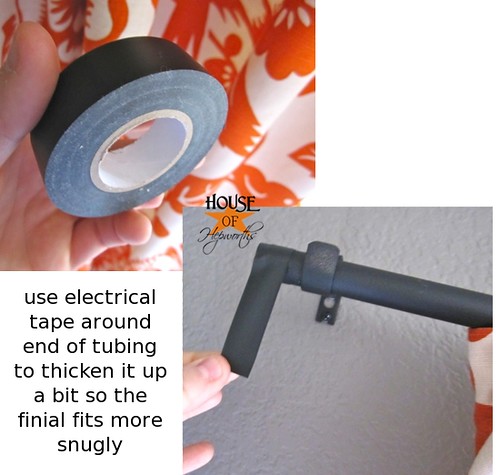
From there, slide your finials on, tighten them down with a tiny screwdriver, and you are done!

I know I showed you a lot of steps, but trust me, this was an easy project. It did take some time, but the amount of money I saved was so worth it. Here’s the cost break-down for ya:
Electrical Conduit: $2
Finials (2-pack): $6
Brackets and screws: FREE
Grand Total for the entire DIY Curtain Rod: $8
EIGHT DOLLARS!!!!
Trust me when I say to purchase a 10′ curtain rod could cost you anywhere from $40 – $80, if not more! I saved boo-koos of moola here.
So there you go. A complete step-by-step tutorial on how to make your own $8 DIY Curtain Rod.
* I want to add that you can purchase expandable rods that pull out to about 10 feet, but I personally hate extendable curtain rods. They leave a seam down the middle of your rod where the two ends meet, and I don’t like that at all! I want my DIY curtain rod to be one solid piece without any seams across it. This is why it was such an ordeal for me to find a 10′ rod. You can’t really buy rods that long at very many places, so they are very expensive.
I hope I was able to give you some useful tips that you can use in your own home!
Check out these other curtain-related posts:
- My dining room curtains are done! (Thomas Paul Aviary Fabric)
- How to make Professional, Lined Curtain Panels
- How to make cheap, sophisticated window treatments
- How to turn bed sheets into curtains
- Using an IKEA kitchen rail as a curtain rod
- Adorable tween girl polka-dot pom pom curtains tutorial

Instagram || Facebook || Pinterest || Youtube
This post contains amazon affiliate links
Thanks for reading! Have a wonderful week!
You’re pretty much a genius! LOVE the curtains and the dining room is coming together magically!!!
Awesome work!
Awesome skill! You presented the project in such detail, it is well illustrated and clearly and logically laid out. Wonderful job. (The drapes are nice too).
Bruce
OO
Um…how is it $8.00? You needed electrical tape. Paint. A conduit cutter. Those aren’t included in the 8 dollar final price.
Furthermore the same quality of curtain rod can be purchased at Walmart for between 8 and 15 dollars. I appreciate your creative flair…but…”Saving Money” isn’t really a reason to do this.
http://www.walmart.com/ip/Petite-Clear-Crackle-Cafe-Drapery-Rod-Pewter/4023697
Preston, thanks for your input. For starters, as stated in my post, I needed a rod 113 inches long. The link you provide is for 48 inches. Please find a rod that is 113 inches long for $7. I would love to see one.
Also, I made assumptions that items like electrical tape and paint you probably already own. As for the conduit cutter, I chose to buy one for future projects, but Home Depot will cut your conduit for you for FREE if you ask them.
If you can find a 113″ rod for cheaper than my tutorial, I welcome you to try.
Preston emailed me back another comment:
Please show me how to create a curtain rod for 7 dollars. Because the curtain rod you created WASN’T 7 dollars. Electrical Tape, and paint weren’t included in the final price. So why would I try to find a curtain rod that was significantly LESS than the amount of the rod you created? The actual price of the rod WASN’T 8 dollars. 8 dollars is what you had to pay because you had previously paid money on other products. If someone were to create this curtain rod from scratch they wouldn’t be creating an 8 dollar curtain rod. So regardless your article is misleading.
My reply:
If you have absolutely zero supplies on hand it would cost about $16 total ($8 for rod and finials, $6 for 2 cans of spray paint, and $2 for electrical tape). Cutting the conduit is free.
This is absurd however, because most people in the market for a DIY project already have electrical tape on hand and probably have an arsenal of spray paint in their garage. If you aren’t a DIYer you probably aren’t googling how to make your own curtain rod to begin with.
Having said that, please find me a 113″ curtain rod for less than $16. Heck, I’d be surprised if you can find one for less than $30!
Preston is grumpy ’cause you’re a GENIUS!!!!
Preston has also provided a link to an extendable curtain rod which in my opinion is a lower quality than what you have made here. Opening an closing curtains when there is the bump from the extension even when there is the plastic grommet in there to make it smoother can be a pain and not having that because you put some time into a very nice DYI project is well worth the effort put in.
I am impressed!!!! I could find cheap rods but the length and “strength” are the big variables here. Find a cheap one that is not flimsy. I love this notion and I am planning to use this on my daughters screen porch…for privacy. I am using a canvas painting drop cloth. Perfect for outdoors ( with a covered roof) and with your rod solution…a terrific bargain. The weight I am using needs a substantial rod. Thanks so much for your blog.
I have done this a couple of times. Even cheap curtain rods are more expensive that doing it this way, and the bonus is that you don’t need a center support because the conduit is not flexible, just make sure your hangers are in a stud, which you can usually find because you are putting the hangers at the end of the window where it is framed. I did this in my sunroom and took steelwool to the pipe because everything in my room is stainless steel. Looks awesome and even better, it is one solid piece so you don’t have the part in the middle where they connect and the rings always get caught up in it.
Just to be fair, you would also need to buy curtain rings and automotive primer if you were starting from scratch. So yes, I too felt that $8 was a misleading quote.
I’m not arguing that you can’t just walk in a store to buy this size. Definitely agree!
I’m appalled that there are numbnuts like Preston out there who have nothing better to do than to burst someone’s bubble over such an innocent post. Preston, get a life. This post helped me out tremendously. I need a ten-foot rod and Home Depot and Lowes only went up to seven feet. So thank you, Allison, for your very helpful input. Write off Preston as a loser.
I LOVE YOU!!!! I went to Ace Hardware here Wichita, KS and looked at the 10ft curtain rods and they were $28.00 EACH. I quickly grabbed my iPad and found your site. Ran over to the Electrical department and got two 10ft rods for 2.12 each. Then I asked them if they would cut them down for me. They did this for free. I bought stainless hooks to slide the rods in because I am doing this outside and VIOLA!! This project cost me less than $10!!!!! I am thrilled because I budgeted this project closer to $100. Thank you!!!!
Your idea was great! I have a window 120″ and can’t find a ready made rod anywhere….looked online and stumbled upon your DIY idea. Job well done girl! And since your to kind to say it I will, PISS OFF PRESTON!!!!
Thanks again for passing along your clever idea….keep em coming 🙂
Even if you cannot replicate this curtain rod for $8, it’s still a deal. It’s best to ignore the trolls,who delight in raining on parades, licking the red off lollipops, etc.
Not sure why he is so negative about this post, I think it’s brilliant! You are also correct that most people who read about how to make curtain rods will have a majority of the supplies already. I love your idea and since we just moved into a bigger home, we need new curtain rods and will be using your suggestions! Thanks so much for the great idea 🙂
Thank you as well. Good luck with your curtain rods. I only wrote the post to help people out. I don’t know why some people get so snippy about it. Ugh! Thanks for your support. 🙂
Plus, as someone else pointed out, all long rods that are relatively cheap have joints. If you are using rings or sewn tabs, they always catch even with the joints covered. I bought a rod assembly for a 7 foot window at Walmart, years ago. It has an extender section in the middle, thus giving my rod two joints to pull the rings over every time I open and close the curtains. Very annoying. AND the reason I am looking for an alternative for another set of windows this year. Thanks Allison.
I wuld luv to have been able to do this project myself as I have been searching for a rod jist that size, well I believe I have found a place that $12.99 although the electrical conduit sounds grand
Forget Preston, your rid is awesome. Cost or not I love the fact you created it. I will use your idea to create rods for three of my Windows. Thanks for sharing.
I agree, Prestonsburg sounds like a jealous killjoy. No matter, not only did your product turn out absolutely fabulous, but your DIY instructions were so simple a 5th grader or a creatively challenged individual could follow them! I was racking my brain for ideas on homemade rods and you made that easy! Thank you so much. Can’t wait to see your future DIY jobs. I’m trying to figure out how to make a canopy for my four poster bed next! 😉 Alicia in Ga.
Allison I think this a great idea for an excellent price even if you had to add paint to the project, it is WELL under cost for purchasing that length rod anywhere. I too had a window spanning 108 inches- costs were crazy for rods. I opted for 3 honeycomb shades each 36 inches wide with a valance over the top. Not CHEAP. Great job and kudos for you and thanks for sharing. I love the faux pleats on the curtains too! The more relaxed look is so much more welcoming than rigid pinch pleats, but your idea gives some shape and structure to the material- love it! I actually only decided to comment because Preston is such a jerk, and wanted him to know it. Get over yourself boy… Thanks again Allison and keep up the great blog!
Give me a break!! People can’t read this and enjoy the pure fact that it is possible to create something so cool that fits your needs to your exact specs. Maybe you won’t be able to make this for $7.00 or $7.50 or $10.00. Whats the difference! Maybe a person has nothing in his supplies, so it costs more.
The next time, they have the cutter, tape, primer, paint, etc. There fore they pay more. But how about a guy like me that has shelves full of spray paint, 1/2″ conduit for never ending electrical additions, tapes of all kinds, hand and electric tubing cutters. Doesn’t that count to even out your $7.00 cost? A person sits down to relax and can’t escape the nonsense on a simple helpful article. P.S. I use turn signals when driving, how about you……………………….
I’m constantly DIYing and personally have an Arsenal of spray paint AND electrical tape. Not to brag… This is a fantastic tutorial and exactly what I needed for some sheers in a bedroom. I’ve recently had a major reduction in finances and this tutorial allowed me to still meet a goal without being financially irresponsible. I greatly appreciate you sharing! Thank you!
Preston is a butthead. He is the type of person that just wants to argue and is right about everything. I think she did a great job. I will definately use her idea for my screened porch which is 12×24. I will have to do several but its still so much cheaper.
Very nice, I’m impressed and I’m an engineer, lol. The pipe cutter used is one meant for doing plumbing in tight spaces, like between studs or floor joists, a bigger pipe cutter with a T shape handle will make cutting easier. Copper pipes are more expensive but will cut easier, there are at least two types of pipes, one softer than the other (and thus not as stiff).. A cheap cutter can be found at harborfreight.com A little oil on the cutting wheel might not be a bad idea.
Thank you for the explanation Raul!
To overcome the rod junction obstacles, there’s this tape with a tiny plastic cone at center to bridge the rod junction, works pretty well to slide the curtain rings across rod junctions. You can purchase it on Amazon: http://amzn.to/2yLYoTk
Allison, can you connect conduit together with soemthing that would look nice or can’t tell? I have a wall of windows and am looking for a rod 312″ long, it would not look good to have six seperate rods on this. I know I’ll need support brackets, but love your idea, so what do you think about getting enough conduit for 312″ and somehow putting them together, any ideas?
If you get a wood dowel that is just too big to fit in and sand it until you can just tap it in with a hammer that should work nicely. It would help to make the joints land at the brackets, otherwise they will drag on the curtain/curtain rings as you open and close them. Out seems to me it would be best to assemble then in a nice straight line on the floor then have three out more people lift it into place.
good luck.
Hi Sallie: I need conduit for a window that is 120″ long – so the 10′ is not long enough for me either. I found out that home depot has couplings that you screw on the conduit to connect two pieces together. You would have to get the coupling the same size as the conduit. So if you get 1/2″ conduit, you need 1/2″ coupling.
I’m thinking you could use a coupler that fits inside each end of the pipe join. I envision something like this: http://facility.unavco.org/project_support/polar/images/photos/aluminum_pipe_coupler.jpg
This is used in the construction of solar panel apparatus, but I bet there is something like it at the Home Sweet Depot!
Cheers,
Wil
I think this is brilliant and thrifty, but I just want to say, “beaucoup” (which I had to look up) is the French word for “lots” that you’re looking for.
I really want to do this.
-Nancy
Thanks!
Absolutely! We need a rod that’s longer than 148″. Very difficult to find rods that long. This is a great project and very, very cost efficient!
I am impressed with your substitution, which is SO much more substantial than the thin extrusion that’s generally used. It’s exasperating when your needs don’t match what is in stock, and you found an incredibly clever way to make things happen!
Years ago, I wanted unique finials. Everything that was available was far too expensive. (I have champagne tastes.)
While poking through some Housewares sales table, I found wine stopper – with no corks. They still wanted $7 each for wine corks – with no corks. But I DID like the designs. I was able to scrape out the remnants of cork and glued them to dowels. I still love them.
I absolutely LOVE this; not to save money, although that’s a bonus, but because we need a very long curtain rod for our bedroom, and I absolutely HATE the seams where the long poles telescope to be adjustable. I am also trying to avoid a center support, as we want all the drapery to stack on one side. Commercial, telescoping poles are simply not strong enough with out a center support. Thanks SO much; just have to talk my husband into letting me try it 🙂
This is what I’ve been up against too. I have a standard sliding door (75″) and want my grommet curtains to slide to one side (no center support). I’ve checked out the big box stores and online and nothing works. The only other workable idea was through an iron works or Kirsch and costing over $100 for the one sliding door (rod, 2 brackets and inexpensive finials). I also need to do the 2 small living room windows to match so it would have cost me another $160 for them at estimate of ~$80 each (only a shorter rod). Thank you so much for posting this information.
plus any telescoping rod will bend under weight 🙁
Home Depot no longer will cut them. Also $5.00 a 10 ft piece . 2018
I got lucky, married a plumber…needless to say he can cut any size pipe….we have about six pipe cutters! Thanks for the great idea as I need a 9 ft. rod!
Plot twist: Preston sells/designs curtain rods for a living lol
agreed. glad you said it because I was going to. I would also have to buy the brackets because I don’t already have them so it would end up costing as much as if not more than just going and buying a curtain rod. like you said if this is for money saving purposes it’s not a good example. If it’s strictly so you can say “I did this myself” then that’s a different story.
The brackets are less than $3 for a 2-pack at home depot. I just bought some last week.
Preston, I too, have looked for longer curtain rods. If it’s possible at all, to find them, they are in the $40 to $80 range as Allison said. As for the cost of the electrical tape and pipe cutter etc., you don’t have to buy that each time you make the rods. I would figure the cost of the rod, and if you want, the 2 inches of electrical tape @ finial ends . The curtain rings had to be bought no matter what rod you bought. Your average household usually has electrical tape laying around. Allison did the best job I’ve ever seen of explaining and showing images of what she did! She should write how to do it manuals for a living! Sharon
If you are looking for a rod for a big window its really hard to find at the store that size, at least i’ve been searching and haven’t find anything especially for the price.
This is why the conduit is so perfect! It comes in 10′ rods!
Unless i missed something, the metal part that finials go to did you purchase that separately?
The end of the finial came that way from IKEA. All finials are not created equally so check the ends and make sure they will work before you purchase them.
The walmart rods you provided only go up to size 84″, won’t work if you need 100″ – 113″. Kay
Preston you are a idiot.
Thank you for voicing what all of us were thinking when reading Preston’s comments….there’s one in every crowd 😐
Good grief. If you don’t like the post, just leave. Plenty of other people found it helpful, unlike your comments, which were not helpful.
Preston, you’re crazy, just try to find a 10 foot rod at Walmart….I already looked. And who doesn’t already own electrical tape or spray paint. I suppose you think using toilet paper is also a waste of $$ since it’s not renewable.
Thank you !!!Thank you!!! I needed 130ft. ,looked all over for the length. You have saved me so much time. I will use your idea happily.
ditto genius – nice to come across the other people who wander through home depot looking for low cost alternatives –
Rich,
I also wander through hardware stores when doing a project, to find low cost and/or to create what I need . Guess there are lots more of us out there. LOL!
I think this is awesome. I have the same problem with French doors that also have side windows so we need a lengthy curtain rod. The problem is that the longer the rod the more support brackets they have therefore you have to divvy up your curtain panels between the support bracket. I want something that I can pull the curtains completely across and I think this project will work perfectly!
Thanks
YES SHE IS A GENIUS! THANK YOU!!!!!!!
2020 and this tutorial still ROCK’S!!!! This is going all over my house as I have 12 AND 30 foot windows in my house and curtains will be heavy!!! Your tutorial is clean, to the point and very well illustrated. Even updates are awesome! Thank you for saving my meagre savings and helping me replace the ” 1980’s ” barf colored curtains in my new old house!!! LOVE
Hi, has the spray paint worn off from the curtians being slid across the spray painted conduit?
How have these rods held up after time.
Did the paint scratch off the rod from sliding the curtain open and close?
Thanks for posting
Smart smart smart!! I’ve been using pvc but this is a far better option! Thanks for the idea! (My husband would kill me for spray painting in the garage though!! Lol!)
Brilliant! It’s the perfect accessory for your awesome curtains!
Sweet!
All our rods at the lake are made from conduit. Easy, inexpensive and sturdy.
Hang on to that tubing cutter, you never know when a plumbing issue will call out your name.
Drapes are beautiful and just the right splash of color!!
Great post, Allison! Seriously amazing…
That is fantastic Allison! Love!! If we ever put curtains over our large windows in the living room, I’m totally doing this. Even considering just for the bedroom windows, just because it’s so awesome 🙂
Your dining room curtains look fantastic! Thanks for sharing how you did it so inexpensively!
Great job! I love the faux pinch pleat. I missed that on TDC so I’m glad you shared it too.
to quote Jurassic Park, “…clever girl…” girl, you clever like a velociraptor!!!
Thanks for the tip on the electrical conduit! The rod looks great, especially with those glass orbs on the ends.
I’ve also rigged multiple rods together to cover a really long window before. Our first apartment had lots of small windows so we had lots of the small curtain rods. I took the ends off and pieced a few of them together to cover large windows at our next place. Just another option, but your version looks much more professional!
Great, great ideas…you never cease to amaze me! I think that’s why you have such dedicated followers because we know you are going to produce some seriously great stuff! Love it…I’m saving this one on my Pinterest for later when I need another rod! I may save a fortune!! We’re all smack our heads thinking “why didn’t I think of that?”
Becky B.
http://www.organizingmadefun.com
Organizing Made Fun
Ahhhhh! Love it! So bookmarking this page so I can copy every move. I’m headed to an ikea soon (live very far away, so it’s about once a year trip) so this was perfect timing. Thank you soooooo much!
LOVE the orange, and I know how expensive rods can be too… yikes! I ought to go get some conduit piping, that is a fantastic idea.
Also, your beautiful faux-pinch pleats are actually called ripple folds! So you can tell people you have ripple-fold draperies in your dining room and they will be uber impressed.
Thanks a bunch for sharing this. I have been wanting to curtain our laundry area (really just a cubby in the hall) and did not want to worry about bowing on the center of the rod. I will be trying this.
OMG. I love you Allison. You are so brilliant! I will hopefully be heading to Home Depot tomorrow and obtaining the necessary items for some curtain rods!! And IKEA, here I come. Thank GOD we have on here. I would be jealous.
Em
Awesome blog! Visit you via Creating success around the world!
You are an absolute genius!! And so kind to give us all your secrets!! Thank you!!!!!!!
This is utter brilliance!!! Love, love, LOVE this idea! Thanks for being such a genius. 🙂
Awesome. Because I need a 144″ rod – you can find them at Home Depot, but not for cheap. Thanks for sharing your brilliance!
GREAT TIP! I wish I knew this about 5 years ago!! I will definitely remember it next time I’m hanging curtains!!
What a great idea! I love it!
I tried to comment a few days ago to say THANK YOU for featuring my wreath on your post…but it wouldn’t let me. Grrr! So here I am today: THANK YOU!! And thank you for letting me know too – that was really thoughtful.
Sarahxx
What a great project. Thanks so much. Love it. Had to pin it on Pinterest!!!
A-freaking-mazing! <3 it. The curtains look fantastic. Im loving the color, the contrast in the room & the rod is awesome. Great choice. Very inventive!
You never stop amazing us lol.
Maybe now I'll tackle that window in the door in my laundry room that leads to the backyard!
Smart, smart, smart!!! I love the faux pinch pleat! I have never seen that before and your lined curtains are awesome!
LOVE! i have sliding glass doors that i wanted to over and now i can !!!!!!!!!!
Definitely marking this for future reference! They turned out so great. I never thought to think so far outside of the box when it came to curtain rods.
Pinterest here I come (again). Consider yourself pinned, again, Allison!! Does this mean we’re going steady? Thank you for saving me beaucoup bucks AGAIN!! I am over-the-top excited!! You are the bomb!! Do kids still say that? My nieces used to tell me that (along with, “Aunt Judie, your roots are sparkly. Time to dye your hair.”).
THANK YOU!! THANK YOU!! THANK YOU!!
I adore your new curtains! I’m lovin’ orange lately too. They really make your dining room. I’m planning to use this hardware idea when I make some outdoor curtains for under a client’s deck. You’re right – it’s a very inexpensive option. You might be interested in taking a look at an inexpensive solution that I’ve used multiple times when your rod won’t be showing. Here’s the link: http://worthingcourt.blogspot.com/2011/06/decorating-my-mbr-part-ii-treats-are-up.html Scroll down to see my very inexpensive curtain rod.
Okay, so I just found your blog/(subscribed, of COURSE). Just have to say how much I LOVE all you SMART people!!! I’m going home and changing my curtain rings to the back today…..
Wow! You may have changed my life with this idea! We have many large windows in our house and I have been dying to put up curtains, but the thought of spending so much on curtains and finding long enough rods has given me such a headache! I can’t wait to try this out!
I needed this tutorial about 6 months ago!!! I had to drop $50+ on a loooooong curtain rod that I’m not even all that in love with! I WILL be doing this!!!
GENIUS!! I am crazy about this idea! Electrical conduit – who woulda thunk it! I am SO using this idea!!
I’m so glad to “meet” you Allison!!! This curtain rod idea is genius and super creative and thrifty. I LOVE it!
Aimee @ ItsOverflowing
Amazing! What a great idea! I’m so doing this. Love your blog.
You never cease to amaze me – I’m officially impressed with that dining room – get on the chairs!!!
Ok so someone already called you a genius so I guess I will go with… You are a level 50 wizard ! at decor and neat thrifty ideas . I love going to home Depot with the Mr and looking for ideas.
Ill have to remember this curtain rod idea ! For Sure
-KAT –
The only thing I like more than having really nice things is having really nice things that don’t cost a lot of money. I want a high-end look at a budget price. No wonder I love those curtains so much! No wonder I love your blog! (You’re so clever, Allison. You get the thrill of having a designer dining room, along with the satisfaction of knowing that you did it all yourself using your creativity and skills.)
SOOO awesome!!! love the rod, love the fake pinch pleats and love the curtains!! great job! thanks for the inspiration!
Wow! The rod turned out wonderful! One would never know that it was from the electrical isle at the hardware store! You are so crafty. I will deff. have to remember this trick! Thanks for sharing! 🙂
Stephanie @ Ladywiththeredrocker.wordpress.com
b-e-a-u-t-i-f-u-l.
bravo, alison. this is such a generous post full of so much instruction and new stuff for me!
just lovely.
michele
You are amazing!! I have a couple big windows that yes, were very expensive to buy rods for – and your’s are so much cuter! Your curtains are fabulous, by the way! Your room is just amazing, I’ve loved seeing the transformation.
Ok, first response was…”love you for this! flippin’ brilliant”! Second response was…”hate you for not telling me this years ago!!” lol! j/k Pinned this!
Jamie
You are amazing! There are so many great ideas in this post. I never would have thought to spray paint conduit. I had no idea Ikea sold ring clips. And the faux pinch pleating is genius…especially if you ever get sick of the pinch pleats you can hang them normally!
These look AWESOME!! Just wondering how much weight the Ikea clipy thingos hold? Would you just use more clips if you had a heavier fabric? THANK YOU for such a brilliant tutorial 🙂
Allison, I just discovered your blog. What a great tutorial!! I will definitely have to try this!! I see that you are in Texas, as well. I am a newbie to blogging and your newest follower. I hope that you will follow me, too! Many blessings to you!!!
Isn’t it funny the things we’ll do either to save a few bucks, or to create blog content! Your DIY curtain rods look super, and your instructions were very clear. And the curtains themselves are so cute! I can understand how you could just stand there gaping in awe. 🙂
love love love this post…my husband has talked me into redoing the kitchen and dining room area and I’m trying to figure out how to do it in a way that we can #1 afford it and #2 not make it look like a DIY project gone wrong
and these curtain tips will certainly help.
liZ
(simplesimonandco)
What an awesome idea for inexpensive curtain rods! I love how those curtains look against the gray wall color. I love that spray paint as well. We used it on our front door last year which gets hammered by the Texas sun for at least 4 hours a day. It has held up wonderfully!
~JamieS
What a fantastic solution to a usually expensive problem! Your tutorial is wonderfully easy to follow and filled with great insight. Thanks for sharing it! I’m a new follower from The Bonnie Burrow.
That is genius! I never would have thought to use those materials – and it looks incredible!
I love the curtain rod! What a great dyi option!
Wish I would’ve thought about using that conduit when I did mine this past year! I have a 12 ft bank of windows that I was covering and it IS expensive! I ended up using a wooden stair handrail…covered with metallic bronze spray paint and no one can tell the difference! Except my check book, that is!
Thanks for sharing another great post…I’ll be using this for my guest room!
Thank you! Thank you! We live in the country so no need to pull curtains closed. However, because I needed two 10 ft curtain rods and refused to pay the expensive price, my front windows have gone without curtains for 4 yrs now. Now I can do it!! Yay!
Isn’t conduit the best? Thank you for reminding me about it! I used it a couple of years ago to build vertical climbing thingamajigies for my garden (still use them)…but might not have thought to use them for my next attempt at curtains. (The first curtains I chose were a bust…too bad). I remember reading somewhere about using conduit for bay window curtains too…just bend the conduit to match your windows! I’ll be giving this a try, hopefully soon!
Great job finding long curtain rods that won’t break the bank. They look great. Love the finals.
Beautiful!! Loved it
Hugs
SueAnn
Thank you for this idea!!!! The previous homeowner of our house left all the curtain rods and clips, but I’m not a huge fan of just clipping the curtains up. Now I’m so excited to make some curtains and hang them!!! Thanks! (And thank you for the curtain tutorial!!!!!!!)
This is a great idea and tutorial. I also love your curtains. I have been trying to decide on making curtains for my dining room and did not want to spend a fortune on them or the rod. You have definitely inspired me to get started on my project.
That is totally awesome! Love it. What a great idea (all the way through)
I Love this! I am so going to do this next time I need a curtain rod! Also, most home improvement stores will cut an item down for you if you ask…so if you go in knowing exactly how long you want it you wouldn’t even need to buy a pipe cutter!
Thanks for yet another inspiring DIY tip!
You are my hero:) I wonder if thy have 12ft condiut?! Will have to check it out. Thanks for the instuctions.
Thank you for sharing this. I have been trying to figure out an economical way to get curtain rods for our kitchen. We have four windows and I just can’t afford that many curtain rods if I want nice ones. This looks perfect! 🙂
My electrician husband suggested conduit when we needed a quick curtain rod fix, and I agreed thinking it would be a cheap temporary solution. Well a year later it’s still up and holding strong. Best of all, no one knows the difference! Great post – it’s definitely the way to go for long curtain rods.
thank the good lord of DIY! if every how-to post were as clearly thought through, photographed, and genuinely helpful as yours are, i’d be out of an all-afternoon internet hunting hobby and probably busy making things.
thanks!
John, wow, that was a really nice comment! I’m so glad to hear when people appreciate the time I put into tutorials. Have fun making a curtain rod instead of googling all afternoon!
Yay!! I’m so glad to know that someone else is using conduit for curtain rods. I started using it last year in my craft room. I, too, needed a 10′ rod. I then preceeded to change all the rods in the house…it was just too easy and inexpensive. I used my jigsaw, and a “metal” blade to cut to length. I did have one cut, at the store (Home Depot). They have various “cutting” stations, located throughout the store. The man looked at me like I was crazy when I told him I was making a curtain rod!
Easy explanation for such an interesting idea. i really like it!
Nice job. I bought some heavy galvanized pipe from Home Depot to use on an outdoor staircase to hold a handrail. Home Depot cut the 10ft length into 3 bits for me. I was not looking forward to doing that part myself. But, really just an FYI, they will cut pretty much anything for you. Just make sure you measure well before you go!
Thanks so much for this post!! With all the DIY ideas I have I never would have thought to use electrical conduit!! I probably would have tried a broom stick or something… lol. Cheap curtains, here I come!
As always, Allison, a great post with a great tutorial – and it’s just what I was looking for!
This is amazing! I have a window 127″ long sandwiched between two bookshelves so ending with finials is not an option as the curtains must go the edge completely. Any ideas on how to end the conduit without a finial? Your curtains are gorgeous!
I would just cut your conduit the exact width between the shelves so when you hang it the ends touch the shelving. When you hang your curtains, just have the curtains go all the way to the end of the curtain rod so they are touching the shelving. Kind of like how you would hang a tension curtain rod.
Yes! Of course, I actually did think of that after awhile, but I do love your finials. Then today I found a new fabric outlet close by where I might just find some great material for $2-$4 a yard! Keeping my fingers crossed. 🙂
This is genius! Thanks for posting, and your dining room curtains turned out just lovely.
Thank you! I have been mulling over the same dilemma for quite a while & was almost ready to throw in the towel & just have rotten curtains! But this blog post let the sun shine in on my mind & opened the **duh!!** obvious & easy solution!
I have just enough time before Christmas comes to update & beautify my draperies! Thank you for showing me how!!
Margaret
just finished sewing my curtains..double rod..largest window 110″ wide :-0…….needed this fabulous info like AIR!!!!!……
KISS MY GRITS!!!! :-*…follower as of today!!!
cause girls like us get down to BID-NESS…..
;-$
Great great idea about the electrical conduit. I have a 10 ft rod in my kitchen that is the expandable kind and I hate it. I’m going to Home Depot today! Plus, lovely tip about the faux pinch pleats. I’m sewing new curtains for the kitchen and will totally use that idea on them. Thanks a bunch!
This is such a fantastic idea! We move a lot for the military and never have the same sized windows, wherever we go, so buying rods after each move gets expensive QUICK! I’ll have to do this for our next move. 😀
My husband brought up a good point about this, though: The metal for conduit is galvanized and was thinking the paint might not stick to it for long, so I went to the Rustoleum website and this is what their FAQ had to say:
Q Can aerosol paints be applied to galvanized metal?
A Yes, if Aluminum Primer is used as a base coat and allowed to dry for 24 hours before applying aerosols. Most all of our spray paints are oil-based enamels. If applied directly to galvanized metal without the primer, the oil in the paint will react.
Have you had any issues with the paint reacting or not sticking to the metal?
Thanks for the awesome post!
This is my question too. I love this idea b/c it would give you sturdier rods for less, but will opening and closing the curtains constantly scrape the paint off?
Sorry Brenda, I replied to the above comment by email and forgot to include my reply here as well.
If you use the right kind of primer on the conduit the paint will stick and won’t flake. If you don’t prime first than yes, the paint will flake. Mine did until I primed it.
Awsome idea. I made curtians from black velvet and lined with black-out so very heavy. Conduit pipe is ideal to carry the weight, plus no break in an extension bar. Love it!
Has anyone ever seen the helitg finials online or in the IKEA store. I cannot find them on the website by searching the name or the item number. I live about 40 minutes away from the nearest IKEA and would hate to waste the trip. This post wasn’t written that long ago so its hard to imagine that they have already discontinued them.
you are a genius,and this is the best post ever (well, for right at this moment, because I am going to redo my living room and am looking for curtains. I have a ridiculous gold (what was I thinking) rod that I bought at JC Penney for about $80, and it is sooo ugly, and it is expandable, and awful! I am going to make a fancy new conduit rod, and I cannot wait! THANK YOU so much for this post! you rock!!! 🙂
Allison, you are genius! LOVE this tutorial…just pinned it.
Such a great job with the curtain tutorial – very clean, thorough & well done! Thank you for sharing!!
Awesome Curtians!!!!!! Just another helpful tip for you on the rod. I work with conduit quite often. So here is a tip for you. If your material is light you can get away with emt. This type is generally cheaper, but if you have a heavier material you might want to use rigid conduit. It usually a little heavier so pay attention to your anchor points. Thanks for the idea and I look forward to your next project.
Awesome way to save…I”ve been eyeing some target ones for $35 each, so this would be much better, I will have to start looking for finals where I live…no Ikea 🙁
I must have these curtains! Where did you get them or get the fabric to make them?
Do you reckon that these could be easily bent to make a curved shower curtain. I have an awkwardly shaped corned tub in my bathroom right now that has no shower curtain. I am dying to hang one but I cannot find a shower curtain rod that is long enough or that I can afford.
OMG!!! How wonderfully brilliant. I have been looking and looking at curtain rods for my dtrs room and was just aghast at the cost and was just wondering… Here you are… Just BRILLIANT!
What did I ever do before pinterest brought me to you!!! Thanks
Genius…really!!! I have 2 sets of picture windows (each window is almost 9 feet) that I have wanted to put curtains on but have been procrastinating because of the cost! Not anymore!! 🙂 Thanks for sharing your wonderful finds!
Oh my goodness, I just found this post via Pinterest and I think you may have just solved my problem with the long curtain rod I need for the sliding glass doors in my dining room!
I really like this simple idea…mostly the part about creating a pinch pleat look. Thanks for the detailed tutorial!
Great idea. How’s the paint looking now that you’ve used the rod awhile? Is it chipping off where the rings slide?
Oh my gosh! What a great idea and wish I would have seen it before I moved into my curtain house. I am definitely filing this away.
I love your how to. I’ve purchased my conduit and scrounged up finials and rod hangers I have laying around. But I have one question, have you had any trouble with the paint flaking off of your curtain rod? Should I prime it first? What about a sealer coat?
Thank you SO much for sharing this!!
I need a 14′ long drapery rod and this is the perfect solution!! I also love your faux pinch pleats. My grandmother made lined curtains for my son’s room that were hung with rings, but it’s ugly (luckily it’s hidden behind a valence) but I think I’ll re-clip them using your pinch pleat method and hopefully they’ll look a little nicer. Thanks again for the inspiration and very detailed tutorial! 🙂
Thanks for the great tips. I just helped a friend hang beautiful rods and draperies only to ruin the effect by using the clips. They are hung at the top and are unsightly. I will be going right back over there to hang them like a pinch pleat. I am always amazed by the brilliance of my pinterest friends.
Thank you! Thank you! I have a large (around 108″) window in my bedroom and when we first moved in I looked for curtain rods and they were like $80 and above. I ended up buying the cheapest white curved aluminum one and I have hated it with a passion. Now I can make one! I am amazed at what you have done with this it’s the best. I can’t wait to get it.
Okay. This is nice and all, but I don’t think you value your time very much as I could go spend 20 bucks and get a really nice curtain rod in 15 minutes or spend a few hours or so doing this. I mean, I would much rather spend the extra 8 bucks and save a lot of time, but I guess if you have a lot of time to waste then this would be the way to go.
If you’re not ready to spend the money on the tubing cutter and are only making 1 cut, the hardware store will usually make the first cut free.
LOVE this! Made my own set and saved a buck- thanks so much! Linked back to you, of course 🙂
http://lollyjaneboutique.blogspot.com/2012/02/diy-curtain-rod-with-clay-finials.html
Thanks for the inspiration, Allison!
XOXO
I could just sit down and cry from joy. You just saved me a whack of money. Thank for an awesome idea and tutorial!
Thank you so much for posting this! I’m so glad I found this post because I’m getting ready to put up curtains over 4 windows in my living room. I’m getting the curtains for free (gotta love hand-me-downs!) but was dreading having go to Walmart and buy those ugly, plain white curtain rods. Now I can make my own for so much cheaper!! Thanks a million!!
Hello,
Really appreciate the how-to on making rods, great ideas and simple to understand. However, my window requires a rod that is about 156″ long. Any ideas on how to join two pieces of conduit that will look okay? Or do you have another idea? Thanks.
This is a great post. Only wish I would have stumble upon this a few years ago. I too had a wall with a huge window and couldnt fine a nice decorative rod for it, so I had to opt for the ugly white ones (with the extension too) that curve at the ends, then made my own curtains to cover the rod. So so glad I found this and now I will make sure to save it for the future. Thanks.
Good God girl, that is just brilliant and gorgeous, too!!! I’m so doing this for EVERY stinking room in the house!! I hate spending money on those dang rods! You’re just too clever! And the ‘faux’ pinch pleats have also inspired me…so doing it. 🙂
Thanks so much!!
Thank you SO much for putting in lots & lots of steps….now I truly know how you did it…I luv it!!! We have bay windows so need a curved pipe, but I’m going to assume the conduit could be bent??? Anyway, I really luv what you have done, it looks totally professional…WTG!
Amazing, i shared with everyone i know……
I’m looking for a rod that is 130 inches long and finally decided I would have to DIY one but I wasn’t sure how to do it. Problem solved! Thank you for saving me a ton of money!
I would like to hang curtains on the walls of my garage to cover all the man nonsense. We are having a party and have a pretty small house, so the garage is a great option for space. What type of fabric can you recommend for affordable floor to ceiling draping? I am going to make the rods myself thanks to you! The party is in a month, so any help you could give would be awesome!
Thanks!
I could not find the ikea finials. Maybe they are in the stores but not on their website?
I have been looking for a 113 inch curtain rod as well for my new apartment and cannot find a thing. I am sooooo grateful for your post. Thank you VERY much!
Hi! Thanks for the awesome post – I went to Home Depot and got the conduit etc.
Has the paint peeled on your rod at all? The guy in the spray paint department told me to first wash the conduit with vinegar (he said there is stuff on the conduit that makes paint not stick and it comes off with vinegar) – then spray prime them (I forgot about the auto primer and just bought Rustoleum spray primer). He said to give it two coats of black and then spray a mat finish polyeurothane on top! So…if your rod has not peeled, I might skip the second coat and the polyeurothane! I think it would be easier to just give the rod a little flat black spray here and there (with curtains off, of course:) than to mess around with polyeurothane – yuck!). Please let me know your thoughts now that you’ve had the curtain rod for awhile. I’m making rods for my entire house – bought 11 pieces of 10 ft. conduit and have A LOT of cutting to do….so anything that will make the project easier will be great. Thanks again for the info!!! And thanks in advance for your update on how the paint is wearing and if you think it’s better or not to do two coats of black — and mat polyeurothane:)
THANK YOU!!! As a military family we are ALWAYS in need of curtain rods. These are durable and cheap! THANKS!
Thank you so much for this idea! You saved us gobs of money! I am very glad I came across your site. Definitely a favorite!
Allison. I’ve been sewing for many years and love the faux pinch pleat drapes. It’s amazing the versatility of common everyday hardware and parts. Love your creative and economical twist. Keep thinking and creating!
Thanks for the creative tip…i almost gave up on the plinch pleat…great job on the curtains,they look great:)
You are certainly a Jill of all Trades! Great work! You can also make curtain panels, lined by cutting the lining 2 inches narrower than the fabric. Sew the fabric and lining together and you automatically have a lined curtain, when you turn it right side out. Now that I’ve thoroughly confused you and me, I’ll say good night!
You are unbelievable! How beautiful! I have a HUGE front window and you are right, the rod alone is very costly. I am going to make these!!! Your tutorial, by the way is probably the best and most detailed I have ever seen. Thanks for sharing!
Love your blog and loved this post. I just moved into a new house and am definitely using your rod DIY post! Love your Thomas Paul Fabric! I own a shop and just might start making some of those.
Thanks!
Liz:)
Oh my gosh you this tutorial is awesome!! Curtain rods are so expensive today and you don’t always find the right one in the right size, so this is perfect!
Do you mind if I feature you and this tutorial on my my blog?
Is there a reason why you put the curtain rod higher up and not even with the top moulding ? Looks great regardless … was wondering if it was because of the length of your curtains you decided to hang your rod , thanks!
Anytime I hang a curtain I always use the “high and wide” method. It makes your window look much bigger and wider than it really is so it’s a great trick for smaller windows.
We lost our home in the Bastrop Texas Wildfires last September. I am soooo glad I found your blog!! I am having to replace EVERYTHING and it’s so expensive!! Thank you so much for sharing your wonderful ideals with us!! YOU ROCK!!
nice !! lot of ppl wonder how to get around high curtain accessory prices and this is great diy advice to save $$$. Thanks.
Swarna @ lushlivings.com
Came over from Organizing Made Fun…Thanks for sharing this great tip! It has motivated me to put up curtains in the nursery {we just recently relocated and are leasing}. I even have the Ikea curtain clips (and curtains and tie backs) and can’t wait to hang them using the pinch pleat trick!
LOVE the tutorial for the pinch pleats! I can already think of a few rooms in my house where I want to try this. thanks!
Thank you so much for this great tutorial. I was trying to find a low cost option and your blog was the first one I found and now I don’t need to look anywhere else. I am following you on Pinterest now as well!
Girl! You are the bomb! Getting super long, affordable and sturdy curtain rods is a challenge. This will be an upcoming DIY in my new house! THANKS!
OMG!! You are a money saving genius! I <3 you!!
ive begun to visit this blog once or twice now and i also need to declare that i find it quite exeptional actually. continue! :p
I just have to tell you how much I appreciate the work that you did to come up with these curtain rods!!! I know cuz I did it myself. My hubby and I got some copper conduit / pipe. We used this our breeze way. However I was trying to find some rods and ends for our bedroom and living room. We could never agree. If the rod was long enough we couldn’t afford it! Now after 6 yrs!!! Yes 6 years!!!, I am going to have a way to hang my beautiful curtains! Thank you for posting!
I’m going to use this idea soon to build curtains of my own, but I would really like to know where you got your fabric and how you sewed it; or where you bought the curtains themselves! They look great and I’m really wanting to sew my own curtains… where can I get fabric cheap and how do I sew it is what I really need help with!
I wish I would have found this earlier. I have a whole house full of 10’+ windows and have had to deal with the Alaska 24 hour sunlight… Now we are moving to normal daylight but I will definitely use this technique in my new house. Thank you!!
Brilliant!
I’m a huge fan of using non-traditional items in a different way especially when it saves money and this turned out great! I may never waste money on expensive curtain rods again!!
Thanks so much for posting!! You’re going to save me hundreds of dollars, we need 30 ft curtain rod, and will now go to Home Depot or Lowes, and buy three 10 ft conduit-thingies, and my husband told me that they make conduit fittings so that we can fit it all together, spray paint it and our massively, hugely expensive window covering problem is solved. MUAH!!!!!
Just came across your blog today. Thanks for sharing with such great detail how you did your drapes. The photos really help.
I love the end result.
Great!!!!! Loving it! and I have most of the things I need in the garage totally cool tutorial.
I love this. My daughter’s room window is only about an inch from the corner of her room, so as I’m trying to figure out what color blackout curtains I should get for them both (pink and purple rooms)..I realized I won’t be able to get a traditional curtain rod in that spot with a finial. If I make my own like this – I can leave off the one end finial and get exactly the looks I want. Thank you!
Thank you so much. I spent the whole day yesterday looking for pleaters tape to make my own pinch pleats, and getting frustrated at the prices of rods, etc. I already bought my fabric, so with your shortcut, the fake pleats should leave me enough left over to a whole other set odf windows. You are done with your project, I know, but for people like myself doing it now, JCPenney has a pack of 14 Linden street clip rings for $5. They are right across the street from Home Depot here. Yay! Thanks again for the tutorial!
Thanks for this idea! I ended up using Anthropologie knobs as my finials,– I splurged because I saved quite a bit of money on the hardware, due to your great ideas and suggestions. I also used sheer drapes from Target as my liners. They were the thinness I needed and measured 60×84.. Only $5 also.. If you use your Target card $4.75. I ended up not liking the fake pinch pleat so much. Yours looked much better than mine. I decided to just do the triple pleat on each panel. Since it is my formal dining room and I am an avid sewer, it looked more professional than my attempt at the pinch pleats. Thank you for posting your great ideas here. I will have you to thank for my lovely dining room!
Hi,
Can I ask you how you used knobs instead of the end cap style finials? I’m having a hard time finding the end cap style of finial. Thanks!
I loved this idea! I am making a pipe curtain rod for our bedroom, so the conduit idea was really helpful! The guy at Home Depot said I would have to strip all of the fixtures of the galvanized coating in order for the spray paint to adhere well to the plumbing fixtures and the conduit. Did you do this? Is your paint stripping with time?
Thanks!!
Aimee
Love this idea. I also have really wide windows and I was able to find rods with extenders on sale very cheap but they arent my favorite.
Thank you!!!! I have been looking for ‘mini’ curtain rods (about
1 1/2 foot lengths ~ 4 of them) and I just can’t find them. I live in South Texas and I sure wish we had an Ikea…..you’re so lucky to have one near you! Anyway if I find them on-line I’m sure they’d cost a small fortune anyway. Since I saw your article I’ll get all 4 very very cheap! Thank you for saving me money 🙂 I thank God for people like you who share your talents with others.
Thank you for all the fabulous ideas you share, you are amazing!
You are a life (and penny) saver!!! I am building a home currently and of course cannot stop mentally decorating the entire place. I have a couple of long stretches of windows and I was preparing myself for the huge cost of new curtain rods, not any more!!!!
I also LOVE and have been looking for that chandelier you have in your dining room pic. where did you get it and (if you dont mind my asking) how much did you pay? Please email me your response
Thanks for the terrific post!
ohmygoodness! I found this tutorial through Pinterest and I literally almost died from excitement as I read it. This is the most perfect idea I have ever seen. You may be a genius. Nope, it’s official, you are. And my hero. Sorry, I gush when I find amazing DIY-ness. AMAZING! $8!!
I am in the process of making this rod now, just waiting for the paint to dry. All together it cost me about $23 since I had to buy it all. This is still cheaper than a store bought rod for my large window. I had to change it up a little since I couldn’t find end cap finials sold separately and didn’t want to wait by ordering them online (I saw a few on eBay). Buying the brackets separately was too expensive so I got a cheap rod (with hardware included) & with finials that I liked for $16.97! The conduit was $2.05 and the paint was $3.67. I plan to stick the thinner rod with the finial attached directly into the conduit and glue the other finial in place (it almost fits, just needs a little help). Thanks for a great idea!!!
I am beyond excited I stumbled upon your blog. I have a huge window in my living and hate the room that was provided when I rented my apartment. I is for pinch pleated curtains/draperies and they alone are expensive.
Off to Lowe’s I will be going this week and already have a road trip planned with my daughter to IKEA…can’t wait to make my curtains and put this tutorial to great use.
Awesome!!
I’ve been trying to figure out how to replace my draw string curtains. Now I just have to figure out how to replace the draw string rod on my curtains for my back sliding door. It’s a long expanse but if I put a bracket in the middle I won’t be able to open the curtains all the way to one side. I don’t want the curtains to hang in front of the door handle. I’m working on a solution. If you have any suggestions I would love to hear them.
Hey I was wondering what fabric you used for those curtains! I love it, I was hoping to see if I could find it online for my new guest bedroom.
You are my kind of person. I am doing stuff like this all the time. I am in the process of making some drapery panels for my kid’s rooms. We looked at Ikea panels but they weren’t white enough so I bought some VERY cheap fabric and will make my own. But, how to deal with the header of the panel. Rod Pocket? No. Grommet top? Too expensive for grommets. And, I wasn’t even sure about a curtain rod… I found this posting. Never heard of you. First, you are a genius! Second, I have read a lot of do-it-yourself books and I have never seen instructions as clear and precise as yours. Thank you thank you thank you! I am going to make mine EXACTLY like yours. I am going to share this web link with all my ‘do-it-yourselfer’ friends. Let’s just hope Home Depot doesn’t find out we are using their Electrical Conduit for drapery rods and raise the price! BTW… LOVE the fabric on your drapery panels in your dining room. Nice choice!
The curtain rings pinched to the back is genius, I was trying to figure out a simple way to get the pleated look without much effort and this is it, thanks!
LOVE this!! Thank you!! Did you make the curtains yourself? I am actually getting ready to make new curtains since we just moved into a new place. I needed this tutorial.
(You forgot to include the cost of your rings in the final cost, so it should be $11 instead of $8).
🙂
Has anyone asked where you got the curtains? I’ve been looking for some just like that…and now with your curtain rod diy I can have the look I’ve been after!
Holy cow! They look amazing. I have two ultra long windows but needed a long alternative rod. Love your idea!
Thanks so much for posting this DIY project!! I have a sunroom that still had the yellowing honeycomb blinds of the previous owner. As soon as I saw this post, I got down to Home Depot and bought the conduit. And, as I had no brackets laying around, and I needed like a dozen of them, I made my own with conduit strap, L brackets and screws with the hex things to hold them together!! I painted everything black and finally got the curtains up last weekend. I can’t tell you how great they look!!! Now all I need to do is put the finial things on the ends, but I’m in no hurry because now we love our sunroom again and those ugly blinds are gone!! Thank you, seriously!!!
I know this is an older post of yours, but I just found it! I have a new home and about 8 billion windows to jazz-up. I am totally going to try the conduit idea, as curtain rods are out of the question expense wise! Thank you sooooo much!
i love,love ,love your idea…and i am determined to make it this summer. I have a bay window that needs curtains too..any suggestions?
You just saved my life. We’ve been in our house for a year and have a sad looking expandable curtain rod over our 113″ window. My husband just bent it to pieces on accident, and I’m headed into town in a couple days. I’m definitely picking up some conduit. Thank you!
Lots of steps is a good thing. You also added pix with each step…also good. As a former teacher … knowing how to do something and teaching someone to do it … 2 different things. I also like that you explained your other thoughts and/or options. Ex. black electrical tape is what you used … but only for the color … so knowing why you chose that allows us other options as well. I felt like you were in the room showing me in person. I’m new to your site…but will be following you. Keep up the detailed tutorials…:)
You have come through for us once again with an alternative to costlier options. You are just a genius at this. You should have your own show on the DIY network.
THANKS! I have been brainstorming ideas for a patio door for some time now…plumbing pipe was my thought so I’m so glad to hear that you found something better and cheaper. Now I can have curtains that are as wide as I want and don’t sag in the middle!
A+! Great tip!! These ideas are especially awesome if you want to put up some quick window treatments in advance of a home sale. “Sure, we’ll leave the drapes and hardware!!” Years ago I was searching high and low for some 2-3″ diameter silver curtain rods. On a trip to the Depot we had a eureka moment in the chain link fencing aisle! The “rod” shaped fence parts (used for joints and corners I think!) were perfect for my drapery project! I don’t recall the price now and it was quite a bit beefier look than the delicate rods you created with the conduit. I painted some wooden finials with hammered effect silver spray paint, a bit o hot glue to affix and yay!! Crazy what you can find when you aren’t even looking!!
Hey Chica! I made these same curtain rods! Like the same finials and the same curtain clips! Too funny!
Your tute is rockin by the way!
xo Beca
This is right on time! The ugly cheap curtain rods I was forced to buy because of lack of funds are going BACK to the store. Great idea!
LOVE this idea!
This is fantastic! Thank you sooo much for this step-by-step guide. It looks so easy to follow that I’m sharing it with all my friends.
Hi,
Another great tutorial! I like the clear and concise step-by-step instructions. I also like that you tell us why you like/don’t like a particular product.
It’s hard for some people to get right down to the basics when giving instructions. I think it’s because we have been doing a certain something for so long that we forget that some of the things we do without thinking we actually had to learn.
Keep up the great work!
Cathy
ohhhhhhhhhhh myyyyyyyyyyyyy…..u r a genious..I simply loved ur curtain and ur rod tutorial..thank you soo much…wat creativity…
SUPER cool and SUPER economical idea! Thanks for the input. I’ll be definitely checking out more of you’re blog!
I made this and it turned out great!! I couldn’t find any finials I liked for a good price that weren’t the screw in type and each piece of the hardware was sold separately at Lowe’s. It would have been $15 just for the 3 hooks!! I bought a small curtain rod with finials I liked (with the hardware included) for $16.95 and just stuck the small side of the telescoping rod in the end of the conduit. Since nobody is going to touch the rod they will never know it’s just sitting in there. This also works out nice when it’s time to wash the curtains, I just pull out the finial & rod & slide off the curtains. My husband hot glued a nut inside the conduit to screw in the other finial! Final cost was about $20, still way cheaper that buying a rod for 96″ window. Thanks so much for a great idea!!
FYI- I got my conduit cut for free at Home Depot in the plumbing section. Didn’t even have to ask- they offered.
OH MY! For a teacher on a budget this is AWESOME! I cant wait to go to the hardwear store and get this “party started”! Thanks so much!!
You are a genius! Thank you….thank you for this detailed instructions on how to make this curtain rod! BTW, I love your curtains!
thanks for this. I needed a solution for the big window – just like you i hate the seam an adjustable rod makes, so tacky and the sag in the middle, ugh. Sturdy conduit eliminates the need for the center bracket and I love that i spent only $15 bucks on all the stuff for this project – you rock!
Pure genius. Thx so very much for sharing!
Thank you for this awesome DIY!
Question for you: I’d like to use this in my son’s room and we open and close the curtains every day. Do you know if over time the pain would chip or wear off from the rings running on the rod?
Thanks!
Love this! Anyone know where to buy to pinch clips??
Thanks 🙂
I made my own rods also. But made them out of copper tubing when it was a lot cheaper then now. At the time needed extra long rod for living room and the price of one I liked was way to much. while at the lumber yard with hubby ( in plumbing) just standing their waiting for him to get what he needed. I looked at the copper tubing and thought why not a rod. It looked great . Also saved the brackets from other rods and found the ends ( new ones at our local thrift store still in package. They were also copper . Let the rod tarnish at its whim.
When we moved took the rod with us and redid for new living room.
Great tof find things and make what they are not for.
This has just saved me a not-insignificant sum of money. Thank you for this!
Why on earth didn’t I find this before I spent those bucks in Walmart??? Brilliant, many thanks for this. I still have curtains to put up, so this is really going to help.
I love this. I wonder if you could use burned out globe light bulbs for the finials? Take them apart, wash them well and add a sleeve/bottom for attaching to the conduit. I will have to try that. I love to recycle old light bulbs.
Brilliant idea, I’ve been looking for a rod for my living room window that measures 180″. Though I did find a rod that goes up to this length but it costs $120 plus S & H. Totally following your lead and your creativity, but would like to ask if they have conduit pipes 14-15 ft long? And if not how to join them to make it this length? Would save bundles of money and not to mention the satisfaction of doing it all by myself!!! Many thanks for this awesome post and keep rocking and blogging 🙂
they look FANTASTIC!! genius.
but did ya mean to exclude the cost of the tubing cutter? that would bring the Grand Total to a whopping $14
thanks so much for your wonderful idea. I need a rod 107″ and they do get expensive. Started looking in the thrift stores and had no luck. So I too, thought I can make one of these…but what do I use. I was running out of options when I got the idea to google it and your site popped up. Sounds perfect for what I’m trying to do in my dining room. thanks again
You are a lifesaver!! I haven’t done this yet but had purchased “long” rods from JC Penney, but they have a smaller sleeve that fits into a larger one in the center . . . impossible to put the curtains over the transition, rendering this rod solution basically useless. I was think wood dowel, but am going to head over to Home Depot for some conduit!
I was excited to get started on my curtain rod so I went out and purchased the rod and paint last night. The problem I ran into is the brackets. I’m having a hard time finding a large enough size to fit the half inch rod. What i did find at Home Depot and Walmart would only fit a 7/16 rod. I came home and searched the web and was able to find a bracket the correct size, only the cost is $7. per bracket. I can purchase the already finished 10 ft. rods with brackets and orbs at a number of places for $35.-$40. Any suggestions on how I can get the cost of the brackets down. So far, I’ve spent $2. on the rod, $5. on primer and paint and $1. on a set of 4 brackets, which ended up being too small. I was hoping to keep the cost for the entire thing to less than $15. Thanks for your help.
wouldn’t the total be more than 8 dollars if you include the cost of the tools you required to put the rod together? It would be about the same to just buy one at Big Lots wouldn’t it. They have long ones at our nearby store for about 15 dollars.
I love it!
So many consumer products are such rip offs.
The prices are obviously unreasonable.
Repurposing commonly and cheaply available alternatives is the way to go.
It just feels right.
If feels like justice has prevailed.
It feels like rip off artists have been defeated.
This is so cool! If I hadn’t bought curtain rods for all the rooms, I would totally do this! Thanks for the tutorial, I’m off to read more 🙂
Whoa- just found this post. Those rods look so similar to my $$$ rods… I wanted more of the rods I purchased, but they aren’t stocked anymore. So pumped to find your tutorial!
Can’t believe I’m just discovering this now… after I’ve spent a ton of money on curtain rods for the whole house! Lovely tutorial 🙂
Wow these look awesome
Hi love your idea for the pinched curtain! Just an extra idea the brighten up your rod, why not make the glass orbs at the ends into lights? Light bulbs, maybe different colored bulbs to fit with the decor? Just an idea…
THANK YOU for this sweet tutorial! I am absolutely going to do the painted rods. LOVE! I am trying to hang some curtains in a giant garage/workshop and have a question for you: How much weight can those curtain ring clips hold? My curtains are canvas, about 61 inches wide by 8.5 feet long. They feel pretty heavy and I am not sure if the clips are strong enough. Thoughts?
I took so much inspiration from this and for that THANK YOU!! I didnt need as long of a rod as you did so i bought them and the rings from Ikea. the curtains i bought from Target and they are not super stiff and keep falling a little.. :/ Having said that do you have any ideas on how to get the top part of my curtain to stay up? They keep falling over exposing the clip rings… Thanks!!
Maybe clip your fabric closer to the top?
Get drapery hooks and replace the clip portion of your drapery rings. the pin portion goes up which does not allow the curtain to fall off.
PRESTON IS FULL OF SOUR GRAPES! COME ON- WHO DOES NOT HAVE THAT STUFF??? ARE YOU FOR REAL?? I HAVE 45 WINDOWS AND DOORS AND I AM SO HAPPY TO HAVE READ THIS POST. I GUESS I AM IN THE SAME BOAT AS YOU AND YOU COULD CALL ME A HOARDER BECAUSE NOT OLNY DO I HAVE ELECTRICAL TAPE, A PIPE CUTTER, AND SEVERAL CANS (20 OR MORE) SITTING AROUND JUST WAITING FOR THIS SOLUTION TO COME ALONG. THANK YOU FOR THE MOST INFORMATIVE POST. THIS IS GOING TO SAVE ME THOUSANDS QUITE LITERALLY. I THINK WE SHOULD ALL PITCH IN AND MAIL PRESTON A ROLL OF TAPE, PIPE CUTTER, AND A CAN OF FRIGGIN SPRAY PAINT!
Love this idea but have a stumbling block. We have 2-8′ sliders (side by side) which we would like to “dress.” We are hoping to acquire rods long enough so that curtains will clear windows for view (that would require 2 rods of 132″ each pulling curtains for left door all of the way to the left and right door to the right.) Our obstacle is we would have to have (at least 1) bracket to support a rod of this length which would make it impossible to close curtains. Any ideas?
THANK YOU so much for this post! You just saved me hours of driving around town looking for a cheap looooong metal curtain rod! Bravo to you and your ingenuity!!!!
Pure genius! Exactly what I need! : – ) thank you… xX
Oh em gee oh em gee oh em gee. Just took a cleaning break to shop for the cheapest-I-could-find-yet-still-probably-expensive curtain rods for our new rental house windows, including a 1950’s original 104″ beauty. I just thanked you 104 times in my head.
Thanks for the inspiration! Have made my own curtain rod from piping – http://tinyurl.com/8evxor5 . Easy and cheap, great DIY, thanks!
This is awesome. I need a curtain rod for a sliding glass door. I never even thought of conduit. I have used PVC pipe before on smaller window. I also looked at your lined curtain tutorial. I am a seamstress and your tutorial was wonderful. You can also do this for professional looking shower curtains. I have done it in two bathrooms. I used piping for post and put in medal grommets. Problem I have had though is the pipe has rusted some.
This idea of faux pinch pleat just saved me!! If I’m careful about how I pinch and clip the little clips to the back of the fabric it makes the edge stand up. Which was really helpful because my panels are a silky material with little body.
Thank you for the money-saving, sanity saving, time-saving idea!!
Dee
You are welcome. Glad I could help.
I guess it depends on how much time you have on your hands.
I don’t want to spend my day running from store to store to find all the parts I need to complete a project. Thats probably why most people spend $60+ on a crappy chinese made curtain pole, because it has all the parts you need in the box. If we take the cost of the rod, the finials, paint, cutter and other parts (assuming you don’t have them), and add on the cost of gas, then the time it would take to make the curtain, I’m tipping towards the $60+ curtain rod.
I only undertake projects like these under certain circumstances, like for example the lamp that had deteriorated with age. I couldn’t find a replacement that looked anything like the one I had, so I refurbished it. But if I could have walked into a store and bought one just like it, I wouldn’t have bothered.
Thank you and Thrifty Decor Chic for the great and cleaver “fake pinch pleat” idea! I used it this weekend to complete my living room and dining room curtains. My husband made me wrought iron rods our of unfinished steel and fence finials using a neighbors welding machine. We spray pained them black and used store bought brackets.
The style fits my 1928 Spanish Mission home and cost a fraction of what it would have if I went with a designer.
So glad I found you!!
Dee
Dee, I bet your rods look fabulous!!
“clever.” Oops!
Dee
I guess I need to better edit my posts!! “out” of unfinished…
A friend of mine use PVC pipe for a curtain rod too. Not sure of the price, but it’s cheaper than an actual rod, especially if you want it to be a little more substantial. Great tutorial!! 🙂 TFS
You TOTALLY rock. Thank you so much for sharing. I have a beast of a window to curtain and you just saved me HUNDREDS of dollars.
Gooooolden!! Just moved into a house full of blinds and was dreading the cost of replacing 27 window openings with new drapes and new rods. This article will save me a bunch of cash, and for the larger windows the conduit will be better than the extendable rods i had been looking at! Thanks for posting this.
Just wow! Thanks for this, it solves the problems in my living room (3 windows with no curtains) and in our new sunroom (the two clerestories are each six feet wide and aggravating my skin cancer). We already had the conduit, electrical tape, pipe connector, and pipe cutter, so the whole sunroom project just cost me the price of the drapery rings and finials.
I have always hated flimsy curtain rods, so thanks a lot for this!
April
I just stumbled upon this post while searching for a 11 foot curtain rod. I just purchased a 86-120 inch rod at Walmart ($37) hoping it would work . We had a cheap double rod up, until I purchase thermal curtains and it tore it off the wall. Well the walmart rod is not going to work either. It is sagging and the curtains aren’t even on it yet. We are going to make your curtain rod this weekend!! Thank you so much!! I might have to subscribe to your blog, you have such great and practical ideas!
My daughter and I just started learning how to sew together and we are in need of curtains in our family room!! Can’t wait to make these curtains and DIY curtain rod!!! Thanks for the post
Katie, have fun sewing with your daughter. It’s so fun to be able to share a hobby together. xoxo
You saved me some money!
And I get to feel productive/crafty.
Thanks!!
I needed a long rod and just knew someone else out there in webworld would have figured out a better solution than spending $60+ on a cheap rod. This fits the bill for us (especially since we have some of the supplies already). We “upgraded” to a thicker rod – can’t wait to paint it today!
Love your curtains!!
I was looking at pinch pleats for our living room (which has an even biggggger window – 9ft!). Your method is bookmarked so I remember in the future when I find fabric (love your orange – but don’t have the budget right now for it)
Thank you so much for your post on how to make this curtain rod, I can’t begin to thank you enough. I think I am going to rod up my house now!
I love this idea.you nailed it.Nobody can guess that you did it in under $10 !!!
I have a question ,can I follow the same method to make 13 ft long curtain rods ?
you opinion will be highly appreciated.
thanks.
The conduit comes in 10′ sections, so if you do you will need to get a coupler to hook them together. Unless you can find longer conduit…
Just found your site, love love love this idea and I intend to use it even on the shorter rods. I can make it cheaper and nicer just by using your ideas. as for those complaining ignore them, they are linking to inferior rods that really will not last. Your idea will last for a long time. Also with your idea if we change things up and want a different color rod instead of having to purchase a whole new rod we can paint the rod and have an all new rod to match up what we change out into. personally i like projects like this and i am so thankful you were kind enough to share this with us.
I absolutely love this! I wanted something inexpensive but durable and this hits the mark! Thank you so much for sharing your creativity, I can’t wait to put up my new curtains!
I absolutely love this! And if you have enough time, i would love your help. I just rented a house, that is wonderful, except for the wood paneling that is in one wall of the living room. It’s hideous. I originally wanted to cover it with curtain-like fabric, however, it is 15ft in width. Do you have any ideas of where I can get something to support a curtain on a 15ft width? Or do you have any other ideas for me? I’m not too sure if painting is out of the question, as I have yet to ask.
Amazing!!! THANK YOU FOR THIS TUTUORIAL!!!
Thank you, thank you!
I’m scouring my resources to find “the perfect” curtain rod that will stretch across the width of my foyer, and be strong enough to hold up a draft curtain at the front door. Just about to call it quits, and here you are with this great idea. Armed with my tape measure and new-found info, I am literally off to the all-night Home Depot for conduit and some brackets. Thanks!
This is perfect! Now I just need to find finials. Our closest Ikea is over an hour away so I won’t be heading there.
I am going to give this a try. Two rods at Cost Plus or anywhere else that I like, and are somewhat decent, will cost me $50.00 +. I have those curtain rings from IKEA and hated them but I never thought to use them this way. I will definitely be doing that when I get home! =) IKEA doesn’t have those finials anymore. Any ideas on an alternative? Thanks!
THANK YOU SO MUCH FOR YOUR POST!!!
I have lived 10 years in the same house with an oversized window. The curtains and rod are falling apart and I haven’t done anything about it because of the cost. I can afford this!
Thank you, Linda
A few years ago, when faced with 75+ sliding glass doors and very heavy thermal backed curtain panels, along with a very small budget, I bought a copper pipe for a couple of dollars from Home Depot. Along with finials that had come with a dollar store rod long since trashed, it worked perfectly. Recently, we dumped all the sliding closet doors (think 1981) and began replacing all with curtains. Hoping to get the same results, imagine my shock when I saw the price of copper piping at Home Depot. Silly me! Of course the prices were up…..how many stories had I read about people stealing copper piping from model homes? Anyway, I wandered up and down aisles at Home Depot looking for a substitute but never did find anything that wasn’t out of my budget. I completely bypassed the electrical aisles without a second thought. Thank goodness I found your idea! Brilliant! Thank you so much. Now all I have to do is find my measuring tape….again.
P.S. Recently, when my cheap dollar store finials popped out of the copper pipe, after several rounds of hot glue, I found a couple of flat onyx beads (from a broken necklace) and hot glued those onto the pipe. So far, so good…
I love this idea!i have been wanting this style of curtains I my master bedroom forever!! Do you have any ideas or tips for styling a wall with three windows with about 3 inches between them.. Problem is the wall is not symmetrical and the last window is three inches from the corner of the room.. Aka: not much room for finials on the end of a curtain rod. I feel it would look odd.. If you have any ideas, or tips please let me know!! Ice been dealing with this for three years!!!!!
I was wondering how the painted rod stands up to opening and closing of the curtains… I would open and close daily!
Thank you for this! I just moved into a home with alot of windows and I was going to need a lot of curtains and rods. I’m headed to the Habitat Rehab store today to see what items I can find for a very low price. By the way I love your dining room! Great job!
Not sure if you ever found it yourself, but the original post about faux curtain pleats at thriftydecorchick.com was from Nov. 9, 2010. I had gone searching for it to see someone else’s thoughts/details on the trick and figured I’d share once I located it 🙂 http://thriftydecorchick.blogspot.com/2010/11/tricky-tricky-window-treatments.html
Thank you SOOOO much for this tutorial! I will be making curtains for our church sanctuary (after I heard the bid for ‘professional’ ones was $12,000 – I think that money can be put to better use elsewhere!) There are LOTS of sections of windows that are probably about 10 feet in length. I will definitely be using your ideas. 🙂
I did this with the PVC and it did sag but a strategically placed nail fixed that. I used table cloths for the curtains. Love your idea of how to get pinch pleats. I covered the PVC with wrapping pare from world market. It turned out pretty.
Brilliant! Can’t wait to try this!! Thanks so much for posting this!
Thank you so much for posting this “how to”. It’s exactly what I was looking for. Curtain rods are insanely expensive. Your curtain rods look way better than the $100+ versions that I’ve seen and I can’t believe how inexpensive they are to make. Thanks again!
Just stumbled upon this website while looking for how to line curtains.
Very smart, practical lady!
I love how your curtains turned out in the dining room and in your daughter’s room.
I am just starting on making curtains in our new house for my son and daughter. If they turn out half as nice as yours, I will be happy.
Wow awesome, well done.
wow!
YOU ARE AWESOME!
I am a creative person, but for the life of me, I couldn’t find an alternative route to hanging my pleated curtains on anything other than a $100 rod! You saved us so much money, and I can’t wait to show it off!!
I loved your project of the curtain rod. I am having a hard time solving how to hang drapes that require a 138″ rod and finding brackets. Any ideas
Thanks for the great idea and the instructions to go with it. I’ve used wooden dowels, but like you, I’m not crazy about them.
Your rod and curtains turned out great.
make your own curtain rod: wonderful idea/ loved the detailed explanation of “how to”…………..? will spray painting the conduit pipe be patio/outdoor worthy? i would hate to go to the trouble and have issues in a few months. thanks for your opinion. i too, need 12′ span filled, so i will hope to find 12′ or use your dowel idea for 2 shorter pieces.
Love this really useful discussion. You started a good deal here, Thanks.
I need longer, stronger rods. Home Depot’s, etc. max lenghs are 10′. I needed 12’5” with no more than one support. And had committed to Grommet style which come with their own difficulties–at least in my plan. Went to industrial pipe distributor who taught me about aluminum pipe. Much longer lengths available. The aluminun pipe is strong: 1″ diameter, Schedule 40 is a thinner walled pipe which in lengths of 12’+ begins to sag–not something I can use with limited extra support. But the 1″ Schedule 80 is heavier in weight and no sagging. The Schedule 40 (thinner) in 12’5″ is $35, the Schedule 80 is $65, and I have to polish the aluminum. Another $25 delivery. We’re talking Wilmington, Los Angeles, just next to Port of San Pedro. I’ll shop one more pipe distributor, but this may be good option for the heavy sailcloth grommet floor to ceiling drape I’m hanging. Also looking at heavy duty metal closet wall support hardware for a side wall to side wall support system lagged into plaster.
Thank you! I can’t believe i didn’t think of electrical conduit. I have a box of 3 sets of lined drapes that i only paid $13 for. I didn’t want to spend $100+ to put them up.
Love love love this!!! Thank you! Going to the home store now and buy my materials. Yay! I can’t wait.
Just and FYI and not sure if it was already said…if you ask Home Depot an associate will cut the conduit for you for free (a good bet is in either plumbing or possibly closet sections) saving the need to buy a pipe cutter. Be sure however when you go to the store you already know what length you need.
To make it even cheaper, use curtain rings from family dollar and make clearance Christmas ornaments into finials.
Get grip people, it cost Allison $8.00 because she had a few of the things needed, I also have all those items, and need a decent long rod, bravo on coming up with this idea Allison. and your dining room looks amazing.
For all you critical people, come up with your own ideas. whether it’s $8 or $28.00, it’s still a superior rod.
comparable rods I found at this length started at $50.00 for chinese junk.
I love the idea !! Its exactly what i need. I have been looking at rods,.. and they are not cheap !!! I need a 116 “and 144″ long. I don’t know if i’ll get that lucky, but i will be checking it out today ! The reason this is so perfect for me is that i’m looking to hang drapes on my pergola that are 108″ long. I can’t pull them open and closed to stack to one side the way i was planning with a center support in the way. I have plenty of thrift shops around that i’ll look for brackets. Spray paint I have, and primer is always a good idea on any bare surface, which i also have. Yes, it’s ‘a little’ effort if you don’t have all your items. I’m sorry to read about people nick picking the idea. For a 48” window you could pick up something at Marlburn curtains cheap,….and it looks cheap. Adding your own finials and a beefed up rod gives you the quality that i’m looking for. And if i can get a rod long enough, …I’ll be saving big time and i love the bragging rights of how little it’ll cost. and by the way, the long drapes were from IKEA if anyone needs drapes that length.
Love this idea. I may use outdoors on my patio for something substantial. I like the outdoor curtains from West Elm but was trying to figure out how to hang them on a covered porch. I’ve seen ropes, but that idea just looks too flimsy.
Just a little fyi you can rent a pipe cutter from O’Reillys. Then when you return it you get all your money back.
Hi …Loved both your tutorials for making the drapes and the curtain rod.Also the idea for the “fake” pleats. However I did not have good luck with the curtain rod. I purchased same at Home Depot and washed it down first with rubbing alcohol to remove any grease etc. I then primed it with a metal primer. No problem. When I went to put on the finish coat (a grey metallic) it bubbled like crazy but not in all areas. We even tried sanding it with sand paper and reapplying and same thing happend. I noticed in one of your posts you mention using the right primer but I did not see what name of product you used. I would sure appreciate some advice on this. I didnt see any of your other readers have a problem with bubbling paint so I am mystified. Many thanks.
Vinegar was mentioned as a wash for cleaning galvanized pipes in preparation for priming then painting (down quite a few comments from here) – maybe that is the problem as to residue left from manufacture of the pipe itself after the galvanizing process is done to it … Hope that helps. You might have to take down the pipe, strip it with paint stripper – use “a NON-Methylene Chloride” type – those are toxic. (ugh) … One that is better for you is a ‘Citrus-based’ stripper – they have no nasty fumes and is better for everyone! Then strip the pipe, wash with vinegar then redo your paint priming the metal (after lightly sanding it with uber fine sandpaper), then after you have sealed it, then painted with your colors and re-sealed it again to avoid scratching the paint on it, you should be good to go! Enjoy your curtains by the way!
Hello,
I was just wondering if anyone knows how to make a curtain rod longer, I already have exactly what I need and I loved your posting about painting the conduit piping black bc my rod is black but how do I get it to stay in place and do you think that will work?
How wonderul! I am needing some VERY short rods and can’t find any, anywhere. Now, I will make my own!!! Thank you, thank you, thank you!!! <
Thanks for sharing this! I, too, have been trying to find a cheaper option for exterior curtain rods. I considered PVC but also concerned about sagging. I can’t wait to go buy my electrical conduit!!
This is amazing! I’m definitely going to try this! Thanks! 🙂
I may have missed this, but did you buy the fabric and line it. or are the panels store bought? Just wondered about the fabric. Does it need to be a “heavier” wieght or not? Thanks for the great idea!!
Fantabulous curtains!!!! They’re designer perfect! I’m really digging your blog!
Wow! Brilliant. Totally understated and elegant. Thanks a bunch for sharing.
I LOVE YOU!! Thank you. THANK YOU!! I’m in a rental house and it has the horrid nasty cheap vertical blinds and they are snapping off left and right. I am pretty handy with tools, but um… it’s a RENTAL and I don’t want to invest a gazillion dollars in window treatments. I can make the curtains, no problem. I’m pretty handy with a sewing machine, and Goodwill always has plenty of fabrics. The rod part was stumping me.
THANK YOU THANK YOU!!
What a good job! At first I thought, no way are the 1/2 inch EMT Conduits going to be so inexpensive here…but they ARE. Love it. Thank you so much for posting this.
Okay, I am trying to make the pinch pleats with ring clips and a rod, but mine are not standing up as nice as yours. I assume because I am using a lighter fabric, but a heavier black out backing, so I thought it would offset the weight of the fabric. My pleats are droopy and I can’t seem to figure out how you pinched the ends. Thanks!
Try pinching them higher on the fabric. I’ve done this several times and it always works pretty well.
I feel like a total idiot. I spent $145. for a 83 inch curtain rod. I will never do that again!
Hurray for you! Finally I have a way to hang drapes on a 10-foot window span. Very clever!
This is absolutely brilliant! Curtain rods are so expensive and I’d rather spend the money on good quality curtains than the rods.
This is a wonderful idea, THANK YOU ! I’ve been looking for a less expensive way to make curtain rods…..this looks fabulous……and even if you need some paint and/or a cutter, it is STILL far far cheaper than buying these over-priced curtain rods, no matter what the size is ! Better to “splurge” on finials 😉
I had another idea that might work …..haven’t done it…..but, there are a lot of metal patina paints at places like “beadaholique” and other “mixed media” art websites…..these patinas are made to STAY on metals without coming off….so, if one wanted to make say, an “antiqued verdigris” or other type of artsy “look”…..these paints might work. I would also recommend getting those “ring liners” to help protect the painted rod from chipping with the wear of the rings on it, etc. Those aren’t too too bad, price wise……places like Antique Drapery Rod company sells those, it might be good to keep the painted finish to last longer …….Thanks again, this is a fabulous idea, I loved it !! 🙂
G.E.N.I.U.S!
Allison – Thank you so much for posting this and providing great details. Our dining room is 6’7″ wide, plus need an additional 1′ or so on each side for the panels. I just received a quote of $539.55 for hardware including a 12′ wood rod, because the 8′ rod is too long. I decided a DIY is necessary.
Have you had any issues with the weight of the curtains and the pole? I have been hesitant to use metal due to weight. My panels will be width and a half wide each.
Thank you so much for posting this DIY curtain rod! I’m getting ready to move into a house with a HUGE living room window, and I have been trying to figure out how I could possibly make a rod work there. I will be going to Home Depot this weekend! Thank you! Thank you! Thank you!
Love this idea! Rhank u so much for the tutorial! Just a quick question, all the finials I have found have a screw at the end….how did u get the finials on?
LOL! When we bought a 170 year old , 3000+ sqf rundown farmhouse, we had 60+ windows! I couldn’t afford hardware for them all so I cut wood dowels to size and rested them on downsloped wide headed nails. My plan was to replace them one by one. Sixteen years later when we moved, all my curtains/drapes were still on them!
I’m currently trying to copy your tutorial. I purchased the same exact tube cutter and a major problem I’m having so far is that when I use the tube cutter, it cuts in a spiral rather than overlapping the original cut. How did you prevent this? Did you do a full 360 clockwise, tighten, and then do a 360 counter clockwise?
This actually is my first DIY aside from sewing projects. I’m very determined to get this to work!
Thanks!
Mine has never done this. Maybe yours is bent? A hack saw or sawsall works great as well.
Thank you for this! This is EXACTLY what I needed. We have 2 BIG windows in the front of our house. The old curtain rod we took down (from previous owner) is no good anymore. Windows are big enough it was going to cost a small fortune to get rods big enough. THANK YOU! They look great! As do your curtains 🙂
quick question – the finals I have decided on already have screws attached to them. How do I get my finals to screw in to the conduit?Btw Im new to this diy stuff 🙂
Allison, thank you for a very thorough, step by step guide to making this! I am very visual, so the photos even down to which aisle these conduits are located is a huge help! Thanks for taking the time to do this for DIYers – it is very helpful! I’ve been looking for 111″ w rod and the ones I’ve found thus far is quite expensive (I got a quote for brackets & 4 poles for $1,200!), so this will be a perfect solution! Thanks again!
love, love, love this post. you are a genius. i need a 110″ rod and now i’m going to do the same thing you did. thanks a million!!!!!
Wonderful tutorial. Thank you so much. I can’t wait to pinch pleat my dining room curtains.
I love this idea!! I need to find 100″ rods and stumbled on your site. Perfect!
I have one question, though. How exactly did you screw in the finials? Did you put an end-cap on the rod or something? The finished photo looks too nice to be just electrical tape.
Thanks for your help.
Love love love this!! Thank you! Making gazebo curtains and did want to spend more than absolutely had too And never found anything long enough186″ until I found you! Thank you for sharing your fantastic idea!
Allison- you really helped me save some money- thank you! I have corner windows which meant I needed the corner attachment in addition to rods. The traditional corner attachment (if you can find it in the style rods you want), was just under $10. Guess because its a specialty item. I didn’t have mounting brackets but was able to find similar hardware near conduit as well as a corner attachment. With your help, my project was ~$12. Saving me ~ $60. And it looks fabulous! Thanks again!
I think your curtain rod is excellent and u are right most people have spray paint and black tape i wouldn’t be without it. I was going to put curtains up today and i don’t have the proper rod but i will now im definetly going to make u thank u for your tips . Ignore Preston lol
I used that type of pipe for my outdoor curtains. Holds up great even outdoors. I left mine silver for outdoors but had considered using it indoors too. How is the paint job holding up with the rings sliding over it?
I am wondering how these are holding up as well. Is the paint chipping or wearing at all from sliding the curtains back and forth? Please keep me posted 🙂
You have no idea how excited I am about this!!
Thank you so much for this tutorial! I had a 18’2″ span and decided to give the conduit a go. I had to buy two 10′ sections and use a connector that fit in my rod support. A can of spray paint and some curtain hardware I already had made this project less than $30. There is no way I could find an 18ft. curtain rod for that!
wonderful suggestions will do the same 🙂
Allison,
This could be the single best help-blog I have ever read! It’s so clearly-done. The rod is so simple I feel embarrassed. Thank you Preston for being such an amazing JERK… you remind people that there are FREAKS out there cruising blogs. BTW, you can buy spray paint for metal that doesn’t require a primer. A dollar store is good for electrical tape where you can get a pack of 6 rolls for $2.
Lady, you are seriously awesome!!! I’ve just had to rip out an arm and a leg to have custom Roman blinds made for my home office windows. I held back on the sliding doors though to first see how the smaller window dressings turned out. And though they look lovely, I would be so much more satisfied if I could cut costs somewhere. This is EXACTLY what I was looking for! I’ll be doing this for the sliding glass doors to my home office. Hopefully it’ll turn out okay and I’ll be able to (proudly) put up some pics.
Thanksssss!!!!! =D
Wow…you were just what I needed!! 🙂 I’ve been struggling with finding really long curtain rods too! I almost went the pvc route last week, but decided to look online just one more time! I’m glad I did!! Thanks for your inspiration!! You did an amazing job! Did you make your curtains too? They look great!!
Thank you! I have been on a search for a 150″ curtain rod for ages and the prices were just absurd. This is the answer to my search! I will need to make some adjustments since I need more than 10′ but still a much more affordable option.
So I am definitely using this idea for my apartment. Rather than painting the walls I want to hang curtains around the room for color. This tutorial is perfect. Thank you SO SO MUCH! I am going to save so much time and money not having to worry about buying paint etc. And if I get tired of the color all I have to do is change the curtains! 😀
I’m in the process of making a 17′ rod with two conduits and grommet panel drapes from JC Penny. A gal I talked to on the phone recommended putting Vaseline or some other ‘slippery’ substance on the rod to preclude scratching. Anybody out there do this or have input?
Just a tip for the finials i recently made curtain rodsand used pvc pipe. I decided that i wanted even cheaper rods because i have three different windows in my living room so i bought apack of clear christmas balls, they were 12 for 7.99 i also wanted color so i painted the inside of them with acrylic paint. My total project cost around $23 including the paint for the pipe! Wish id have seen this earlier though iwould havewent with conduit.
Pardon my French, but you are f*ing brilliant!!!!! I have 4-5 curtains that need to be bought and hung, and I was dreading the cost of this portion of the project. No more! I can do 5 for less than the cost of ONE of the ones I had been considering. So glad I hadn’t laid down the card yet!!!! Thank you!!!
Wahoo! I’m so glad my tutorial helped.
Thank you so much for your post! We need 16 feet rod for our bedroom and I almost paid $15/foot custom rod. Heading to Home depot right now:)
I am a professional seamstress, I did drapes for about 8 years, everykind of drape, roman shade, pleated, inverted pleats, swags, cornice boards, bedspreads, shams, upholstery, boat cushions, and I could go on and on. I JUST WANTED TO TELL YOU WHAT AN AWESOME JOB YOU DID. HOW REALLY INVENTIVE OF YOU AND THEY LOOK GREAT! SMART LADY. I am acutally going to go replace a left draw expandable kirsh rod that are supposed to last and that is why they charge those prices. It is a heavy duty rod but I think this is the third time in a couple of years, and , I have had it with those rods with the draw in them! They are always messing up, so I was looking for a solution for the rod and you have given it to me. So cool. Thanks, and you also are very good at explaining the whole procedure. Very well done. ps. thanks.
Cindy, wow thank you so much for this compliment. It means a ton coming from a professional like yourself! I just wanted pretty drapes that were lined but I didn’t want to pay someone to custom make them for me. The fabric was already pricy enough! I couldn’t afford anything else. lol. Anyway, thank you for such kind feedback. I really appreciate it.
Dear god woman! Marry me!! You saved this college student a bunch of money!! <3 <3 <3
I accept! haha Well, now you have to actually go make them! Have fun and enjoy your cheap rods!
I think this would be a great idea to display a blanket or a tapestry on a wall.
That sounds beautiful! I appreciate you sharing your ideas!
I just pinned this. You have done pretty much the best job on a blow by blow tutorial I have ever seen! LOVE IT!!
Thank you very much! I appreciate it. I’m really glad so many people enjoy the tutorial.
Hi so can I use this on a 12 foot sliding glass door that has two stationary PANES and would have to be extended to about 8 inches on each side ? Wondering do I have to use more than one bracket along the way or would middle bracket be enough? PS ignore those people who have so much time on their hands that they have to criticize someone who shares their bright ideas because they are bored..
Jane, you can do the rod on any size window. You will have to purchase a connector piece for the conduit though. I have never blogged about how to make it longer, I should do that. Anyway, buy the connector to make two pieces of conduit join. I would suggest putting at least two brackets in between instead of just one center one.
Hi Allison,
Thanks for your awesome tutorial! I have already made the curtains, curtain rod, pinch pleat done and hung them over patio door. The only thing I’m struggling with is the finials! No glass orb finials at Ikea. And I can’t seem to find them, or any other decent finial for that matter, anywhere else that they’re not attached to a rod already. I did pick up some other finials at ikea that just have a screw sticking out at the end, thinking I could come up with a way to attach then to the rod, but no luck so far. Any ideas?
Thanks!
You can buy a cheap ugly rod from Walmart and just take the finials off of it. Or check craigslist and garage sales.
Hi, Allison. Just an FYI your the first blog I’ve subscribed to because I not only love the idea and style of this project (and curtains), but I’m from Austin myself and appreciate the fact you are doing my price comparison shopping for me! I just wanted to say thanks for sharing this idea – I love it. Single mom with a new house in 3-digit temperature Austin summers – I bought 22-yards of black out fabric from Hancocks on clearance but was dreading starting the project because of the cost of all the rods – and I’m as you are, I don’t like cheap rods, spring rods, thin rods, plastic rods, etc. With the extra materials I keep on hand I will only need to purchase the conduit piping and the pipe cutter to make rods for 6 windows. Thanks and looking forward to perusing your site as I have time! Shari
Yay, I love hearing this! I try to always include my research. If I have to research a project before I start, I love sharing the info with all of you to save each of you time and money as well. No point in all of us always having to do the same research.
Too funny- this EXACTLY what my husband and I did for our son’s room a few years ago! I bought those same glass finials on clearance at Ikea for $3, and he (being an electrician) had some conduit handy that he spray painted black. I ended up buying the wall brackets at Ikea, and the curtain had loops so we didn’t need to buy hooks. It was the sturdiest curtain rod in the house. I loved it! He had done DIY curtain rod long ago in his apartment using conduit and j-hooks when he was a bachelor (again, he had a stash in his van) so that project was entirely free. Even though it wasn’t his intent, it made a cool industrial looking curtain rod with the metal conduit and metal j-hooks.
Love this! I wanted double rods for my window a few years ago and they are sooooo expensive and options are limited. Wish I had found this before shelling out that money!
(I do agree though that $8 is a bit of a simplification. The price still can’t be beat though and the info is valuable)
Good luck with your rods and have fun!
Thank you! Thank you! You saved me close to a grand!!! I have 16 windows the are 8 feet and wider and I was looking for high end finishes. All I had to do was by the high end curtain finials and they looked like I paid hundreds of dollars for each rod. If your ever in Indy I own you dinner at Ruth Chris Steakhouse 🙂
I will fly to Indy just so I can eat there! LOL I’m glad you were able to outfit your house for a fraction of the price. Paying hundreds of dollars for a curtain rod is ridiculous!
I love this idea! I’ve already gotten the conduits, brackets, and a dowel to connect 2 together. My only problem is finding finials that are like yours where you slip them on and tighten them down. All I can find (including at ikea) are ones that have a screw sticking out of the end. Any sites you could recommend to find those, or maybe another term to add to finials when I’m searching?
I’m sorry, I’m no help at all! I just buy them at ikea and all the ones I’ve ever bought screw on the outside of the conduit.
Maybe get some PVC end caps that fit onto the ends of your conduit. Drill a small “starter” hole through each PVC end cap, then screw the finial into the hole. It will enlarge and self-thread the hole for a good fit as you screw it in. PVC can be painted to match the rod if you scuff it up a little with sand paper , then use paint for plastic. Or (easier, no need to paint) just press a short length of dowel into the end, screw the finial into the end of the dowel. Done!
This is an awesome post! Thank you for all of the details, even the aisle location in Home Depot. I really appreciate you sharing this info! Can’t wait to try it!
You are welcome! Have fun making some cheap awesome curtain rods!
I love this post! Thank you for sharing this (and the other ideas 🙂
One helpful thing would be to spray a coat or two of clear spray paint on the pipes. That way you have an extra few layers to prevent scratches. I always try to do this when I a spray painting metal, and it really helps. Taking the extra step to prime is also helpful, but the clear coat is what protects the paint!
I’m making curtains today and your tutorial is wonderful. Thank you for all the pictures — I need visual aids to understand instructions. Your curtains look great.
Thank you and you are welcome. Have fun sewing a little and ironing a ton!
Just found your blog and am loving the curtain rod idea! Am going to Home Depot today for materials. I’ll let you know how it turns out!
I can’t wait to hear all about it!
OK, I know this is an old thread BUT people are still following and getting inspired SO I will put my two cents. Please DO NOT paint galvanized steel with rattle can spay paint or oil based paints. It WILL chip away in no time because of the chemical interaction between zinc and alkyds. Instead use a brush-on epoxy or water based paint (yes, water based like a latex acrylic). Before you paint make sure to prep the surface. Vinegar works great. Clean pipe, wipe with vinegar, allow to dry, and paint.
I’m ready to do the conduit rod, but how do you determine which “weight” to get. I was browsing Home Depot and notice some are light and some are really heavy. I have floor to ceiling burlap drapes I just made. I put pinch café hooks on the top hem and the current rod I have is not holding — It’s bowing little and only on one side. I like the idea of a one piece rod and I want to do a 1/2″ or 3/4″ conduit rod. I want to make sure it holds, but I don’t want to hang anything too heavy because the drywall won’t hold it. Any ideas?
Oh my gosh. You have just saved my bank account. We’ve just purchased a home with a bunch of gorgeous ( and bare) windows. Been totally stressed out about how to cover them. Last week I bought a 50 yard bolt of of muslin for $90. Between that and your rod tutorial, I will soon have som pretty and affordable windows! Thank you!
Great idea! You certainly don’t miss a step in your instructions! I bet you are one of those talkative women no matter where you are! Awesome kind of woman to be!! Your type of instructions are great. Much easier to follow than complete but not detailed ones. I am adding your web site to my favorites list.
Awwwwsommmeee! Fab idea!!
What a great idea! I have a window that is 110″ and it took me forever to find a rod long enough. I was planning on going to IKEA to get one for $5.99. If it wasn’t so cheap and if I had all of the other items like electrical tape and spray paint, I would probably use this tutorial! Unfortunately I just bought my 1st house so I don’t have much in my DIY collection yet so I would have to purchase everything, which would make it more expensive than IKEA. But loved the idea nonetheless! Will definitely be coming back to see what else you have up here 🙂
As soon as I saw this ingenious idea (really, a series of ingenious ideas blended together into a satisfying whole – bravo!) and, needing two long affordable drapery rods asap for windows in a vintage hard-to-fit house that has already cost us too much $$$ over the years, I set off to the nearest big-box hardware store but cost of raw materials is at least as much or more than their ready-made rods; I was also surprised at how heavy conduit rods are (we have old plaster walls that can crumble like cookies; in our newer addition, the dry wall is essentially glorified cardboard all of which has to be taken into consideration when approaching DIY projects hereabouts).
I went to other hardware stores in the hope of better pricing but no such luck; also, the rods I saw weren’t long enough to cover my expanse of vintage windows. I looked at PVC pipes as an alternative but most were saggy so they probably aren’t an option for drapes. I ended up buying 2 long ready-made “wrap-around” rods instead for a total of $65.00 tax included (I had a 20% off coupon) and will pay my trusty handyman to sink them sturdily into our creaky walls (his prices are affordable and his previous works have stood the test of time).
As for wrap around rods, they are new to me and I wish I’d been able to purchase some years ago (to cover gaps on the sides of drapes that let in light/drafts). I put out this idea thinking that you good craftspeople out there can make your own wrap-arounds with parts from your hardware store – more power to you!
One further point: the electrical pipes I saw didn’t look like they would hold paint without flaking. Will paint rub off with the friction of metal drapery rings rubbing against it all the time?
You are very kind to share your ingenious ideas – thanks so much. Pretty pictures, too.
Are you in the States? Conduit here is less than $2 for a 10′ section. Also, it is very lightweight. The plumbers pipe is expensive though and is heavy, are you sure you didn’t look at that instead? Paint SHOULD stick to conduit if you use a heavy-duty automotive primer. I haven’t had any issues so far.
PS to my earlier post: my trusty contractor/handyman just finished installing my ready made wraparound rods into our crumbly plaster at his usual fair price (but he nearly burned out his drill sinking screws into our vintage walls). He LOVED the idea of making drapery rods from electrical conduit, thought painting them is a nice idea “with the right paint”, and HE, being a contractor, CAN can get the right length of electrical conduit we’d need for our other wide expanse of windows (14 ft) but making the ends wrap around like the ready-made wrap around rods would break our budget for this project.
PPS: Re a post about a husband/electrician who made the best drapery rods in the house, I love browsing interior design books & have seen pictures of WAY COOL extremely length curtain/drape rods made of the thinnest but strongest metal cable – perhaps one of you mechanical geniuses out there can tell the rest of us liberal arts types what raw materials could be used to make sturdy cool retro- machine-age curtain/drapery rods – think of the possibilities! THANKS EVERYONE
OMG your brilliant! Im in the same boat with hard to find extra large rods!! thank you !!!
awesome idea/job…my living room has a 13 foot bank of windows. Everyday I walk past them scratching my head thinking what can I do with this? Here’s my answer…I LOVE Home Depot AND Ikea! I’ve got a new “Saturday Project” now!
Genius!!! I need a 10ft pole for a photography background and simply could not find any long curtain rod or dowel. I was resigned to join a 6ft and 4ft dowel.
You’re a life saver, thank you so much!
Thanks for the great idea!!! I am actually needing a rod that’s 132″ long. Making my own will save me a lot of money vs. buying one…..have already checked prices. You showed it in great detail and is much appreciated!!!
Thanks so much for posting! It’s just the answer I was looking for. I too was thinking of using wood dowel rods, but was afraid the weight of the curtains, or abuse from my toddlers, would bow the wood. Cant wait to try this!
Thank you very much for this post! If I had followed your instructions correctly, I would have had my curtains hung by now on my 150 inch wide window. But I didn’t, I got greedy and picked up a 2 inch pipe, and now I can’t find brackets :(, sigh.
But your idea is awesome, keep up the great work.
this is greattttttttttt u save my lifeeeeeee! i got the everything for 10 $ the electrical conduct and some hooks w. some silver knobs andsssssssss Finishhh so great i did it my self im a girl 22 y/0 thanksssssss!
I couple of nice ideas here though I find 120″ rods are a dime a dozen. I love DIY if it is actually cheaper and looks better than what I would buy. After all is said and done, (providing one doesnt have any or all of the materials to start with) buying paint, rod, rod cutter, finials, brackets, curtain rings, screws, gas running around collecting this random crap, taxes, etc etc these will cost more to make than simply buying standard 120″ rods which average 30.00 (which also look a hell of a lot nicer than painted electrical conduit with cheap plastic rings and ugly finials) and can be found practically everywhere. Not to mention time and space and painting mess.
The author seems to have left out a few purchases here in his “8 dollar rods” which were actually 17.00 for just the basics parts. Factor in everything else you might need and and taxes and you might as well just go buy nicer ones for the same price and for far less hassle. Like I said, a couple of nice ideas here but IMO more hassle than its worth for a lesser end result.
I would LOVE for you to show me a rod that long for $30. And it can’t have a seam down the middle. It has to be one continuous long rod. And thank you for being so rude while sharing your opinion. You can have a difference of opinion without being a tool about it.
You really are a genius. As a diy who may or may not hoard crappy curtain rods from said Walmart, even the expandable ones bow and bend all sassy like even with an extra support bracket in the middle, also the part where they extend is never symmetrical with the middle of the window so you have to do a hop up jumpy dance to get the curtain or curtain ring over the lip of the bigger rod (and if you are a walking disaster and as vertically challenged as I am sometimes you can find yourself on the floor with rods, curtains and rings all around you alongside dented and dinged sheet rock and probably some tears:(…..) NO MORE! And custom colors! In reading some of your other tutorials and I wish I was your neighbor! You are AMAZEBALLS! Thanks for being a genius. Uh, to all the salty comments about the price and products and blah blah blah, GET OVER IT. You heard me. Don’t like it? Move on! She was true to what she spent and had lying around. What if I don’t have the same home store for same price for the pipe? Do I fume about via comment section? Wow. I actually feel bad people seriously get that bent out of shape and find it normal. True diy’ers like a project and the satisfaction and pride in DIY . But hey, every party has a pooper…..
THANK YOU SO MUCH for posting this tutorial!!! I cannot even believe how much standard curtain rods cost these days! Even at Walmart – it is absolutely ridiculous! I never would have thought about using conduit, but it is GENIUS.
Where did you purchase these clip rings? I like the shape of them better than the normal circular ones that I have used before that seem to stick out funny. Thank you! Looks great!
ikea
Thank you so much for this tutorial! I actually have a wall of windows in my sunroom that is closer to 20′ long. Try finding a rod for that length…almost impossible. The only one I’d found (very cheap quality) was over $100 and was actually 3 telescoping rods, so the curtains would get stuck when I open and close them. Bleh.
I wonder how long the conduit comes? Anywhere close to 20′, or is 10′ the max? Guess I’ll be heading to Lowe’s in the near future to see.
I do have a question for you: How has the paint held up to sliding the curtain rings? Has it noticeably scratched? That is a major concern for my project, since I will open and close the curtains daily.
Great job, love the pattern of your curtains, too. 🙂
I never touched my curtains so the rod held up fine, but if you paint your conduit prime it first or it WILL chip.
Awesome. I made my bedroom curtains just a tad long by mistake. Going to use this pleating trick to shorten just a bit. The electrical conduit is pure genius. Thanks for sharing!
OMGosh!!! Totally awesome. I am for sure going to do this. Am redoing my windows. Hate the blinds going back to curtains. Thanksssssssssssssssssssss sooooooooooooo much.
I have a window that is 150 inches long….can you connect 2 pipes and how can you do that without the “bump” I think 10 feet is the longest pipe length but wanted to see if you had any tips.
Love the idea and i am hoping i can make it work.
Fantastic! And I love your curtains — where did you get those, if I may ask?
I made them!
This was the most useful post I have ever read online. I was about to spend $200+ on the 160″ rod that I needed. Now,I’m going to Home Depot. THANK YOU!!!
Here’s another tip for those who want to cover a patio door, or XO style window (one moveable window, the other stationery) where you have to open all the panels to the left or right, rather than opening the panels from the center (as your home project described here).
The difference is that you won’t be able to put a center support on your curtain rod, (or any support at all) except on the ends. In my case, I want blackout panels on an 8′ wide patio door, so there will be substantial weight AND tug on that conduit/curtain rod as the curtains are opened and closed daily. What to do?? Add rebar!
Rebar (short for reinforcing bar) comes in 3/8″ and 1/2″ widths, and varied lengths…including 10′. These are heavy steel bars that are set in concrete projects to, well, reinforce concrete that will be under a lot of stress (such as retaining walls and driveways). You can find 3/8″ x 10′ at Home Depot for around $3.37 (at the time of this writing). Make sure the 3/8″ fits inside the conduit. Now, you can cut your own conduit, but you can’t cut your own rebar, so know your measurements and have this done at the store.
Here’s another important tip for fastening your rod to the wall. The conduit & rebar combo are really heavy, (plus the weight of your drapes) and the rod supports are only at the left and right ends of your curtain rod. Make SURE you find and place the curtain supports into the STUDS. Sometimes the studs don’t line up evenly with the door/window frame either, and you have to accommodate the extra length in the rod to reach the stud. This may be the deal breaker, too, because you might not like the look of the extended rod ends past the door/window frame just to get the supports into the studs. But the studs are a MUST as part of this design, for safety and permanence.
Can you think of an alternative for outside curtain rods if I dont want to screw anything to the siding of my home around my porch areas? I think the metal rod is great just thinking of a tension like piece to stay in place with out screwing anything to the house it’s self (resale value).
Tanks
Cristina
You can make your own tension rod from conduit, a short length of dowel that slips inside it, a small stove bolt & nut just a little longer than the conduit’s outside diameter, and the spring from an old tension rod. It can be any length rod, maybe a thrift store. A shower curtain rod is too big in diameter. You just need the spring, and it needs to fit inside your conduit. Or you can get new compression springs from the hardware store (I saw some in Lowes and HD the other day). Also two rubber end caps (I salvaged mine from the old rod but you can buy new ones to fit at HD or WM etc.).
1. Cut your conduit about 1 or 2 inches shorter than your desired finished length.
2. Cut the dowel about 8″ long. You can trim this shorter later if the rod ends up a little too long/tight, or replace it with a longer dowel if the rod ends up a little too short/loose.
3. Drill a hole all the way across the conduit, about 6″ in from one end of the conduit, using a bit large enough for the bolt to pass through easily.
4. Insert the bolt through the holes you just drilled, then attach the nut. This takes the place of the sliding stopper inside a purchased tension rod. Yours won’t be adjustable except by changing the length of the dowel, since you can’t get that stopper into your conduit without having a slit in the tube.
5. Now drop the spring into the same end of the conduit. Optionally, drop a little washer in there first, that just fits into the conduit. The washer rests on the screw, the spring rests on the washer.
6. Slide the dowel into the end, to rest on the spring. (Paint it first if you like; about 1″ or so will show when the rod is up)
7. Attach rubber end caps on each end to hold the rod up and protect the walls.
Now you have made a tension rod! If it’s a little too long/tight, trim the dowel a little. If it’s too short/loose, put in a longer dowel. This is the only way you can adjust the length, unlike a manufactured tension rod, but where else are you going to find one more than 84″ long!!!
If your new tension rod is too heavy for the amount of tension you get from the spring, do the same thing on both ends of the conduit so you have two springs.
I hope this helps somebody!
Thanks for this blog! I used this idea and made a curtain rod for my sliding glass door. I modified a little bit and did a 3/4 inch conduit because I wanted it to look thicker. I painted black and bought finials from Ikea that I glued onto the ends with super glue. I bought brackets from Ikea too for $1.49 each. All together I think I spend $16.50 for everything including paint, rod, brackets, finials. Home depot cut the pipe for me. I made a 100 inch curtain rod. Thanks! A very similar looking modern curtain rod I wanted cost $69 and mine looks just like it for $16.50.
Awesome!!!
Thank you so much! I did follow your instructions and got a beautiful curtain rod. I sprayed it a brass color to match the curtain rod holders. Now just not sure how to find finials that will fit. I just put tape on the ends so the pole wouldn’t fall off but you cannot see the tape. I am very pleased and saved a bunch thank you so much!
Thanks for this great idea – I’m definitely going to try this!
Did you use 2 or 3 brackets (the chandelier hides the center of the window in the picture)? It would be nice to have an unobstructed photo to see how this looked with the 3 brackets. How heavy are the curtains?
Thank you!
I used 3 brackets.
Thanks so much for this idea! We’re renovating our basement to create a master suite, and have an awkward 9ft space of window and built-in shelf to cover. Going to home depot now!
Awesome! Have fun!!
You are my new hero! So easy with a beautiful result <3.
I LOVE your idea of using electrical conduit for longer curtain rods, but I do have a couple of questions.
1. How in the heck did you get that 10′ long thing home from the store?
2. How did you keep black spray paint from getting all over everything in your garage while you were painting the rod?
Thanks for the help,
Dee in FL
I have a 12ft wide large bay window, needed a rod without a join in the middle, curtains sweep to one side.
Had my local blacksmith make me a VERY STRONG pole with brackets at each end to fix to wall
This has been in position over 15yrs wasn’t expensive to start with, sometimes quality pays in the end. By the way try a bartering option, you sew for them they make pole, works!
Good luck to everyone with curtain projects.
in case you needed wall brackets as well….. stay in the electrical section and pick up conduit hangers, they look like a c and have a hole to screw through….. then head over and pick up plain ole L brackets in your needed size and some small nuts/bolts to attached the c hangers to the ends of the L brackets…. paint to match the rod and wah lah, cheap hanging hardware.
Your rod idea will work perfect for a triple window I’ve got to hang over 🙂
thanks!
Thank you SO much for this article! I have a 21 foot span of windows that need covering. I bought the fabric super cheap for curtains, but had NO idea how I was going to do a rod at that length, and be able to afford it. This is fantastically helpful for me!!
Wow. Thanks for the ideas. I’m going to make Insulated Roman Shades for all the windows in my house. Three of my windows are actually two windows together, so they’re 71″ across. I was planning to use wooden dowels at the bottom but was worried about not finding one long enough to cover full length. So then I would have to make two separate shades for one window opening. So when I read your DIY it answered one of my problems. If I can’t find a long enough wood dowel, I can use electrical conduit as long as it’s not too heavy. Oh, also painting your screws. Great idea. I never even thought of that. Thanks again.
Nice post. I am buying a house built in 1900 and there are about 50 window that need curtains. Thanks for the idea. I was going to hunt around and make this happen. However you did it for me. Thanks.
This was great! Thank you sooo much for the suggestions and guidance! I was looking for a 150 inch rod and those are well over $100! This is going to save me tons. Thank you thank you! 🙂 🙂
Great idea for making a rod to fit curved window scenarios. You have to get an additional pipe bender, but your idea helped me solve my problem. Thanks
Hi – i have been doing this for 8 years, i love the Hammered Metal look as it matches out natural iron lamps and lighting. Glad to see others are catching on. I do LOVE the pich pleat method for attaching the rings. we wil be re-hanging those drapes this weekend
Thank you so much for this idea! I also need an extremely long curtain rod and they’re so expensive. I do have a favor to ask tho…on two windows I need a double curtain rod…you know the ones with two rods? How would I do that? Is it just a matter of buying brackets with 2 spots? I’ve never used a double before so I’ve never seen the mechanics up close. You did a wonderful job! And anyone who is criticizing you or your efforts is just jealous because they’re not creative enough to think outside the box!
I am wondering if the IKEA rings are strong enough for a double layer curtain. Your photo looks like you lined your curtain. Please let me know if they are strong enough.
Hi ya, I’m in New Zealand. and so sad cause everything in general is more expensive here, but conduit is $39 a length! [US$ 33.80] any other super ideas since you originally posted this for a cheaper option on curtain rods. We don’t have Ikea [sob sob] either.
The conduit is galvanized and I am being told that paint won’t stick well. Has your rods peeled? I have found people posting a several step process for painting galvanized metal. Thanks to you, I have made my own curtains and was looking forward to making the rod as well. Can you provide me some reassurance about the pain sticking to the conduit?
Yes, galvanized needs a special primer to make paint stick to it; otherwise the paint flakes off. I had some that came in a spray can (I don’t have the can any more, so I can’t tell you the brand). It worked well to make the top coat stick to some galvanized tubs I used for planters.
Thanks for the info! I bought the materials tonight, I can’t wait to try it! I bought a couple of those decorative balls that people put in bowls for the ends. We don’t have an IKEA in St. Louis and the finials I found were either boring or $20.
Allison, we just acquired an older RV that needs all new window coverings. The original venetian blinds were pretty raggedy. I had to tear off fabric covered valances in order to remove them. Pricing window coverings for a 29 ft. RV made my blood chill! I wasn’t about to fork out those dollars for the old rig! Your blog post inspired me to repeat parts of what you’ve done. I bought four sticks of electrical conduit at Home Depot. Then I marked them with electrical tape where I wanted the cuts. Next day I returned one stick to H.D., because I overestimated my need. Home Depot had a guy cut the rest to my specs with a hacksaw. I bought a spray can of eggshell primer/paint as well as cafe curtain brackets that will accommodate my “rods”. I bought 1/2 inch PVC end caps that are too big for my conduit, but by taping the ends of my rods I can make them work. Not fancy but very functional. I might keep the tape away from the visible point where the cap joins the rod and put a little spackle in that space since I have some around at the moment. Hancock Fabrics ran a sale today and I was able to purchase 17 yards at $2/yard (60% off) , I bought cafe rings but like what you did with your fake pinch pleats and might return these and get the kind you used instead. My fabric has a kind thick white backing so I don’t have to line my curtains. Tomorrow I hope to paint my hardware and get my rods hung. Then I get to sew! Will send you “before and after” pics. Thanks for the great inspiration!
I love this idea. I was searching for a 16″ rod for my patio door that has 3 1/2 foot windows on both sided. I bought to pipes (10″ each), three brackets and a coupler that has two small on the outside to hold the pipes. With a bracket in the middle, I just turned the coupler so the screws face toward the wall pointing upward. the final rod ended up being 196″ (16′ 4″). Had a party yesterday for memorial day and had so many comments on the drapes. Mentioned that the rod was electrical conduit and no one believed me at first. One guy even reached up to tap on it to verify it. Absolutely love it. I could find 144″ rods, but nothing as long as I needed it. Wasn’t that worried about cost, but it had to go the entire distance (there’s only about 3 inches between the patio door and windows on each side – splitting it into 3 rods would have looked stupid). So glad I found your post!!! THANK YOU!
You’re a genius! We recently put our house on the market, and I needed to update curtains in the family room. My window is 144″ wide! I had to special order a rod that cost me about $65. I wish I had found your idea! I don’t know what lengths conduit comes in, but it would’ve been worth looking. The curtains look amazing.
Fan-stinking-tastic! Thank you for this tutorial! I think husband and I will give this a whirl this week!
Love your tutorial!! and yes I also think that you are a genius. I plan on adapting your tutorial to make a 2 valances for my kitchen. They are 6 ft windows. I have to make them inside mounts due to the cabinets. I would like to use conduit but can you think of a way to attach it to the inside of the window frame? Thank you for your help. Sue
You might want to add flanges on the sides for an inside mount. You might also have to steel nipples to screw inside the conduit and the flanges – not completely sure though…
I recently saw some brackets at ikea that allow you to mount a rod inside a window. Check ikea!
Thanks for the tip on the finials – I completely forgot about looking at IKEA for them. I used 1/2″ knock out seals on the ends of the 10′ curtain rod. Since I was able to use the existing brackets, my new rod only cost me $5 – love it 🙂
Ooh and love the pleated curtains – will have to try that as well
So glad you were able to save so much money!
Found your curtain rod idea just in time! Had some grommet drapes that just weren’t sliding easily on our old wood curtain rods….the grommets are metal and do not move without pulling. So went out to find an inexpensive metal rod….there were some, but only small diameters. I wanted at least one inch. And that is when I came upon your site…thank goodness. Bought one inch diameter conduit pipe, a one inch diameter dowel, primer paint and dark brown Rustoleum. I didn’t want to buy new finials so am using the ones that are on the old wood rods (they have a screw which inserts into the wood rod). The one inch dowel fits inside the conduit (not sure why since they are both the same size) and I will screw the finial into the dowel then push it into the pipe and paint the pipe. If the finials don’t look good with the paint, I’ll just paint them too. Can’t wait to see the finished results. Thanks for the wonderful idea!
Perfect! So glad it worked!!
I love the idea of the conduit. I have tried to come up with a curtain rod for our great room (which has 11 very large windows) I was looking at a fortune just for the rods. I came upon this blog and WOW that is the best idea ever! Thanks for sharing!
So glad it helped you. It’s such an inexpensive solution that works well.
After all this time, this post is still blessing folk. I can’t wait to make it fonkay!
I’ve been trying to find cheap curtain rods, but its a complete rip off. Thanks so much for sharing this, this is going to save me heaps!
You were my inspiration behind deciding I could make my own curtains rods for some really large windows which would have cost me a fortune to buy.
I was able to custom-bend the conduit using a pipe bender to match angled walls in my victorian home.
I was a little particular about the finials I wanted (Fleur de Lis), so I used a 3D printer to make the custom shape and size I wanted!
I documented my project here: https://firstbuild.com/JBerg/diy-maker-curtain-rods/
You are so awesome! Have been to several stores and could not find a sturdy rod 110 inches long. Am so going this route. I realize that Pissy Preston’s post was way up there but can I just say, OH MY GOSH!!!!! Get a life, pal. The fact that you went to all the trouble to create this post to help other people is gracious enough. That sad little man is wretched. Thank you for saving me so much money.
This is the neatest idea ever I love curtains they are beautiful except I hate skeletons.
THANK YOUU!!!!
I have a gaint picture window in my livingroom, 9feet across. Since we moved here (last year) i have been using my old “normal” sized rod with *gasp* a black dollar store broom handle as an extender joining the two… and with a toddler and two kittens its been yanked, bent and ripped out of the wall. thanksgiving is two weeks away here in canada and my house was picked as the host this year,
i am going to home depot first thing in the morning, thank you thank you!
Thank you, thank you !! I love your idea so much this is really an inexpensive fix for making rods of any length. . I need to use this in my place. I have only one question, is the conduit strong enough not to need a center support? If so this makes your idea is even bet LOVE iiiiiittttt!
If you are spanning a wide area I’d go ahead and put up a middle bracket. If it’s a short distance you should be fine with no center support.
OMG!!!! thankyou so much! I have not had any curtains in my daughters room for 10yrs, because of this issue!! I had to buy 3 curtains and attach them together, just for my front window and with it costing us over $500 just for the front windows, I just didn’t want to put that kind of money into a childs room. I did try the wooden dowel treatment and had to use pins to pin another panel of curtains on the side, but it didn’t last and it was taken down, plus kids are hard on curtains. lol. I am definitely going to check this out and heck, if its great, I may redo the front as well? thankyou very much again. 🙂
…and 2 years later, Preston’s comment still reads just as pathetic! Happy anniversary!
Wonderful! You dd a beautiful job on everything!!!
I love your idea about the drapery rods! I have been browsing the internet and stores for days looking for nice, inexpensive drapery rods and I don’t think such an animal exists. Then I happened onto your post about doing it yourself with electrical conduit, etc. What an awesome, ingenious idea! ! ! ! ! And today I’m off to Home Depot with my measurements to see what I can do!
Thank you Sooooooo much! ! ! !
I did this years ago, making it up as I went along because, like you, I couldn’t find an (affordable) very long rod. I also had a whole house to make curtains for. You explained the whole process very well! I’ve recently moved to my new home and will do the same thing! This is the way to go for sure!
I’m curious if the rod needs the center piece bracket. We had one set of curtains on a regular, expensive, longer rod that slid out to the size (barely) that we needed. With the weight of the curtains, even in a stud on the outside, the inside bracket came out of the wall (there was no stud in the center). Any reply would be appreciated.
Erin, if you have a large span I’d suggest a center bracket. Use some screw anchors to make sur wit doesn’t pull out of the wall.
Wondering if it is absolutely necessary to have the center bracket. I’d like to have the curtains slide from one side without a center bracket. It needs to span at least 120″ without sagging. Also, have you noticed any wear on the paint job?
I have been looking for and pricing curtain rods for our LR window wall for several months. 70’s house, 3, 4′ windows, a total of 192″ or 16 feet including the drapes and splaces. Not replacing drapes, we want to stage to sell. Pricing for the ones that looked like this are over $550 plus tax or I could piecemeal them together from 3 or 4 parts and have seams, still over $300. My hubby suggested PVC, but this answers a lot of my questions. Thanks for the post!
PVC is also a good option but I think it will bow more than the conduit.
I currently have a 125″ wooden rod that I made from parts I found at homedepot the brackets have a much smaller opening for another rod, I would like to try this but I’m wondering if it will hold heavy curtains without a center bracket. I Really want shears, drapes and a valence on this window but to buy a triple combonation traverse rod for it, if it can even be found, is going to cost an arm and a leg, so far the largest I’ve found is 84″ for $179.99 so I’m trying to come up with a much cheaper solution besides the fact that I absolutly love the wooden rod I made and would like to keep it.
It would probably be fine holding the sheers, but not heavy drapes.
Ok, so i tried this and it works great! I needed 3- 125″ rods to hang the drapes, shears and valance in my living room. Rods themselves ended up costing me a little over $9 conduit was $2.30 for 10′ x 4 connectors were a pkg of 4 for $1.30 but I only needed 3. No paint, no primer and no finials on my project. It cost me a little over $10 for extra heavy duty cafe rod holders they were $3.49 ea pkg of 2 and I needed 3 pkgs. So under $20 I have 3 awesome heavy duty rods. And a well dressed 125″ in window that cost me in total with custom made sheers (eBay $15) and valance ( end of estate sale $0)and the only pair of 144″ wide faux silk curtains I’ve ever seen( Amazon $43) less than $100
The conduit is very strong, even with my heavy drapes no center bracket was needed and there is little to no center sag.
The link to the pinch pleat idea is: http://thriftydecorchick.blogspot.com/2009/04/easy-drapery-tricks.html
I’ve searched everywhere for a solid rod to span 10′. They are all the adjustable ones…”extends from 72″-144″….for upwards of $40. Walmart does not have the solid ones. I’ve found 8′ ones at The Find for $160. I need 120″ – 10 feet. I would be willing to pay $50-70 for 10 ft, but not $160 up. I am tired of struggling to get my decorative metal clip rings over the hump where the extension begins. They are 96″ tall, and I’m not. Grabbers help, but it’s still an exasperating stretch. Husband originally wanted to get draw drapes, but I like the casual look of the rings. Your idea is splendid! Thank you!
Pretty much what I figure I had to do. Since my grommet panel covers a sliding door (120″) am wondering if I should leave the rod unpainted so the paint won”t scrape off with opening and closing? Any ideas on this?
hey – just spray with an acrylic sealer – Rust-O-Leum brand coatings makes a great one, usually $ 4.00 or so a can, you can preserve the nice finish of the conduit, plus it won’t ‘oxidize’ or better yet rust. Or the paint finish ‘scrape’ off, as it might when there is possibly an abrasive ‘metal to metal’ grommet contact.
HAHA!!
Awesome!!
funny thing is i put into google looking for rods that are 13-15″ cause those are hard to find it seems and found this, then looked at price, guess i know what doing for that 96″ and 64″ rods i need as well lol thanks
This is awesome! I am totally doing this in my living room this week. The curtain rods I have found for my gigantic living room window are all super expensive and I love being able to say that I have made my own things. Thanks for posting this (even though I am a few years behind!).
I went to lowes today and bought everything I needed. The total cost was $23.
Thank you so much!!! I needed at least an 11 foot long curtain rod for my daughter’s bedroom redo – she has a bank of three windows that span 122 1/2 inches. I have four 54″ wide panels and I wanted there to be about a 5 inch overhang on either side, beyond the window frame. I had an existing 120″ rod with three double brackets and two green glass finials but that wasn’t going to cut it. I was looking for at least a 132 1/2″ rod. All I could find at the local target were 120-inches. I’m so glad I found your post!! I ended up getting two 1/2″ 10 foot conduit pipes (that worked perfectly w/ my existing brackets) and a bag of couplers, and my husband had an idea that we could use a piece of dowel in each end to accept the finials – he pre-drilled a hole in each piece of dowel and screwed in the finials – it worked perfectly (my finials were the kind that screwed in). We also got a can of spray paint. We cut the rods so that the coupling would be positioned in the middle of the 8″ wide wood median between two of the windows, which is covered by a panel and can’t be seen. It turned out beautifully- this is just what I needed and I am sure I will be using this idea again!!! Thank you again!!
Lined drapes and a 10 ft rod …….to buy??????…..about $500. Who cares if this project is $10, $20 $30 or even $100……this is an amazingly low cost project!! I do not need lining and may try with a sheet for the panels in a bold pattern.
thank you!! I’m looking for something to use for my covered patio and this is perfect!! Regardless of price or whatever it is a great idea. I will not need to paint or the ends (hidden) so yes mine will be cheap too! Take that Preston!!
i paid for $50 for a large, decorative rod for my living room. i love it…now that the carpenter hung it for me,,fine. however, i needed two rods for the bedroom and i did not want to spend the money. thanks for the post. i have finials from other rods…i have a rod to cut down ..,i just needed to know how to put it all together. thanks. saving money is worth the challenge..
We just moved to a new house with a wonderful, albeit too sunny, screened in back porch. I acquired some gauzy curtains to cut down on the amount of sunlight that shines through and currently renders the space nearly unusable, but was shocked to find out how much two curtain rods 12-feet in length would cost me. Enter you, a beautiful angel sent from DIY heaven to cure my window treatment ails! My husband and I are totally doing this. All we need is some paint, the rods, and a 90-degree (corner) electrical conduit end (our porch is on one side of the house so only 2 sides are screened in and we have that corner to contend with when planning our curtain-palooza) and BOOM. No more blazing hot porch. Thank you for this amazing and inexpensive idea!
These instructions couldn’t have been explain any easier. I will be doing this in my near future.
I love this idea & the price. I’ve been looking for the right length of ‘pole’ for a 10ft Victorian tapestry I purchased years ago. I already have the perfect wooden brackets and beautiful finials and a large empty wall waiting. I would have never thought of priming the tube, thanks for that tip, too! Also, love your blog, your’s is the first blog I’ve ever read! I’ll figure out how to subscribe. I am soo excited!
Why would a curtain rail be ‘awesome’? I just don’t see how it’s going to inspire awe. Admiration possibly, but not awe.
Omg!!! Thanks so much!!!!! I’m so going with this idea! Awesome!
Quick question. Have you noticed any issue with the curtain “pleats” pulling out of the little pincher parts holding them? I want to do this in my wellness center offices, but we children who pull on EVERYTHING. I figure I can do this in my office that doesn’t see children, but do you think the pleats would stay in yanked on by cranky 4 year olds?
If not, that’s cool too. Just wanted an opinion or two from someone who already has them.
Mine stayed just fine because no one touched them. For an office, I’d do some hard-core permanent solution that can be abused.
You are my hero! I have been running around to many different department stores trying to find a 170 inch rod without success and the one’s online were very expensive, plus I don’t want to wait. You have given me hope and the price is the icing on the cake. Thank you for sharing!
I love using the Conduit for rods. You can even buy thicker Conduit for a different look.
I don’t see how you got the finials to stick to the end of the pipe–did you poke through the electrical tape?
This particular finial had a small screw that tightened around the rod.
OK so I am going to use this idea for a shower curtain rod and save so much money. Thank you
Great Post – you just saved me like $40 bucks! I have a huge front living room window and I want curtains across the lower half so people walking buy can’t see me inside when I’m working during the day or watching TV at night with the lights on. And I just realized that there are already brackets there….so all I need is a curtain rod and then curtains – which i think I can sweet talk my mom into making for me! thanks for saving me the time and $ of truing to go through the same issue!
I just happened upon this blog post today when googling “14 foot curtain rods” and I am STOKED. We have a gigantic 14 foot bay window in the home we just moved into and I have been trying for weeks, unsuccessfully, to find rods and curtains long enough to cover this monster. I need a rod that’s a MINIMUM of 168 inches! I found less than 5 options so far online, and they’re all insanely expensive (I actually need 2; a second window in the same room is 108″). I’ve been very frustrated… and then I saw this 🙂 I don’t have an ounce of craftiness or DIY skills in me, but I am all about cheap so I will be heading to Lowe’s tonight and PRAYING this works for me!!!
Actually, the cost of your rod is even cheaper, as curtain hooks are sold separately from curtain rods in the store. I love the fabric your chose for your blinds!
Can anyone tell me if the rods got scratched over time from opening and closing the curtains.
I never open and close the curtains. They are for show only. So I have no idea!
Hello Allison,
Thank you for this wonderful post. I am about to go to Home Depot and Ikea to make this rod for my mother. Perhaps I missed it but can you explain how to attach the finials to the conduit pipe? I didn’t see that step and I am under the impression that the finials are designed to screw into the rod. Thank you!
Did anyone hear from Preston after this? Is there any chance the notorious DIY gang found Preston, and beat him to within an inch of his life with metal conduit. The gang leader whispered in his ear, “Bet you wish I had wrapped electrical tape around my conduit?”
I am doing this for our formal living room curtains.!!! I can’t find sturdy 8ft curtain rods for my dining area without spending >$80. I AM SO GLAD YOU HAVE POSTED FOR CONFUSED PEOPLE LIKE ME!
Thank you so much for this post. My closet is 10ft wide and I wanted to use curtains instead of closet doors because they are cheaper than closet doors which were gong to be over $200. But curtain rods that long are expensive. This is absolutely amazing. It is the perfect solution and the price to do it is just right. I can’t wait to work on it.
Great tutorial!
I used copper pipe to make a 16′ long rod for my family room. Used copper pipe joiner sleeves for 2 8′ pipes and placed brackets at those locations. Used copper sprayed pinch rings to hang drapes. Attached old mini blind wands to curtain top edges to pull along the pipe.
In our basement I used cheap plastic party table cloths hung on picture wire which passed through eye hooks on joists about 54″ apart. Hung plastic with pinch rings so it overlapped at each seam. On this I just used cotton string attached to end pinch ring to pull the sections open and closed.
Made a great wall to hide my storage shelves along 30 feet of wall.
$16 is peanuts compared to the $99 rods I’ve seen. THANK YOU for sharing this easy, cheap, and beautiful project! You are a great problem solver.
Good idea. I’ve used wood and closet poles for a beefier look. You can make your own single or double rod holders too. More labor intensive and costs more though. Question: how do you prevent your metal or plastic sprayed curtain rings from scratching the paint off of the electrical conduit rods when you open or close them?
Okay, here’s my question – are the clips strong enough to hold the fabric as the curtains are pulled open and closed everyday. I just see myself up on a step stool everyday putting the clips back on the curtains.
Any idea what kind of brackets or mounting hardware I would need to hang these curtains from the ceiling instead of on the wall like standard curtains?
I intend to use curtains as a room divider, so trying to figure out if there’s a way to mount from the ceiling instead.
Any ideas?
Awesome…I have hugely long windows as well…whole walls of windows on the lower and upper floor of my new house. I’ll no longer stress about the cost of curtain rods! Thank you from a fellow Austinite! 🙂
Thank you for this excellent, well-illustrated tutorial. Using clips to make a faux pinch pleat has me excited. Going to try that. Again, thanks so much. (( Need a triple rod, so will get one that goes to 151 inches at IKEA (can order online) for less than $31. ))
Thank you for your wonderful ideas!
To all the worthless haters,go away and keep your nastiness to yourselves.
Thank you for the thought provoking idea!!
Because I have a studio (a beautiful one at that), I need to create a separate space between my living area and bedroom area. Though I have had a screen between the two areas, I need more light to filter in from the windows. The room is almost 13 feet wide and the rod has to be hung from the ceiling. I am thinking of using the em conduit, as well as the conduit pipe hangers and the em tube set screw connectors (or couplings) to hang my very light lace curtains. I could then switch to velvet curtains in the winter, therefore the heavier rod!!
I have to figure it out!!
I figure less than $10 to get the job done!!
Thanks again!!
Wow, Thanks Allison,
Great idea. I’ have over 16 feet , so i’m going to connect two in the middle with a 40 cent set screw coupler. Economically this is way cheaper than even internet purchase, just the freight cost exceeds the cost of this and its all about time. Let us know if we need to send in $ for use of your idea – the cost of your ip added is still worth it.
I’d love your opinion on whether this rod would work to drape a queen size quilt over with just end brackets set into wall studs. I want to hang a quilt behind my bed. If I need a center bracket this won’t work for my purpose. Your tutorial is genius! Thanks for sharing.
I LOVE how many people came to your defense when somebody was negative 🙂
How is the paint holding up after years of slliding rings?
Hi! I absolutely love this blog! I was just wondering how sturdy the ikea hooks were?
I couldn’t possibly have read each one of these comments but Thank You for the ideas!!! I’d also like to add, if using a pocket rod curtain you won’t need to paint the rod at all. Which I’m totally in love and am ready to do this TODAY! I have an off center window behind my bed and I need a 10ft rod to create the illusion of symmetry. This is the perfect solution!
Holy crap this was extremely helpful. Thank you so much
Thank you!!!!! I am almost done with my project!!! However, I am having trouble finding finials that don’t screw in…any ideas?? Thanks!
My only advice would be try ikea
Did you find a solution Hannah? I just found this project but I already have finials from rods which were hung in our previous house. The finials need to screw in which is how most finials are attached. I’m curious if a wooden dowel would work by drilling a pilot hole into the middle of it and then tapping it into the ends of the pipe. But I’m open to a better idea if anyone has one, as I don’t know for sure if this would work.
Genius!
Love this idea! I have been searching for SHORT rods (15″) and am having a hard time finding a rod with substance/heft. These will be perfect!!!!!
I think the spray paint will rub off when the clips slide across them.
Hey, I’m a bit late on this one but want to know if this will work for 1 & 1/2″ rod. The drapes will be closed daily and I don’t want the paint to rub off.
After YEARS of struggling with the long, seamed curtain rod in my living room, and finding no long seamless roads for sale, I finally googled for a solution and voila! Thank you! I can’t wait to try this and end the unhappy task of coaxing rings over the seam and having the entire thing come crashing down on me when I get impatient and yank too hard!
Thank you for the very detailed way of how you found the items and combined them together and the cost of your lovely curtain rod. The look is fabulous.
Thank you! I love hanging my curtains on these types of rods. They look great and are affordable!
Thanks Allison. Great solution for my very tight budget. Hope I can afford the extra money for the few inches of electrical tape. HA! Gotta love the Prestons of the world, they give us something to laugh about.
I love this idea! I just bought like pocket curtains (which I really don’t like) and the faux pleat is brilliant. I was wondering if you put some sort of wax over the paint, if it would make it more durable and allow the rings to move easier. You could use any of the waxes made to go over paint. I plan on doing this for the two bedrooms that have huge windows and the patio door, but I’m going to try gold (maybe).
Hi Allison,
Great idea. Now in 2017, if you still have them, how did the pain hold? Good, or partially came off?
Cheers,
Alex
Excellent idea!! I hate the expandable curtain rods i have 2 and they keep falling apart. Grrr. I’ll have to get some electrical conduit next time I’m at home depot. Thank you so much!!!
One word, GENIUS!
Where were you 2 years ago when I was racking my brain. anyhow, cannot wait to try the clip suggestion, it would look much better this way.
Thank you.
I cannot believe people actually take the time to complain about the cost. You are absolutely right in saying that a DIY’er probably has these things on hand. I need a 10ft rod and am thrilled at how cheap this will be! Thank you.
Awesome share. Thanks! I’m hoping someone has advice for me. I’m trying to hang long (96″) velvet curtains (i.e., heavy curtains) across my wide (about 140″) bay window (on the outside of the window seat). The problem is that there’s nowhere to put a middle support bracket. Above the window seat area there’s just a picture rail. so there’s just empty space where the middle bracket would go. The one idea I had was to hang some sort of a t- or l-bracket from the top of the area and put the bracket into that. But ideally, I wouldn’t need a middle bracket at all. Does anyone have any ideas? Or success not using middle brackets with heavy and wide curtains. Thanks!
Wow! Excellent DIY…..I especially LOVE your casual pinch pleats. Did those little clips hold the fabric up? I think I will use your idea then sew the little clips onto the fabric for extra strength.
Outstanding!…I’ve been looking for 10′ curtain rods, this a great and inexpensive solution, now all i need is 8 foot curtains…LOL. Thanks a bunch.
Awesome Look…..I simply Loved it.
I tried Couple of times………….Thank You.!
Good one…Thank you for sharing…!
This is wonderful!!!! I am so glad to have “stumbled” on your site!! I am going to subscribe!! THANK YOU!!!!
This is nice article about Curtain rods.
great post…great idea thank you for sharing
Has anyone been able to use the electrical conduit with an ANGLED coupler to create a very long curtain rod to hang curtains for windows flanking French doors with ONE rod?
Check out my friend Ashley’s post: http://www.domesticimperfection.com/2011/06/dining-room-curtain-project/
I have a question, will the electrical conduit work for very heavy curtains. To be specific, can it hold total of 32 pounds curtains (16 pounds each)? I have 20 feet ceiling and have black out curtains which is so heavy. please let me know what you think of weight limit on this?
I’d go larger on the conduit – just buy one in a larger diameter.
This is an excellent tutorial! Easy to follow, minimal cost and lovely outcome. I’ve chosen to layer these on top of my window blinds.
Thank you for posting this! We needed 20 feet of curtain rod, and bought one that was going to barely work…it ended up looking rickety and….just not good. Went to Lowe’s and got 2 10-foot sections of 3/4-inch conduit, painted it, and put finials on the end (my husband is still working on that). Really nice to have a long, sturdy rod with only one seam in the middle! Thanks again!
Awesome!
This is GENIUS! I’m currently living this struggle! But my issue is that because my window is floor to ceiling, and our ceilings are concrete that cannot be drilled (HOA problems), expandable rods will bow in the middle without a third support bracket. I notice that you have a third support bracket in the middle, but do you think since the conduit is one piece it could do without it? I’d obviously have the brackets on either side, so wondering if it’s sturdy enough to be supported by just those.
I think if you used a thicker conduit it would hold, but the thinner ones I use are kinda bendy.
I have concrete walls and do not want to drill into them, do you think the conduit would be light enough to hang with 2-3 large command hooks? I was looking at PVC as well but I don’t want it to sag.
Hate to sound like an echo, but this idea really is genius. My 10′ half inch conduit pipe cost $4.58 today inc tax at Home Depot and saved me at the very LEAST 50 bucks for the cheapest nontelescoping ten foot rod you can find. (And some of them are $85-90) I left it as is without painting it and it has a great stainless look to it, but isn’t too hardware-y. It is straight as a level with absolutely NO sag (not possible with the PVC pipe I had up there before) and no uneven spaces that prevented a smooth closing of the drapes that I had on the previous telescoping rod. My 8′ sliding glass door and drapes now look fantastic. I can’t thank you enough for sharing this tutorial!
Amazing for information…Thanks for sharing that.. Succes for you
I LOVE this idea and appreciate it so much. I was sad to see how much the conduit has increased in price over the years, from $2 to over $10. But still cheaper than buying a curtain rod in the length I need! Thank you for posting this!!
Ten dollars? What?! Are you sure? I just bought some a few months ago for $2. Maybe check a different hardware store!
I am dying to do this for my huge kitchen window area — and the curtains are going to be bleached canvas drop cloths (keeping the entire window treatment under $25!)
The only thing that worries me is the clips or rings scratching the paint off the pipe when you open or close the curtains — has that proven to be an issue?
It hasn’t been an issue for me.
This is so perfect! I absolutely love.
Love this idea!!!! So I have a double sliding glass door with a 6 foot kitchen window next to that. I’ve found curtains that have 150 inch panels. Now I’ll be sliding these back and forth everyday. Will the paint hold up? Anyone experience scratches from constant use? Thank you for your site and your wonderful ideas!
Mary
Hello, you have a great finesse in writing the blogs. Keep on writing more on these lines. Enjoyed reading this, great insights. Thanks!
7 years later and when I need a good idea for some DIY, I still come to your blog! I needed an alternative curtain rod to use with some command hooks to not put holes in our rental and this was perfect!
How can I do this and get a off-white, distressed look for a curtain rod?
Thanks!
Spray paint it off-white, then lightly sand
Excellent explanation, it’s simple & focus. Keep up the great work!
This is a really great idea. I’ve been looking forever to find 14inch rods for my skinny windows but I don’t want to do tension rods. The only short rods I could find was at Bed, Bath and Beyond but they were too thick and $40 for 2.
I can’t wait to try this and I already have the paint and brackets
Hi! How are these curtains holding up? I’m looking to do something very similar in length but using it to hang plants and plant lamps, do you think this electrical conduit would sag with that weight? I’m not familiar with the material and was initially considering pvc but I know that sags. Thanks!!
Did you hang the rod without center support bracket ?? Been looking fir awhile now for a way to hang cafe style curtains on arched window without center suport ..across 78 inches
My window does not allow for center bracket and am looking for a riod that will prevent curtains from sagging …
OMG this is exactly what I was looking for! THANK YOU! Also wanted to say I started to go down the comment rabbit hole (PRESTON NEEDS A SWIFT KICK IN THE SHINS) and honestly cannot believe there are such a-holes in the world. You’re a genius, people suck, end of story.
a toddler and two kittens its been yanked, bent and ripped out of the wall. thanksgiving is two weeks away here in canada and my house was picked as the host this year
It’s now 2021 and your blog has helped me tremendously! I need 18 inch gold curtain rods, I’m not paying the asking price of 50.00+ per rod. Yes prices have gone up since 2011 but your blog is still very relevant, chic, trendy, and just pretty awesome! Thank you for the brilliant idea!
Wow, thank you for the positive feedback. So glad this blog has helped so many over the years. 🙂
I used your instructions to create curtains for my daughter in 2013. When she got married and moved into her current house, I returned again to your site to create new curtains for her living room and dining room. The earlier set of curtains are still in use in her family room. She received so many compliments and people who were surprised to learn that they were not created by a professional decorating company. It’s all about being able to sew a straight line, patience and your fabric selection.
My husband and I have recently moved to what is going to be our retirement house and I am looking forward to once again using your DIY instructions to finally make myself curtains for our dining/kitchen area. I am so pleased that these step by step instructions are still posted. THANK-YOU!
Amy in Delaware, USA
Love it! Thank you for the amazing feedback. Glad this blog has been so helpful to so many. 🙂
This post is quite old so I don’t know if you keep up with the comments, but…
Your post is so great! Your directions are clear and the pictures you take are so helpful. I’ve seen many tutorials where the bad lighting or the angle, or even the photo that didn’t tell the story of the last instruction serve to not clarify but confuse even more. Yours are not like that! Thank you for a well-thought-out tutorial with great pix!
Thank you so much!