• about
    • press
    • work with us
    • Privacy Policy
  • archives
  • our favorite products
  • popular projects
    • link parties
    • Facebook
    • Instagram
    • Pinterest
    • Twitter
    • YouTube

House of Hepworths

Helping you DIY your home one awesome project at a time

  • DIYing
    • Decorating
    • Fixing
    • Furniture updates
    • House Tips
    • House Tours
    • IKEA hacks
    • Kids DIY
    • Moulding
    • Organizing
    • Outside
    • Painting
    • Renovating
    • video
  • Crafting
    • Crafts
      • Craft fails
    • Dollar Store Crafts
    • Decor
    • kid crafts
    • Seasonal
    • Vinyl crafts
    • Wood Art
    • Wreaths
  • Sewing
    • Bedding
    • Costumes
    • Curtains
    • Kids sewing
    • Pillows
  • Eating
    • Appetizers
    • Breakfast
    • Candy, Cookies, & Cakes
    • Healthy
    • Kids Food
    • Main Dishes
  • Lifestyling
    • Announcements
    • Challenges
    • Diet/Exercise
    • Musings
    • Random
  • Blogging
    • Blog Tips
    • Brands
      • Giveaways
      • Product Reviews
      • Promotions
    • Conferences
    • Features
      • Guest Bloggers
    • Link Parties
      • Hookin Up with HoH
    • Press
    • Roundups
      • HoH Roundups

in Renovating

Fireplace makeover

It’s amazing what a little paint can do!
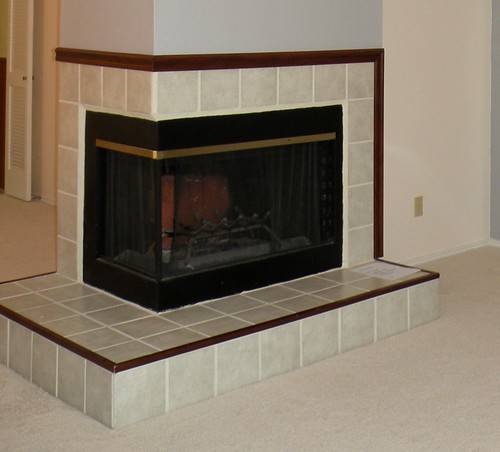
Before:

DSCN1119

After:

This photo is from my cell phone so pardon the crappy quality.

fireplaceafter

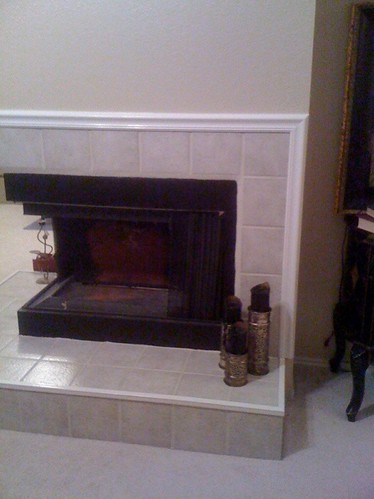
Here is a better picture of the finished fireplace. Long story, but I can’t take an “after” picture right now

DSCN7357

Now here’s how I did it:

The fireplace has some type of cheap pressed molding around it. It’s fake wood that is covered in this plastic-like paper that looks like cherry wood stain.

The first thing I did was tape off the area and prime the molding. I used two coats of cheap white primer. I was afraid the paint would peel off if I didn’t prime it first because the molding is basically the same quality as particle board Wal-Mart furniture. (The previous owners skimped constantly on this poor home!)

During:

DSCN6897

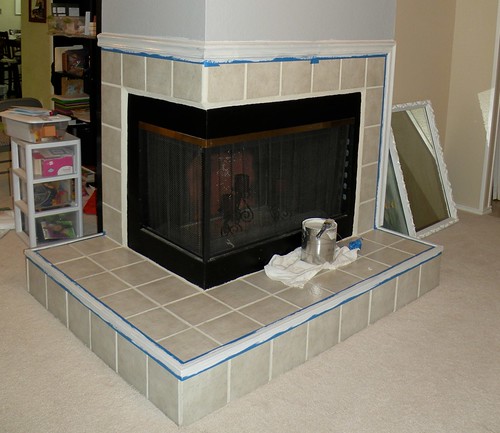
After I let the two coats of primer dry (just a few minutes – primer dries really fast) I just painted Sherwin Williams (Alabaster) high-gloss. It took a few coats because the molding was so dark before. Once I was done with the paint I carefully used a utility knife to help get the tape off.

After that I painted the walls with Sherwin Williams Kilm Beige (I think that is how you spell it). On my walls I use either Satan or Semi-gloss. I never use flat paint. My kids would destroy my walls!

Filed Under: Renovating Tagged With: before and After, fireplace, Paint

Check out our most recent posts

  • How to BEND A BASEBOARD around a tight curve
  • diy SNOWBOARD shelves: an easy tutorial
  • Make your own succulent hanging wall planter
  • 20+ amazing FARMHOUSE counter-height barstools
  • Recipe: The most amazing CHICKEN SALAD!

Get the latest via email!

« Favorite Item of the Month…
Cakes in cones »

Comments

  1. Heather says

    03/03/2010 at 7:51 pm

    Hey! I took that crappy photo! Wish you would have told me what it was for…I would have taken a better quality!

    Reply
  2. Nony (A Slob Comes Clean) says

    03/09/2010 at 10:48 am

    What a huge difference! Great job.

    Reply
  3. mike says

    02/26/2011 at 9:18 pm

    I really like what you did with it. Corner fireplaces are lovely.

    Reply

Leave a Reply Cancel reply

Your email address will not be published. Required fields are marked *

Recipe Rating


Welcome to House of Hepworths!

House of Hepworths Family
Our mission is to help you DIY your own home, one awesome project at a time. Learn all about us by clicking here.
  • about
  • archives
  • our favorite products
  • popular projects
Privacy

Copyright © 2026 · Market theme by Restored 316