Have you wanted to sew your own lined curtain panels, but you have no clue where to start? Does making your own lined curtain panels intimidate you? Does the thought of sewing your own lined curtains freak you out?
Before a few weeks ago I answered YES to all three questions. However, now I can say that I’ve made my own lined curtains, and I survived! And now I’m going to show you how to make your own too.
This is my 3rd and final post about my awesome Aviary curtains. You can also go back and read about the curtains and learn how to make your own custom curtain rod.
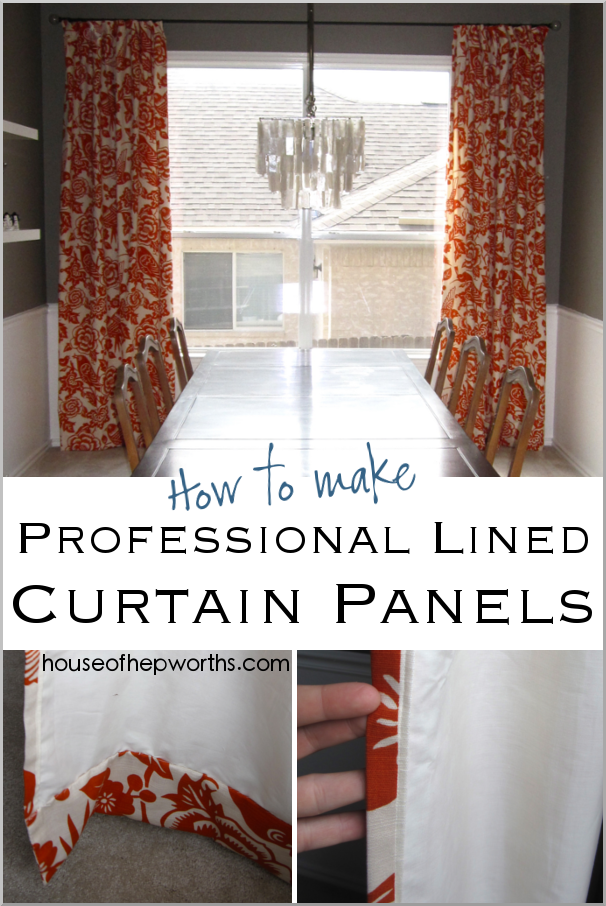

I’ve got loads of photos (too many probably!) so hopefully you’ll see just how easy it really is to sew your own curtains.
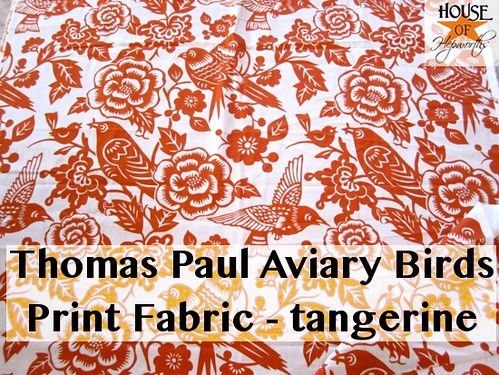
Here’s the fabric I used:
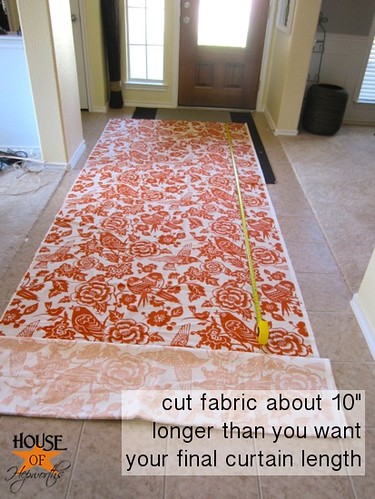
To start, spread your fabric out on a large flat surface (the {clean} floor works great), measure it, and cut each panel about 10″ longer than you’d like your curtains.
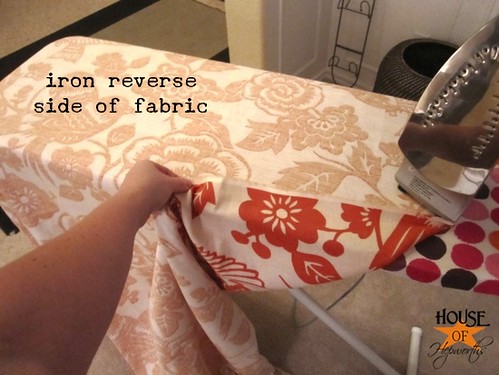
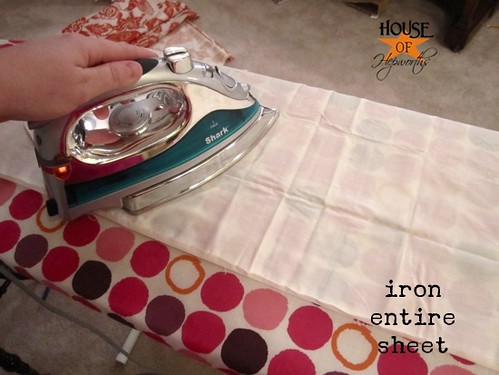
Once your fabric is cut, it’s time to iron!
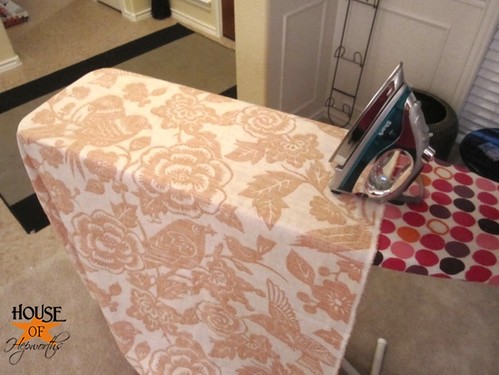
I ironed the reverse of the fabric just to be safe. I didn’t want my iron freaking out on me or anything and ruining my fabric. That would suck hard core.
If you don’t like to iron, you might as well give up now. You will do more ironing than sewing!
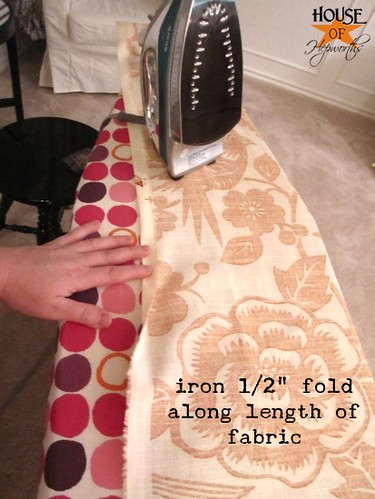
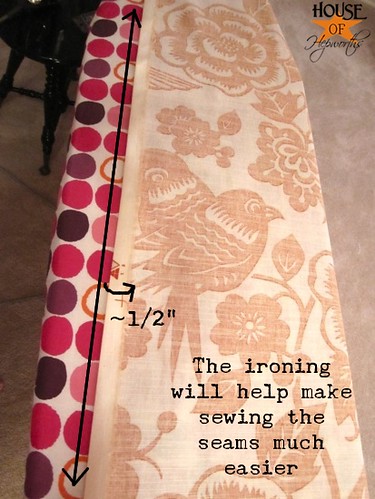
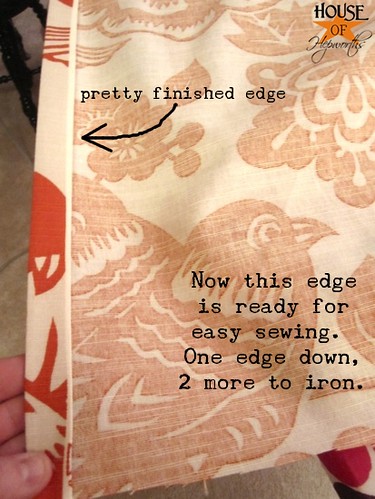
I ironed the entire curtain panel first, then I ironed both of the length-wise edges (sides). It’s much easier to sew the panels if the seams are completely ironed first.
To iron the edge, fold the raw edge over about 1/2″ and press. Do this down the entire edge of the fabric.
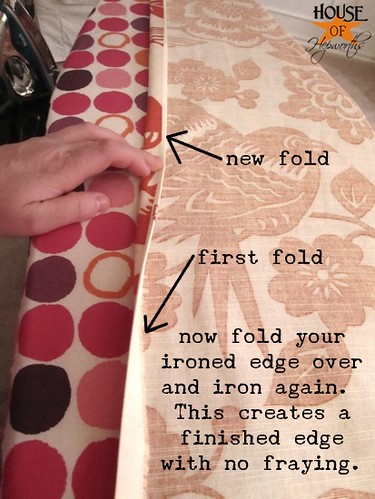
Once your edge is ironed, fold it over again and iron a 2nd time. This is your finished edge that you will sew in a few minutes.
Once your edge is ironed, you’ll need to iron the opposite edge as well.
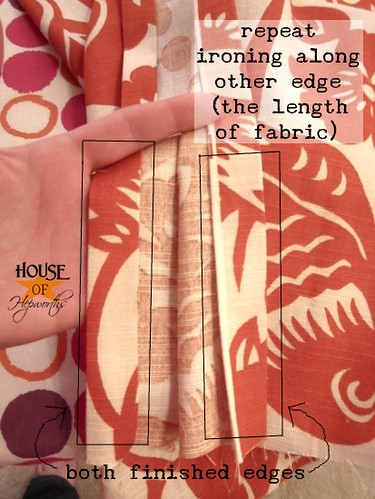
Both edges should now be ironed about 1/2″, then folded over and ironed about a 1/2″ again to create a finished edge.
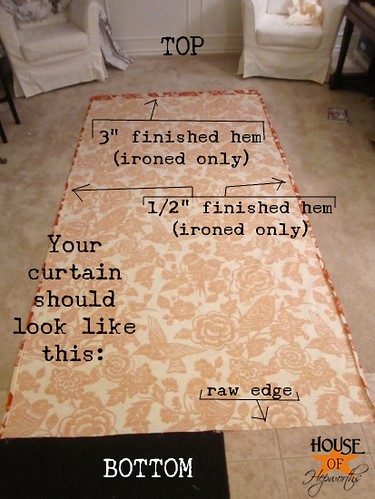
Now iron the TOP of the curtain fabric about 1/2″ over.
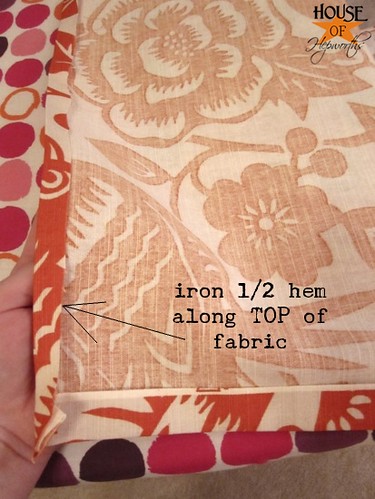
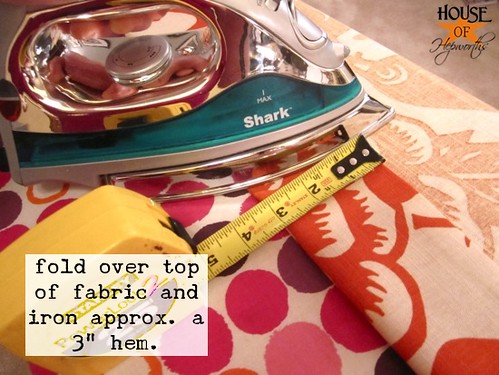
Instead of folding it over a 2nd time and ironing a 1/2″, this time fold over and iron about 3″. This is creating the finished edge of the top of the curtain.
You should now have 3 edges ironed over (twice each) and the bottom edge of the fabric left untouched.
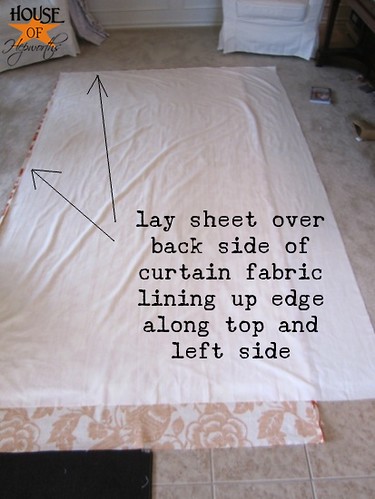
From here, leave your curtain fabric alone. We will now prep the fabric for the lining of the curtain.
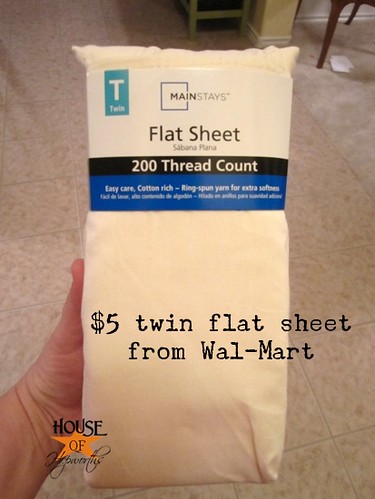
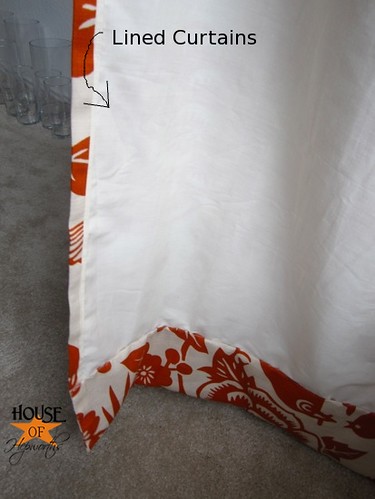
I wanted a cheap solution for the lining, but that was also good quality. My solution? Cream colored twin top sheets from Wal-Mart. They are $5 each, and I bought two packages – one for each curtain panel. They are the perfect length, and just a tad too wide. They are a great alternative to curtain lining fabric and come in a wide variety of colors.
I didn’t pre-wash the curtain fabric or the sheets. If I ever need to wash them, I will hang them to dry to prevent shrinkage.
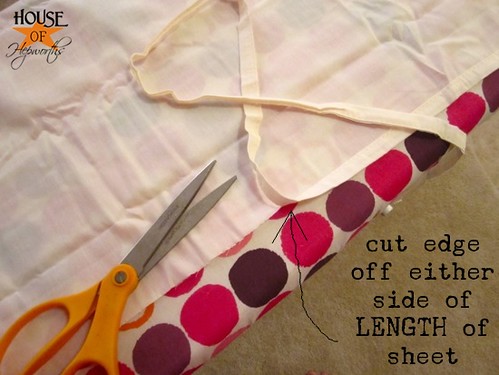
First step to prepping the sheet (curtain lining), cut the hem off of both long edges of the sheet and the bottom edge.
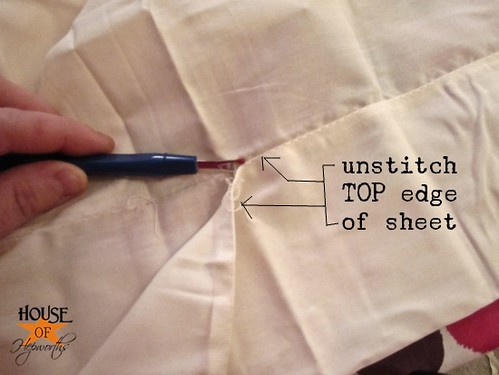
Now un-stitch the top edge of the sheet.
Lucky you… more ironing! Iron the entire top sheet once the top edge is un-stitched and the other 3 edges are cut off.
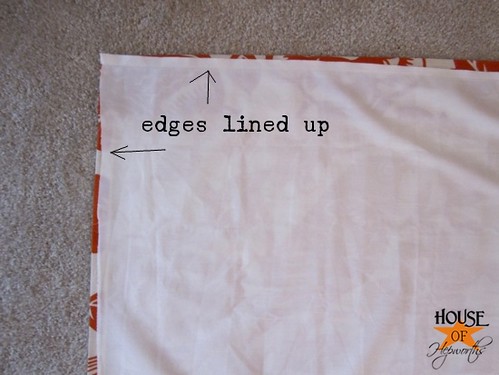
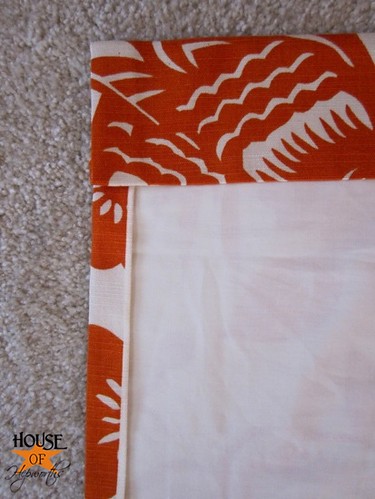
Lay your sheet over the top of the reverse side of your curtain fabric making sure the top and left edge are lined up perfectly with the edge of the curtain fabric. (I am a leftie, so my tutorial is made for left-handed people. If you feel comfortable, you may want to line up the right side first. Otherwise, just stick to the left-handed instructions.)
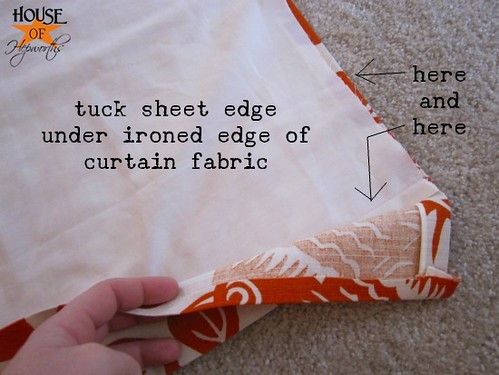
Slowly tuck the edge of the sheet under your ironed edge on the curtain fabric. Tuck only the top and left side. Don’t worry about the right side or the fact that the sheet is too wide for your curtain.
Your top and left edges will now look like this:
Pretty, hua?! Lookin’ good so far!
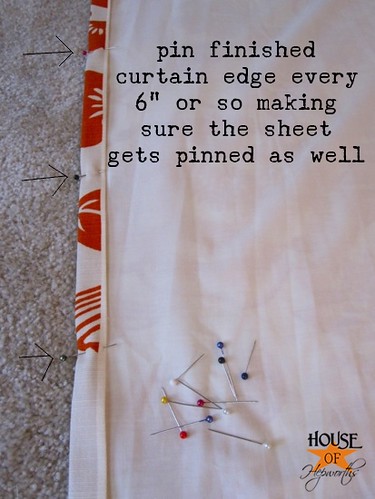
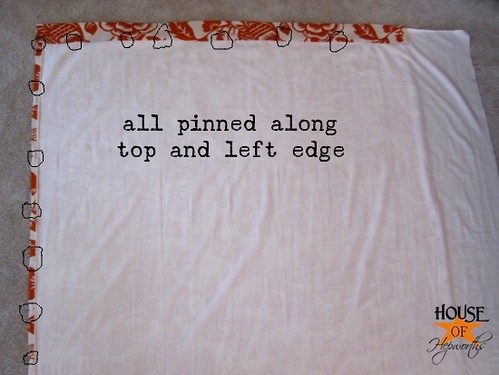
Work your way along the top and left-side edges and pin them every 6″ or so. Make sure your pin attaches to the curtain inside the pleat as well.
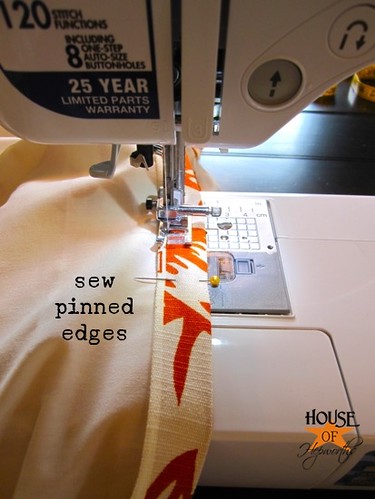
Now {finally!} it’s time to sew! Don’t be intimidated by this step. You are only sewing a straight stitch. No curves or anything!
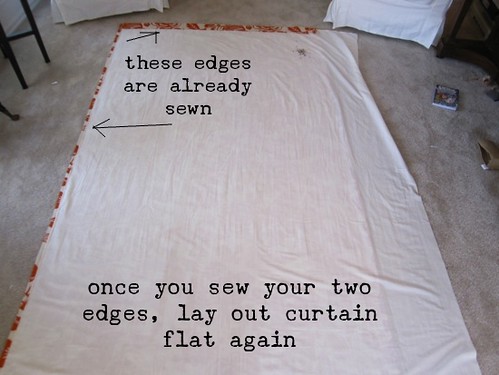
Sew along the pinned edges, removing your pins as you go. Sew about an 1/8″ from your inner seam on each edge. This will leave an almost 3″ gap when you sew along the top of your curtain but that is okay. You can even use that pocket to stick the curtain rod through if you choose to hang them that way instead of with curtain clips.
When you have both edges sewn, lay your fabric out on the floor again paying close attention to getting your sheet and fabric both as smooth and flat as possible.
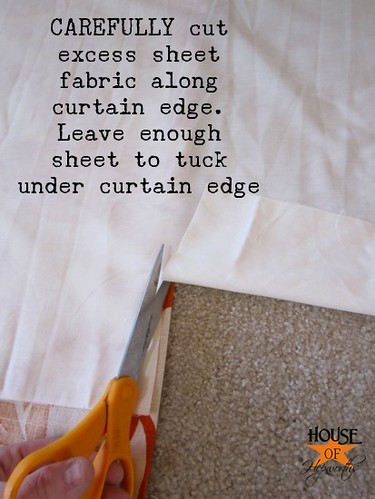
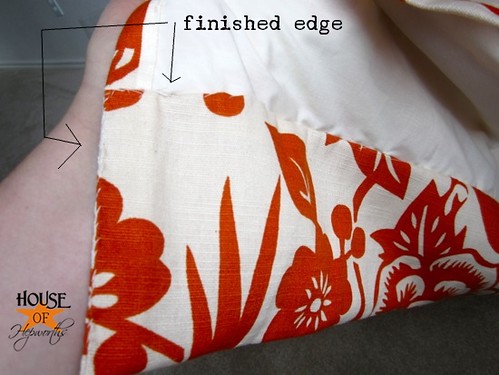
From here you need to remove the excess sheet fabric along the right side of your panel. Carefully cut it along the curtain edge making sure to not cut your curtain fabric. Also, don’t cut it too narrow. The sheet needs to be long enough to tuck inside your curtain seam.
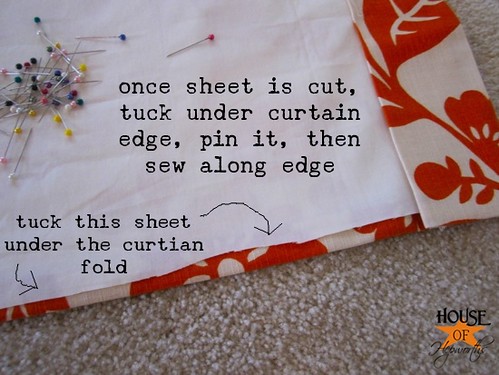
Once the sheet is completely cut up the right side, you will do as you did on the other edges – tuck the curtain under the pre-ironed curtain seam, pin it all the way down the edge, and then sew it.
You are *almost* done now! Yippie! Your curtain is ready for hanging (you will figure out the bottom hem in a minute. I didn’t forget.)
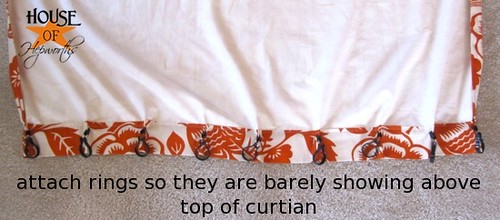
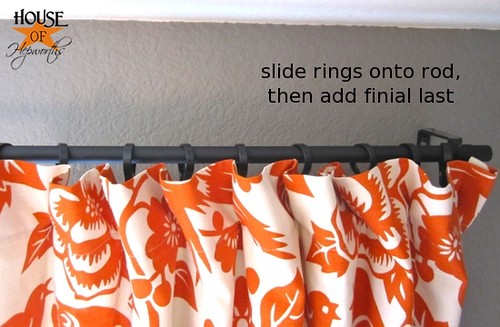
Attach your clips to the top edge of your curtain and hang it. To see how to hang your curtain with faux Pinch Pleats, follow this tutorial.
If you want your curtains to be exactly touching the floor, you’ll probably want to hem them while they are hanging to make sure your measurements are exact.
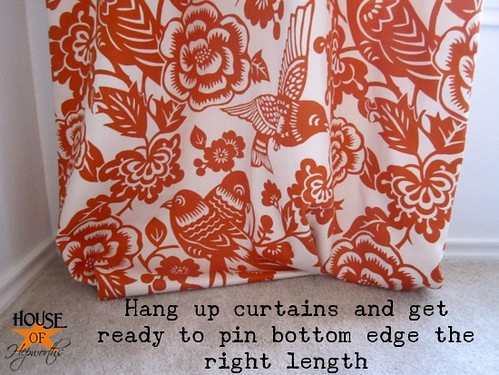
First, figure out how much extra fabric you have.
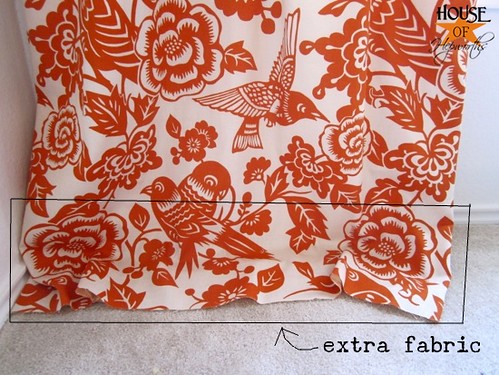
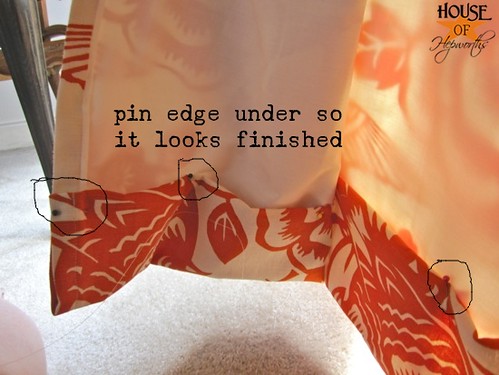
While sitting on the floor, take your time putting pins in along the fabric bottom (on the front of the fabric is easier) to mark where you want the bottom edge of your curtain to fall.
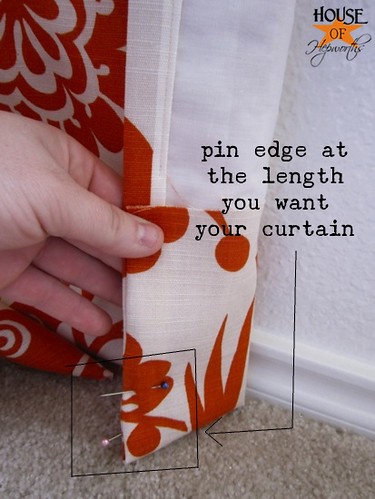
Once you have the front of your fabric pinned it’s much easier to pull the fabric away from the wall and properly pin your fabric for hemming. Make sure to tuck the raw edge under so it doesn’t fray and also keeps it looking pretty and professional.
After you have checked and rechecked your curtain to make sure it’s the perfect length (you may have to tweak it a few times), you can now hem them. I chose to hem them while they were hanging for two reasons: 1) I was lazy and didn’t want to take them down again, and 2) if you hand hem them you don’t see as much stitching across the front.
You can totally just take the curtains back down though and hem them across the edge like you did on your top hem.
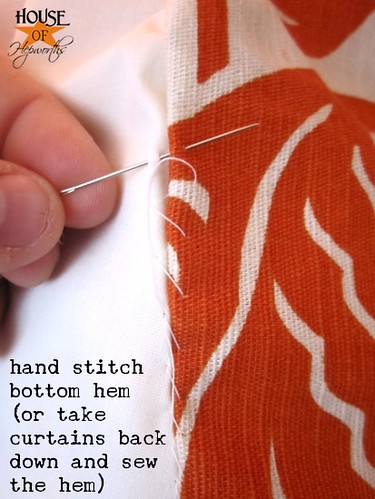
I ended up sewing down the entire edge on the side of the curtain as well because it was kind of gaping open. Here is the finished bottom hem.
You have officially sewn a completely lined, professional quality curtain panel! Now get busy making the 2nd one. 😉

This completes my 3-part series on my Aviary curtains. I hope you learned a lot in the process. If you end up making curtains, I’d love to hear all about them!
To see the original Aviary curtain post, click here.
To learn how to make the most awesome custom curtain rod for only $8, click here.
Check out this other awesome curtain tutorial I made for my daughter using IKEA curtains as a base:
Shopping List:

Instagram || Facebook || Pinterest || Youtube
This post contains affiliate links
Thanks for reading! Have a wonderful week!
Awesome job Allison! The orange is such a fun color, and your dining room looks AMAZING! Great tutorial too, I love how you take the time to add text and circle all the straight pins.
♥ Michelle @ Thrifty 101
This is a great tutorial! I followed it step by step and now have beautiful curtains too! It is so exciting. Thank you so much for the detailed steps. My curtains came out great! I never would have done this on my own. You were a great inspiration to me. Thank you so much! I love the orange curtains btw.
AWESOME tutorial! So easy to do! I just might have to find some fun fabric and make some curtains! Love how yours have turned out!
Thank-you, thank-you for sharing your tutorial! I will be making curtains for my kitchen soon, so your tutorial came at the perfect time! Your curtains look amazing! Your dining room is coming along very nicely! take care!!!
I love how you did this with the sheets tucked under the hem of the curtain. They turned out beautifully!
I’m in the midst of sewing lined curtains (cut and ironed but not pinned or sewn–and you’re right about the ironing!). The sheets would’ve been a time saver. Definitely make sure everything is machine-washable, too! =)
That is a great tutorial! I am so glad you used sheets to line it. I made some cafe curtains a while back and just used some random fabric to back it. I am glad to know that this is not an exact science.
Your curtains look fab btw. Love the fabric:)
What a great tutorial!! And LOVE the fabric you chose 🙂
YAY!!!!!!!!!! They look so great and what a good idea about the sheets!! I have to go get dressed now to find some material!!!!!
The timing of this post could not have been more perfect! I have a bunch of fabric for my bedroom/bathroom redo sitting in my house waiting for me. Now, I don’t have to worry about figuring out to line them without breaking the bank.
Thanks so much for the tutorial.
I LOVED this tutorial! I am so glad to be back in the blogging kingdom. I’ve missed talking with you!
They look so great, I love them! You did an amazing job!
Thanks for the tutorial! I love the fabric you used.
This is a GREAT tutorial. Thank you!!!
This is a fantastic tutorial! Thank you so much for all the details! I think I will be making some new curtains very soon!
Jill of oursevendwarfs.com
I found you via pinterest..thankyouthankyouthankyou for this! The detail you put into this post is amazing. I’ve always wanted to make my own curtains, but got confused with the blogs that have the instructions and like, two pictures. I’m printing this baby out!
They look fabulous!!!
Allison,
First off… the curtains look amazing. I love everything about them and and your dining room, in general!
Second… what an amazing labor of love you did with this tutorial. You are going to help so many people acheive beauty in their homes with all of the photos and tips and tricks.
Finally…thank you so much for taking the time to do this and for giving us the confidence to try some new things!
THIS sis SO great!!! My oldest daughter JUST today- told me she wants to get material & make curtains for her home- this will be bookmarked on my laptop so we will know how to do it. Couln’t have come at a better time for me-tfs!!! you are amazing & I LOVE following your blog.
WOW! They look soo good! And I’m so glad that you posted a second time about this tutorial- I totally missed it!
It wasn’t until a friend “pinned” the tutorial on Pinterest that I was like- hold up!- I know I have seen those same exact curtains… so I checked back here. Glad I did!
Great tutorial- as always- I have learned a LOT from your blog. Keep up the great work!
Gorgeous! Great job!! I have some fabric leftover that I want to make a valence out of and I was wondering what type of fabric to put underneath. You just gave me an idea to run to the Goodwill for a pillow case:) Thanks a bunch! You rock:)
I love these curtains! I am in dire need of some window treatments in my living room…and this DIY is just the answer to my dilemma!!
Thank you!
This is the most easy to follow tutorial I have ever seen! I can’t wait to try it out!
Love the fabric you chose!!! Looks fantastic!!!
Bonnie 🙂
Once upon a time I got really into blogging. I had my own blog (it was private) so all my friends and family around the world could see my kids. Then people started telling me about giveaways that I could win if I just followed this person, and liked this thing… and before you know it, I was following over 100 blogs. Silly me took about a week to figure out how to un-follow all these blogs of women doing all these extravagent things, that frankly I had no interest/money/room/ for so that I could possibly win something that I probably would just give away anyway. So then I started purging. If I didn’t see something in the blog feed that i was interested in over a one week period I stopped following. I now follow friends and family, and 8 blogs from strangers. Your blog is one of them. I was inspired to fix an electrical outlet the other day because you sadi you had a gift at looking at things and figuring out how they go together. It cost me a whopping 69 cents to do. just because I looked at it and figured out how it went together. Nice curtains by the way. i am going to have to make new curtain rods for my kids rooms, because they swing on them and bend them, because they are cheap and come in two parts. Now I can make something strong and cheap and well made! The curtains themselves look awesome, but I am so exctied about the curtain rod! Thank you Allison!
PS If you move to Florida I would love to help you with those dining chairs. I can’t wait to see what they look like in the end!
Those curtains are fabulous!
Such an excellent color for all seasons 🙂
I love these curtains but I have to try to find the fabric at a better deal!!!
These are so great!
I totally want to do this cuz I haven’t found curtains that I just love and I love that fabric that you used! 🙂
itsjustcalledspicy.blogspot.com
WOW! What a wonderful tut. Love all the step by step pics. I will be making some for sure. I have always been scaried to do drapes (even though I sew). This makes it so easy to follow! Thanks bunches!!
So I made some curtains a few years ago and I used a walmart sheet to line mine also. It is now 3 years later and my curtains are still not faded. I was so glad to see that I wasn’t alone. I love your pleats at the top. Such a great idea! I can’t wait to try them:)
I think you did a lovely job on your curtains. I do, however, have a few things I felt it important to point out. Your curtains will not be washable because you a) left the selvedge edges on before sewing (those sides you folded in and ironed first? the selvedge edge shrinks at a different rate than the main fabric and will cause ripples if you try to wash your curtains now, and b) the sheet fabric you’ve used as a liner is inappropriate as well. Fabric stores do sell fabric specifically to line drapes and the liner needs to be compatible with the main fabric if it’s to be sewn in. I don’t want to be a party pooper or denigrate in any way what you’ve accomplished. Just some information from a long-time sewer. They are beautiful and look great in your room! Beth
I agree with you about the selvage – I learned this the hard way. The same with the sheet fabric, although it can be used with some fabrics. Another option (if you would rather not have seams up and down on each side) is to cut your facing fabric the same size as your curtain fabric less six inches and with wrong sides together, sew up each side and top. Turn the fabric right side out and iron. It gives you the lined look with a nice professional 3″ on each side hem without any visible stitching. The bottom can be hand stitched as she shows in her tutorial.
Great idea! Thanks
Awesome! Wow….just what I was looking for. I love the easy button and it looks like you have made an overwhelming project look easy and doable. Your directions/photos are spot on. I can’t wait to give this a shot.The only negative I can think of is that I agree with the other post that you should have pre-washed your fabrics and the sheets.
So glad to find this! I, too, am a leftie; nice to have tutorial from that point. I’ll be following your method to make my next set of curtains for dining room. Thanks for sharing.
I agree with everyone—THANK YOU- THANK YOU -THANK YOU!!!
I’m remodeling a sewing room and have had a roll of the perfect fabric standing in the corner for a month, scared to cut into it, but I’m working on them now. You have made instructions so simple and easy to understand:) I have a question, what size rings did you use and where did you find them?
One more thing, I’m looking for ideas and suggestions for my kitchen/breakfast room for curtains. 5 windows with one being over the sink. I need something shorter, more like a valence, but with a bit of flair to it, I don’t want it too plain. I have great fabric already, so once they’re done, I’ll have a big grin and stare for a long time too.
Thanks again:)))
You can find out about the curtain rings here:
https://www.houseofhepworths.com/2011/10/11/how-to-make-a-cheap-awesome-professional-curtain-rod/
Love love love this tutorial because in my world, you can’t give me too many pictures when I’m learning to make something. 🙂 Thank you. Connected via Pinterest.
thanks for the instructions and the LOLs 🙂
Nice job – especially pointing out probably the most important part is the pressing. Just a couple tips though, if you hem the lining and decorator fabric separate (just stitching the sides and top together) you won’t have to worry about the panel having any distortion. It’s about impossible to get it perfect when doing full length window treatments. Also, the more generous your hems are the richer your finished product will look.
AwEsOmE!!! Question(s): So I have 2 rolls of really cool sheer fabric that I bought to make curtains for 5 large windows in the same living space. How do you make curtains with sheers? Is it different than this tutorial? Can you back them with a sheet the same way just to add a little weight and protect the pattern from sunlight? Lastly, are there different styles of curtains that I can make with sheers so I can add some creativity but still tie all the rooms together with the same fabric? It’s really modern fun fabric so nothing formal. Thanks!
Thank you, thank you, thank you! I have some fun fabric (it’s orange too) and now I need to make my own curtains. I originally came across your diy rod blog post on pinterest. This then led me to your complete 3 part series on how you made these curtains! I am beyond thrilled I found you and can’t wait to get my project started!!
Love this tutorial, makes it look doable for a beginner. One question: how do you determine the size of the fabric you need? Is it a formula like twice as wide as your window? Thank you!!
I am going to try this, I hope it comes out! I’m not a very crafty person so I hope it will work. I might have to tweek it a bit since I don’t have a sewing machine and use stitch witchery, I have found it’s a little easier to use and I don’t have a very good eye for using a sewing machine.
Do you know how to make jabots?
I love this tutorial! I have been looking at making a curtain to cover up a closet that I took the doors off of and just couldn’t make myself get started without knowing exactly what I was doing! I stumbled onto your post today thru Pinterest and LOVE LOVE it. Thanks for the abundance of pictures and great arrows and things so that I know exactly which seams and things you are talking about!
I love her simple instructions and how she also units arrows, and lines to show her exacs within her pics. So delighted to see someone caring about her various readers. Thank you so very much for those acts if love. WE
I love your curtains – you did a fantastic job! I have some tall dining room windows that need covering, but I’m afraid of the price of some of the premade 10′ curtains. I’m definitely going to be linking back to you when I’ve started this project. Thanks for the tutorial!
Hi, I love this tutorial and was wondering if I could feature it on the cSI Project tomorrow. The new challenge is window treatments and this is the perfect tutorial. I introduce the challenge and like to have a tutorial on there too.
Let me know if this is ok.
Thanks so much! I love how they turned out!
Dee, the CSI Girl
Beautiful curtains and wonderfully done tutorial! Thank you!
What a great tutorial. Great pics and easily understood. I have no reason for not doing my own now!
Absolutely gorgeous….I am going to use this tutorial to make my own curtains. I’m your newest follower. Would love for you to follow back.
Sincerely, Heather
My mom bought me a sewing machine for my birthday, and I know nothing really about sewing, the way you broke this down, makes me feel like I may actually be able to do this! Although I do hate ironing (seriously, I am one of thosepople tha irons by throwing things in the dryer with a damp cloth.haha) the pride of saying I made my own curtains will be worth it!! Thank ou for the tutorial!
The curtains look amazing! I have been dying to make my own. Where do you buy your fabric? It’s hard to find fabric this nice!
Thanks!
Your dining room is beautiful. I have a question about the top right corner. If you sew across the top, does that not preclude you from putting the lining under the right side seam? Thanks for clarifying
Love this!!! How many yard of fabric did you buy? Is there a formula to this? the fabric i want says the width is 54″……….I am so lost.
Great tutorial! Made mine last weekend and they turned out perfect! I did all of the prep first and then all of the sewing, easier for me to divide up the work that way…
Thank you!
this is wonderful!!!
Thank you so much for sharing~
I love this tutorial! Your choice of colors is beautiful! Now I’m going to need to take some basic sewing classes…ha.
Thanks for the tutorial. I made my own today using blackout liner for the nursery. They turned out beautifully. I am seriously impressed with how easy it was.
Just found you on Pinterest! I have pinned a ton of tutorials but yours has been the first to prompt me to comment. Your style of instructions is GREAT! I’ve started looking for new curtains but now I think I’ll try making my own! Thanks so much!
This is the best tutorial I have seen on Pinterest! Thank you for going step-by-step with great pictures and captions. I am a beginner and am grateful for your advice!
I just found this now, and it’s exactly what I need! I am about to embark on sewing curtain panels and I’m major fetal position scared. I will follow this to a ‘T’ and kick your ass if it messes up. 🙂
I’ve been sewing for more than 40 years, from patterns and from scratch. I consider myself a good seamstress, and have made everything from Barbie doll clothes (yuck!) to wedding gowns to quilts. I’ve made enough curtains and “window treatments” to adorn every window in a small town. Your tutorial has great tips and tricks that I find FABULOUS!! Thank you so much for sharing! I will be using them on the lovely pink curtains I am making TODAY for a friend’s daughter’s big girl room… and your thoughtfulness has made the lining process so much easier. I’m actually doing a knockoff of a design seen in Land of Nod… I’ve made them once already for someone else, but the lining will be perfect this time… thanks to your design and generosity!
Awesome tutorial! I’ll have to use your suggestions when I make the drapes for my home office. Will mention you in my recent post on http://www.momhomeguide.com on making seasonal valences (like for St. Patrick’s Day) for the home: http://momhomeguide.com/2012/02/28/time-to-replace-the-christmas-valences/
Your curtains are beautiful! I am inspired to see my own. How wide are each of your panels?
This is SERIOUSLY such an awesome tutorial!! As you would say, it’s awesomespice! I LOVE the color!! Orange is my favorite too! 🙂
I found this tutorial on Pinterest and let me just say…thank you, thank you, thank you. I, too, am a leftie and this tutorial is perfect for me. It is so nice to look at something and not have to reverse it in my mind :o) I have been wanting to make my own curtain panels for years and now I am finally going to take the plunge…endless ironing and all!!!
Hi Allison,
I love the curtains! They are so inspiring!
How much fabric did you use on these particular window curtains?
Thanks for the tip!
Priscil
Hi, thank you for all the tips, it looks less scary now 🙂 I want to sew sheer linen curtains … how would you proceed ? only manual sewing ?
thanks
mel
I love these panels! Last night I made a pair for my grandson’s newly decorated bedroom. They were easy, fast to make, and look perfect with the valance of coordinating fabric. Thanks for the great directions and help pictures. I will be using this again and again!
Wow, I came across your site by accident …as we do, via Pinterest. Fairly new to the USA from the UK, we are in the proecess of our home renovation project. I have undertaken a few things before including curtain making, but struggled in the past, so this is refreshing. All I need now is to find somewhere to buy fabric! Thank you. I wil certainly be tuning in regularly from now on.
I love it! This and the rod is fantastic! Thanks so much for sharing your creative how-tos, I’ll be linking.
I love this tutorial! I will definitely be using it to make some curtains for our living room. To echo a previous commenter, where do you find fabric? Anything cute that I find is often over $30/yd, and that is out of my budget. Thank you!!
I found the photo of your dining room on pinterest and I love the curtains. Thanks so much for the detailed tutorial. I love that you used the sheet as a liner to save some money. That’s a really great idea. Thanks for sharing!
This is a great DIY tutorial for lined panels! I have one tip that may make it easier…before turning the sides of your panel, lay the lining down first and turn the lining with the main fabric. Make sure you smoothe it nicely so the lining lays flat with the fabric…
I am new to your bog and will start to follow it now…looking forward to reading your previous posts!!
Thanks!
Gosh! I read just every word of this post and the one about the curtain rods and rings…Wonderful and informative! I home-make all of my curtains and I was happy to see that the method I use is almost exactly like yours (with lots of ironing too). When people tell me that they like them, I say “well basically they are just rectangles on rings”. I love, love, love the way you put your rings DOWN on the header…I don’t like seeing a lot of “hang-y’ stuff between the cutain and the rod. I have the Aviary material in the yellow color waiting to be made into curtains to hide my laundry room from folks who come to the back door. I saw your post via “Tip Junkie”.
Best curtain tutorial ever!! I can’t wait to try it. I do have one question. You say to sew the left side and the top before cutting and tucking the right side. Did you sew completely across the top at that point? If so, how did you tuck the liner under the top right corner since it would then be sewn top hem, liner, then the right hem. Is my question making sense? Thanks!
So many lovely things said about your project, and it was a labor of love. However, I have to agree with Beth. They don’t constitute “professional” as they are not constructed to “industry standards”: i.e, the selvages removed, sheeting material is never used to line good quality drapery goods, always use a suitable lining fabric in either ivory or white. These fabrics aren’t really meant to be washed, if you want them to look professional for a long period of time. Also, never stitch the lining inside of the face fabric (the drapery fabric) it will pucker in humidity and if you wash it (or even dry clean it) it will pull. They should be hemmed seperately and the fabrics should be attached at the top only.
LOTS of good books available at Calico Corners and in the library as well as good paperback booklets (even very old ones cover all the good basics) made by Simplicity. I used to sew lots, and for the last 20 years have been designing and selling custom window treatments.
Good luck to all of you. Its fun to read of such inspiration and see what you are doing. These tips will keep you happier with your efforts in the long run for years to come. Keep sewing!
Also you do not want to hem your lining into the decorator fabric hem. Normal relaxing and shrinkage of the different fabrics will cause puckering. And definitely get rid of all selvages.
I LOVE the tutorial!!!!!!!!!!!!!
A lot of detail (which you need if you’re dumb like me)! I am moving into a new house you see and all of the windows either have no curtains or ugly old things. I wanted mine with linings which yours do have, so this was the perfect tutorial!!!!!!!!!!1
THANKS A MILLION
I think this curtains fit for my condo. The colors are so perfect to. Thanks for this!
arrielle_p
Allison, you are AMAZING! How do you have the time for all of this with 2 kids!?! Anyway, I’m officially obsessed with your blog and this tutorial! I just sat down to make my curtains last night, and have one of 3 panels finished!!! It looks AMAZING and so professional. I followed your tutorial picture by picture, line by line, and it worked for even a novice seamstress like myself! Thank you for posting blog posts like this…I wish I could pay it forward!
OMG. No seriously. OH MY. What a great tutorial. I’ve been looking for someone to walk me through sewing lined curtains and you’ve done it! Thanks so much for the detail and the photos. I’m going to make some curtains for my living room. Yippee!
You are super talented. Came over from google while looking up Restoration hardware slate. I’m hooked. Thanks for all the detialed how tos.
Where did you buy the fabric?
I know this post is from ages ago, but I have had it saved forever because I love your curtains so much! I think you have given me the courage to brave this on my own but I was wondering if you could share how many yards you bought for your window and/or how you figured out how many you would need?
Thanks!
I love your blog! 🙂 Very helpful. very step-by-step… love it! Keep it up!
You are so detailed that this is dummy proof. Thanks for taking the time to display the photos as well…these were such an added aid to go about making the curtains. You heloed me to save hundreds of dollars. I am not a seamstress but sure can be one now thanks to your tips. You are definantley creative and cost efficent. I love the orange….it brings such warmth to the dining room. Awesome job.
They look amazing and I’m so jealous of the fabric. I used your post as a base to make my own curtains. I linked back to your blog. Thank you for the inspiration.
http://allforoliver.blogspot.com/2012/05/curtains-and-pillows-oh-my.html
Thank you so much for this wonderful post. You have no idea how helpful you have been to me. I have been wanted to make my own curtains for well over two years now but I was to afraid to begin and my mother gave me a sewing machine for my birthday 2 years ago just for my curtain project.
Genius! thank you for the great curtain rod and curtain tutorials. Your curtains are beautiful and the twin sheet idea is a super one. Love your blog and tutorials!
I am making curtains this week for our new house… it’s a “fancier” house than the one we live in now, so I think lined curtains are in order!!! Once again, HoH to the rescue!!!! I love this blog; it is the resource of all resources. Thanks for sharing all your ideas so freely.
I do not even know how I ended up here, but I thought this post was good. I do not know who you are but certainly you’re going to a famous blogger if you are not already 😉 Cheers!
WOW! Thank you Thank you Thank you… WOW! It’s just that I… Thank you so very very much for sharing.
I cheat when lining drapes. I cut the lining material about 4″ narrower the the fabric. Sew up the 2 sides and press. I then make a seam to hold the lining in place about 2″ in from the edge. I do the top and bottom the same way you do except I machine sew the top and fusible tape at the bottom. By doing the fusible tape once the drapes are up I never take them down. I just scoot the ironing board to the drapes and press.
Allison,
Thank you so much for your wonderful tutorial!!! I have never made curtains before (and have only used my sewing machine for one other project) so I was searching last night for lined panel curtains and your blog was one of the first to appear in Google. Your easy-to- follow descriptions and detailed pictures were exactly what I needed!! I already had decorator fabric and lining; I just had no clue how to make my vision a reality…..until last night. And there your blog was…it was a God-send! So today, I did it!! I MADE MY CURTAINS and love how they turned out! My panels didn’t need to be as long or wide as yours so I went ahead and cut and pinned the lining all in one step, eliminating the need to go back to the floor after sewing the top and the right side. Also, after sewing the top and the sides, I ironed the bottom hem and went ahead and sewed it on the machine as well. I think from cutting out the fabric, and ironing and ironing and ironing, to pinning, sewing, hanging it only took me 5 hours total. I’m sure that someone else could probably do it faster…but I’m feeling like I can do anything now!!
Thank you again!!! I’ve pinned several of your cute ideas to my Pinterest page, and this tutorial is linked to today’s Facebook status! I’ll definitely come back and visit often.
🙂
These look great and your tutorial was so detailed (thank you). I’m eager to start making lined curtains and love your idea of using a flat twin sheet for the lining! Love it! :o)
Meredith @ http://www.waittilyourfathergetshome.com
This may be a silly question (I’m not overly familiar with fabrics and such), but if I’m wanting to just add liner to pre-existing curtain in a child’s bedroom, would the sheets work to block out the sun or should I get blackout liner, instead?
I am so happy I just found this on Pinterest! I am decorating my new condo at the beach and wanted to make my own curtains! I was just going to wing it, I’m glad I found your step by step to follow. Now I feel completely confident! Now I just need to finalize my fabric choice- tough decision!
These are the easiest and most awesome way to make curtains. Can’t wait to make some for my den !!
I like the step by step you presented can you E-mail me the step by step on this and will be following you on all your steps on your how to.
Thanks
Jacquelyn Tippins
I just made some absolutely beautiful curtains using your blog as a guide. Thank you so much!
Wow! We are moving, and I’ve been puzzling over how to make these blasted curtains. Your instructions are easy to follow, clear, and simple!! Thank you so, so much. Just made this an easy job!
Brilliant!
Thanks so much for posting.
I’m working on this project, as we speak! A couple questions: Is it necessary to un-stitch the top edge of the sheet (a.k.a. the lining) and to cut off the sides?
Also, the fabric I’m using is vertically striped. Do you have any tips for making sure the header is straight? It seems like this should be easy, but I just keep ironing and looking and then re-ironing and re-looking… I even got out my man’s carpentry speed square, but I’m still nervous the stripes are going to be crooked when I hang the curtains! Advice?
Thank you for such clear instructions!!! And pics!!!! Doing a remodel/redesign and these curtains will be perfect!!! Woohoo!!!
Really like your easy instruction on how to achieve making these drapes for any room. I am in the process of making some for my bedroom to replace my wooden blinds. I just have two questions for you. One – did you use regular drapery material? Two – How wide was the material that you used?
Thank you,
Bobbie
Such great and easy-to-follow instructions!! Thanks for taking your time to photograph and label all the steps! For me, a picture is worth a thousand words!! Just about to make some of these for my daughter’s college apartment…….figuring out measurements now!!
Can you tell me how much “extra” fabric I will need in width( to pull of the faux tuck) to fit my 31 1/2 inch wide window. I want to be able to close the curtain and have it completely cover the window
Thank you so much for the great tutorial. Even a non sewing person like myself was able to follow your directions and make great curtains.
Worked 3 years in a professional drapery workroom – and this is so much easier – and looks just as good!! Thanks for the tutorial!!
These turned out great! So much cheaper to do it myself than pay the outrageously high prices I was getting from seamstresses and drapery makers. The hem was too thick to sew with machine, so had to hand stitch that part. This project took me about 6 hours (and I haven’t done any sewing in years, so I was pretty rusty)!
Hi. I looked at your tutorial on making the panels. Lovely fabric. When I make panels, I always have the sides folded over the hem because it gives a nicer finish and you can angle in the side. Also, using a sheet from Walmart might pose a problem if not prewashed as if or whenever the panels are washed the lining will likely shrink and not hang properly as opposed to if you used an actual lining fabric which has been properly lined up before sewn.
This is by far the most detailed and well thought out tutorial I’ve come across. They look wonderful. Thanks.
Hi, Allison!
I wanted to thank you – I just made my first curtain in my life!!!! This morning I was looking for instructions long time and there was no instruction in my language (latvian). Then I found your post!
I’m a total sewing amateur but your excellent explanations step by step using photos helped me in every move. I can’t wait my husband come home to put curtain rod and I will finish our bedroom’s extensions 😉
Thank you very much and good luck
Eliza
Hi! I loved your curtain tutorial. I was just wondering if you considered matching the pattern so it lines up the same on each drapery panel and if so, how?
Thanks!
Any ideas about what to use for blackout curtain liners?
Thanks so much for this tutorial – we used this to make 6 panels for our living room and they are beautiful!
This is such a great idea and perfectly timed for me! I am about to start making curtains for my living room and was trying to figure out what I could use to line them cheaply. Thanks for sharing!
This tut was an absolute GODSEND! I am going to try to find a suitable fabric for making INSULATED drapes though, as that is my main goal here. Big windows are wonderful for letting light and air in, but a detriment to my oil bill in the winter! Thanks so much, this was very clear and you made it seem so very simple that even I can do this! 🙂
Thanks for the twin sheet suggestion. Ran to my Walmart this morning, grabbed two pks and was on my way. Your instructions were so helpful.
How much extra fabric should I use for the fake pinch pleats? I found your website just in time! We just bought a house with NO window coverings downstairs! My new curtains are coming together and in the mean time I’m using my lining sheets to cover the windows 🙂
I found this tutorial on Pinterest after searching for that fabric (i found a yellow version by Thomaspaul at Hancock Fabrics) and followed your tutorial to make some amazing curtains for a sliding glass door in my master bedroom ( I used blackout fabric for the lining, I am a nurse sometimes i have to work graveyards and sleep during the day). They are gorgeous and I used your tutorial on making the curtain rod as well. Still looking for finials but they are perfect. I used the 3/4 inch conduit and three double hang rod brackets from Lowe’s, to make a double hang bar for sheers and the blackout curtains.
THANK YOU!!
So glad to hear the tutorial worked for you! I’m glad you love your new curtains and rod.
Great tutorial! thanks
I have been sewing for 43 years and have never made a lined drapery panel – I am getting ready to make some for my new dining room out of a very expensive silk fabric and got so confused reading all my sewing books! Thank you for your very easy to understand instructions and the pictures are GREAT!!
I love your blog, I love your sens of style, your wit…..and I love your projects!!!! Kudos to the House of Hepworths!!!!
Thanks Bridget! You are so sweet.
Love you!!!! LOL. I’ve been searching for drapes for my dining room for about two years but haven’t found anything that I liked (that didn’t cost an arm and a leg). I found beautiful fabric recently and wanted to make my own drapes but I was scared I couldn’t do it. I am scared no longer! I’m about to head out and pick up a few supplies (like an iron!) and should have these finished by the end of the weekend. Thank you so much!
Yay! I’m sure they will turn out amazing!
BEST Tutorial I have found for making simple lined curtains. I love it!!! Thank you!
Wow Good job Thanks for sharing its easy to do it makes me do something while im at home.
Very Easy directions. But could you show how to do the same type of drapes with a blindstitch??? Please!!
I love your description and the finish product. I can also sense the humor (if you intended) in your tutorial all the way through. I bet you type as you would speak and that makes a good tutorial fun to experience, walk-thru and super (feel-no-pressure) non-dummyish. Great job and keep-it-crafty!
Well thank ya ma’am. I am just a little sarcastic. I love making people laugh with my weird twisted sense of humor. Glad you liked the tutorial! Have fun making curtains.
Found your blog while researching making curtain rods out of conduit. Love your curtains. I’m about to make some for my new house and I had to laugh that you lined them with wal mart flat sheets. I use them for everything. Cheapest fabric out there and so good for backing quilts or curtains!
Nice tutorial, although I agree on prewashing the sheets as well as the comment to sew the liner to the edges from the inside and then turn out. Another comment I would make is re sagging: I would not attach the liner to the curtain at the bottom.The liner will sag differently from the DF.
You made this look so easy, with excellent instructions. I’m going to return the $170 (unlined) drapes I just bought 🙂
Seriously!!! I have read so many instructions and I “get” the concept but your pictures with the details make it dummy proof for me for the first time. So AWESOME!!!
I am new to sewing and I think this will be my big project sometime this year! My question is, how would you make your panels wider? I have very wide windows.
Just wanted to thank you for this. I’m about to make some curtains and THESE are my directions. Thanks for what you’re doing!!!
Hey! Blast-from-the-past!!! I ran across something with Ben’s name then poked around and found you here… so talented!!!
Hey! Blast-from-the-Austin-past!!! I ran across something with Ben’s name then poked around and found you here… so talented!!!
I just want to thank you so very much for these wonderful step-by-step instructions. I am normally very impatient, and I am so glad you added the blurb about if you don’t want to iron, you might as well give up now, because it is that exact blurb that kept me being patient and going with your steps. I only did a couple of small things different, but you have it so well written! I am so thankful for this post. Thank you, thank you, thank you. My curtains look like I had them made and they are 13 ft long, so it was quite the challenge and so worth it!
thank you! your photography and explanation are fantastic! i might actually be able to do this!
This is awesome! You spent a lot of time photographing your steps. Thanks so much for sharing!
Thanks SO much for inspiring me!! I hope to make living room curtains this weekend. Given the faux-pinch pleat, how do I figure out the fabric width needed? Would I need more than the standard one-and-a-half-times-the-width-of-the-window formula?
I’ve been searching on the web for an easy to follow and complete guide to curtain making and I’ve finally found it! Thank you! Sometimes you just need to know the step by step of something before you do it. Your site is great and I shall make my first set of curtains as a result 🙂
Thank you for posting this complete and amazingly easy tutorial. I followed it exactly and made some lovely curtains for my office. Just a note to others, if you are making very long curtains like I did (108″) the sheets might be shorter than your curtain. I still used them because the lower part of the curtain was against a wall and hence did not require lining.
Excellent tutorial! This may be a repeat (I didn’t read all 167 comments), but to make your curtains/draperies hang well, stitch a drapery weight in the hem. What I do is stitch a washer (as in screw and nut) they are cheaper and easier to obtain. Keep up the good work, and thank you for sharing
HI,
I first saw this post a couple of months back, after I had finished lining some curtains. I swore I would never do it again but after finding this it gave me hope! I tried your method yesterday and it worked so easily!!! Thank you so much for posting this. I purchased my flat sheets from IKEA for 3.00 per panel. Pretty cheap. Thanks again.
I love this! I’ve been buying every white sheet Goodwill has to line things I’ve made for years, even the slip covers I made for my living room furniture!
I love the orange curtains! Awesome tutorial. I am making 6 curtain panels for my daughter’s new bedroom in a pink/white chevron pattern. I found white flat sheets at Ikea for 3.99 each! I will be using your tutorial because I want them to look good! This is the first time I’m doing curtains, so I hope they come out looking nice! Thanks again!
I have trouble learning from written/even pictorial material, so I tried several other sites before I found this. Yours is the clearest one I found, and the one from which I was able to make my curtains! Thanks
so then can I use a blackout liner instead of a sheet?
thanks
I just found your site…..LOVE IT!!! Thanks so much for making this tut soooooo easy for me to read and understand! I am empowered now!!! 🙂 Great idea on the Walmart sheet! Am your newest follower.
Kelly
I have made lined curtains before and it did not seem this straightforward. I think I really complicated the process. This is an absolutely fabulous tutorial and wish I would have known these tips years ago. Thanks so much for sharing them! I am pinning this to come back to when my husband finally relents and lets me put curtains up over his beautiful trim work.
Krista
Pure Genius! I have made my own panels before, but never with your iron, tuck, sew process. I have eight panels to work on for my next project and this will certainly make it go so smoothly! And I love your comment about ironing! I spend just as much time ironing as sewing on some projects!! Thanks for posting!
Thank you for posting these with text over the image with arrows. It makes it a wonderful reference when sewing, all I had to do was glance at the computer and see the next step. It was so much easier and less frustrating. Keep them coming!!
thank you! just made curtains for both of my bathrooms! i can’t believe how awesome they turned out! thank you for your efforts!
Love your tutorial. I really want to try it! Can I ask how much fabric did you buy for this? I guess how many yards?
LOVE this tutorial – I just finished my curtains and blogged a link to your site. Thanks for making it easy!
Thanks for the curtain tutorial. Made a pair today! Super easy.
love your tutorial, will be making the curtains for my dining room.
What a PERFECT tutorial. You nailed me when you said one might be overwhelmed to start. Yep, that was me. I bought the material and lining and it sits in the closet. I can’t believe how anyone could go wrong following your tutorial. Thank you SO MUCH!
This is awesome! Just wondering–with the faux pleats, how much more width should I add to the panels? 50% wider than the window? 100% wider? Thanks in advance for your help!
18 moves, 7 states and lots of windows later :
Tablecloths! They come in many lengths and wonderful colors or prints, the edges are already finished, extremely easy to wash, the fabric is durable and the best part is the curtains match the table covers for your dining room or end tables perfectly.
Just use curtain clips on top edge to hang or use two tablecloths of different colors hung back to back to have a wonderful color layer for your neighbors to see, while protecting the inside layer from fading.
You can also sew a simple pocket for the rod to slip through for a classic look or fold over the edge and add large grommets for a modern look. I have used oval or round table covers to make valances, just fold over the rod and tie a ribbon or two around the rod & table cover for a finished look.
When you are in a new community with lots of new neighbors or if you are Military family you may want a new look for your home so save the old tablecloth curtains to pass on to others. (No paper covered windows in my neighborhood.) Grannie Neenee
Okay, you are a genius! Girl, I am putting this tip in my back pocket and am going to try this. And tablecloths come in so many different lengths. You are bound to find one the right length for your window. Just don’t get a round one. 😉
Mind. Blown. Tablecloths would allow for such generous amounts of material, too. Grannie Nannie, you just seriously took my stress level from 100 to about 50 when it comes to decorating our new home. Seriously. There are 7 downstairs windows, two sliding doors, and 8 upstairs windows, and I had no idea how to approach doing them without spending $4000 on window treatments because I only own treatments for three windows for our apartment.
For a cheap trick in a hurry, use flat sheets from Walmart as curtain panels. Make the top curtain rod pocket by folding down the short bottom edge (use the pretty sheet top edge as the bottom hem) and stapling (yes, use household stapler!) along about three inches. You can leave the tail, just put it next to the window. I did this for five years in my college dorm room with the same two dark blue twin flat sheets, I just removed the staples before I relocated each year. You can do a double rod and use a set of cream sheets for a “sheer” inside curtain if you have extra funds.
Thank you for sharing!! Getting ready to make some curtains now!
I would love to see them when you are done!
Hi!! Love your project!! I’m new to sewing but I am trying to make some curtains! Any ideas of materials to use to line curtains to make them more climate controling? We need climate control curtains but I have no clue what to use!!
You should check a fabric store. I bet they will have some good suggestions.
So I wanna say thank you for the directions I will be making my curtains from now on out. I made my first set tonight and I am so excited.
I made drapes years ago for my LR (just winged it, it was long before your tutorial!) and you made some really good points, that I wish I had done…these that I have look “ok” but there are things about it that kind of bother me…so thought I’d share this and hopefully help some other people out there…# 1-where to find material. I live near Houston, tx-there are many, many options.. But sprinkled nearly all around are your typical Jo-Ann’s fabrics, Hancocks, sometimes Walmart carries fabric (not really upholstery thickness, though) and Hobby Lobby. If you sign up for their emails (Hancocks, Joanns, HL) they nearly always send you coupons and I know Hancocks will also honor competitors coupons, not sure about the others…they also give a teacher discount (all days) and certain days are senior citizen discounts and active duty/dependent military discounts. You’re bound to find what you want at these stores, but if not, I know of some other places in Houston that are AMAZING; one I’ve been to is called “the whole 9 yards”-they have SOOO much upholstery type fabric, on BIG rolls, and really good sales and closeouts. Places like this also have all the types of lining material you would need, and it’s not expensive at all (the blackout and thermal material, too) and also these type places have tons of trim. It’s worth it sometimes just to go look, at least once, just for the fun of it. Ok there’s a lot more to say but this comment is already too long, so I’ll have to do it a little bit later! Thanks for your tutorial though, it sounds like you’ve inspired a LOT of people!
NICE!!!!!!!!!!!!!! THANK YOU SO MUCH!!!!!!!!!!!!!!!!!!!!!!!!!!!!!!!!!!!!!!
Thank you. FInally have some new curtains in the kitchen and I think I figured out how to use my sewing machine. Followed instructions step by step and they came out great.
Would love to teach you the correct way to make custom lined draperies.
I got here from Pinterest. Thank you for taking the time to demonstrate this so well. Your curtains are beautiful and well-made. I’m feeling brave…
Love your curtains! can you tell me more about how/where you attached the rings? where did you get them? thanks
The rings are from Ikea.
Thanks to your tutorial I just made my first curtain. Went pretty much to plan, after turning of the air blue and a snarl up on my machine. Thanks for the step by step guide. Best wishes from the UK
Thanks! I used your step by step instructions and sewed 4 panels for my dining and living room. The pictures helped my so very much!
You are a frigging genius. THANK YOU!
I made a set of curtains using this guide. Yahoo, someone advised me to use this method years ago. I forgot…
Im using a rod from IKEA its a wire with clips which is really inexpensive, like compared to the fabric I bought to make the curtains. Im happy with them they go from cieling to floor, the window ist huge. I just wanted to do something different.
Dude’s can sew, we just use industrial machines…
Thank you for the tutorial. Your curtains look fabulous!
Loved your simple and easy going tutorial! Just got done making some cute white eyelet lined curtains for my vintage camper. Love this!
This is just the best tutorial. I searched all day and finally found your blog. Thank you very much.
not good instructions. and you said weird words ” suck hard core”?
Great tutorial! I followed your directions for my living room curtains and they turned out so well! Take a look!
http://beautybwb.blogspot.com/2014/07/energized.html
Hi,
Just wondering on the width of the panels? I’m not sure if I missed it above, but how do you calculate how much wider the panels need to be than your window? Thanks!
I stumbled upon this amazing instructional blog. That how to make professional Lined curtain panels. Thanks to Allison’s wonderful picture guided, dummy-proof instructions.
Thanks so much for this tutorial. I am making my kitchen curtains now.
Very, very nice! But I think you’d really need to be focused and particular to accomplish those curtains like yours. Great job, anyways!
Great tutorial! I sew but haven’t made lined drapes. I knew I didn’t want to sew the sides and top together then turn inside out. It shows this on several other sites. Your way is so much more professional and will give a much better finish. My fabric is currently on the floor and calling my name. Thanks so much!
This is my method too. Except the hem, this is where i really cheat. I hem and pin the same way but I drag the ironing board over and use fusing tap and iron the hem to the curtain. Done no hand sewing on the floor.
Even through this post is a bit old, it is the absolute best tutorial I have researched so far on the internet. Many people say that they can teach and give simple direction on making a lined drapery panel, but I have found this, not to be the case. I find your instruction and directions so simple a child can do this, which is how individuals need to learn. Thank you for your drapery tutorial. I am definitely going to use your instruction.
when I make lined curtains I just see right sides together & then turn right sides out. If u want a deep
Hem just cut the lining 2-3 inches shorter.
awesome tutorial! I personally I love lots of photos when they are helpful and yours were super helpful! I’m still trying to build up my nerve! guess i should start by dusting off my sewing machine! thanks so much!!!
I’m getting ready to repaint the living room and trying to choose the color. Browsing an image for Chelsea Gray, the blogger (diydiva) said it was a match for RH’s Slate Gray, which you used in your home. I have an RH nearby, so I followed the link to see your new dining room (wow, that was some fugly faux!). I realized this blog looked familiar. Is this the person who taught me to make the curtains for the kitchenette? Oh, yes, cool! I haz skilz now (and lovely lined curtains) thanks to you!
Hi — these look great! I am stealing for some deperately needed new living room curtains to replace my sad droopy ugly ones.
One question: The fabric I am using is fairly heavy — do you think the curtain rings with clips will hold them up? Your fabric looks like it has a decent weight to it, so just curious if the clips are doing a good job over time.
QUESTION….. does your dining room have 2 panels hanging, one on each side? Or did you make 4 panels, 2 on each side?
So nice to see a tutorial with visuals. Easy enough for a normal person to follow.
Found this in 2015. From Singapore. Super great tutorial. Sp easy to understand and follow. Thank you for posting loads of photos. (:
You need to be a part of a contest for one of the finest blogs
on the net. I will highly recommend this blog!
Well thank you very much!
Hi, I just wanted to let you know that I featured this tutorial on my blog: http://www.sewingshop.net/blog/lined-curtain-panels/
Thank you for explaining everything in detail, it’s very helpful!
Why didn’t you just do a bag lining and hem? You added TONS of work to this effort.
Beautiful. I did take your idea for using the sheet. Awesome and cost effective. But what I do is cut the sheet same size as fabric. Lay them together, right sides facing. I am not an ironing fan. A horrible fault, but this seems to help eliminate some of it. I sew a seam all around, leaving an opening to turn right side out. Now I iron. From the front I turn under, lining and fabric to the back. Turn under your header amount, hem amount and sides amount. Once turned back, you will have your fabric showing on the back. Press nice and crisp. Now top stitch, your hem and sides. The top edge you will sew two rows of stitching which is where your rod will run through. Pretty simple. Sorry, no pictures yet as I have moved and left curtains at other house. Yep, on my list to start making new ones for our new place. Side note: When I do my final ironing, I use magic sizing. Crisps it up and helps to keep dust from penetrating fabric.
Thank you so much for this tutorial! My drapes look professional due to your instructions! I’m so glad I found your site
Hi! How did you measure your panel widths? If my window is 42″, what do you suggest each panel to be?
Thank you so much. Sewing is all VERY new to me!
Thank you for this awesome tutorial! The pictures, the clear, informal instructions, and the encouragement all helped me make great, lined drapes for my first grandchild’s room.
I had already purchased lining fabric–and the instuctions worked just as beautifully!
Thanks!
Once you have your fabric cut to size, cut the lining width 4″ narrower than the fabric. Sew the fabric and lining together at sides allowing a 1″ seam. This will still give you a 1″ fold on either side to hide the lining from showing. Fold down 3″ as you stated for the top and stitch. Also fold up hem and stitch. No ironing needed for seams until it’s finished. This will save you half the time and “none of that pre-ironing”.
thanks you
I wanted to thank you – I just made my first curtain in my life!!!! This morning I was looking for instructions long time and there was no instruction in my language (latvian). Then I found your post!
I’m a total sewing amateur but your excellent explanations step by step using photos helped me in every move. I can’t wait my husband come home to put curtain rod and I will finish our bedroom’s extensions
Thank you very much and good luck
Darep.
Here it is July 2017. I wish I had known about your blog years ago. Your tutorial for making your own curtains is WONDERFUL. Each step had a picture and it was so helpful for those of us that don’t sew much. Thank you and you have some beautiful tangerine dining room curtains. Thank you thank you!!
Your tutorial is amazing!!! I’m just learning to sew, as I took an early retirement. I seriously had NO experience one year ago. I started with embellishments to my current window coverings, and today I am following your tutorial; voila, LINED CURTAINS!!! You have an exceptional way of explaining instructions anyone can understand, which is an amazing talent. Thank you again!!!
Enjoyed watching your tutorial, so straight forward.
Thank you for posting.
Just use curtain clips on top edge to hang or use two tablecloths of different colors hung back to back to have a wonderful color layer for your neighbors to see, while protecting the inside layer from fading.
You can also sew a simple pocket for the rod to slip through for a classic look or fold over the edge and add large grommets for a modern look. I have used oval or round table covers to make valances, just fold over the rod and tie a ribbon or two around the rod & table cover for a finished look.
Just came here to tell you that even nearly 10 years after you posted this tutorial, you are STILL helping people! THANK YOU! I just made 2 floor to ceiling panels for about 1/3 the price of custom panels, and I have the satisfaction that I did them, and they are completely unique. Thank you, thank you, thank you!
Love this tutorial! I am new to sewing and would like to make my own curtains. I already have a curtain rod that seems to be a lot thicker than the one you used and I was wondering if the rings you used from ikea could accomodated a much thicker rod? Do I need to find larger ones? Thank you for the wonderful info!