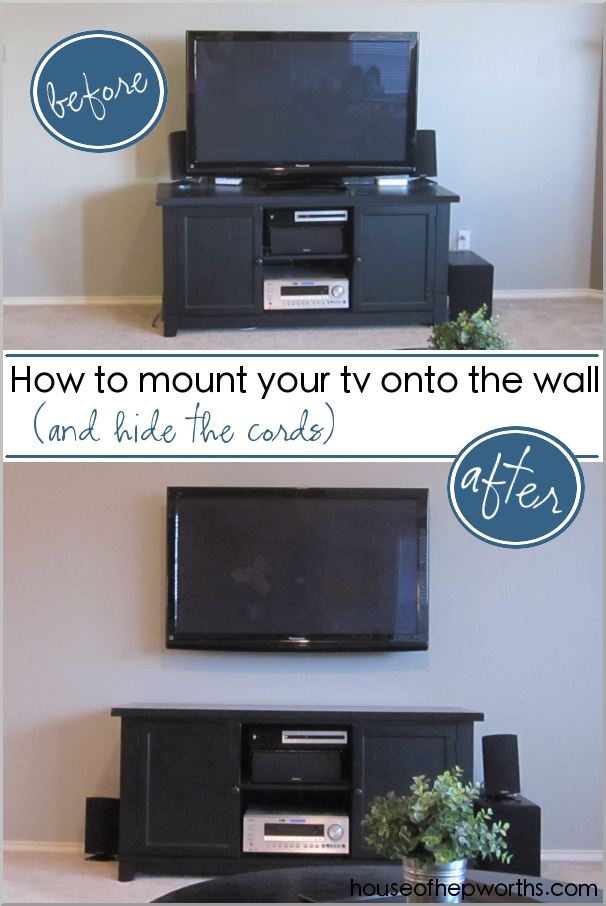
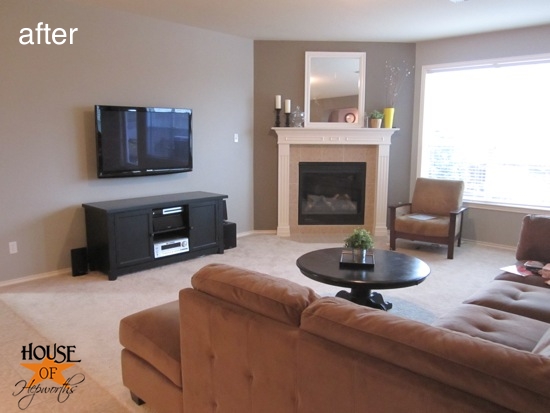
Today I’m going to show you how to mount your tv to the wall and hide the cords. We finally got around to mounting our TV on the wall this weekend. Mounting your tv to the wall and hiding all the cords is fairly straight-forward. Here’s a step-by-step tutorial. Have fun!
Oh rrrright. Because I’m the President of the Procrastinators Club. I even added this project to my to-do list, and I still put it off another 5 months. Shame.
To tackle this project you will need a few supplies. Some obvious, some not so much.
Shopping list:
- Recessed in-wall cable management system
- A small level
- Steel Fish Tape
- Stud Finder
- Tilt Wall Mount bracket for your tv
- A flat-screen TV
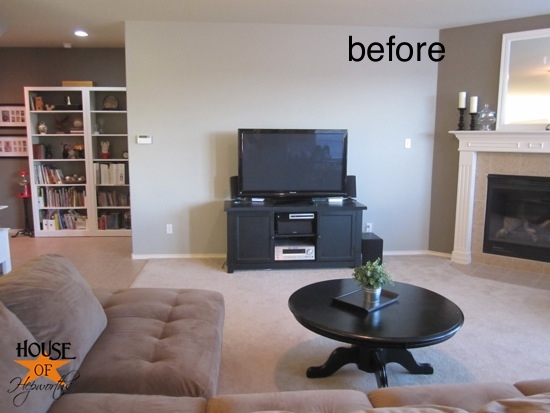
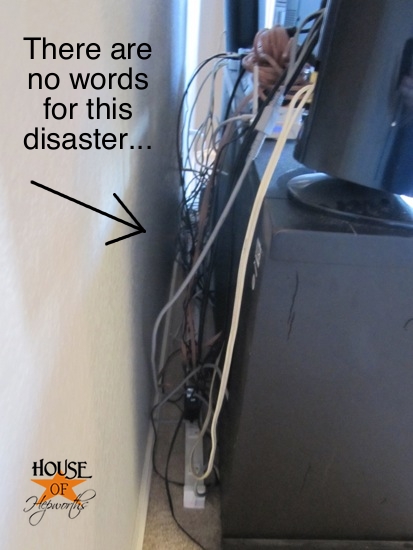
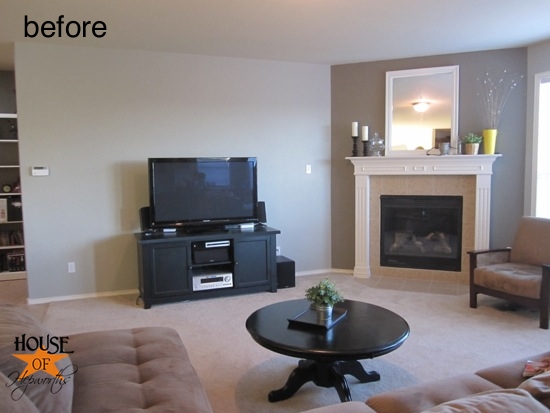
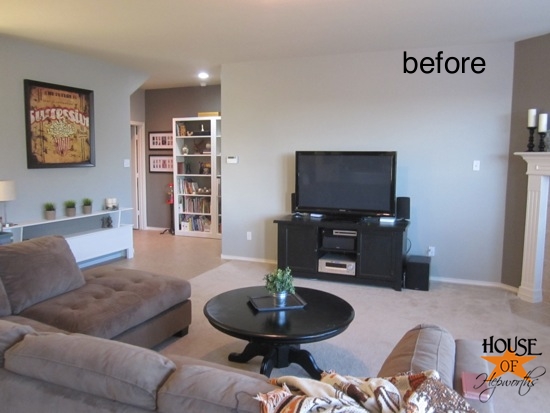
Here’s the eye-sore before we tackled this afternoon project:

Here is a step-by-step tutorial on how to mount your tv onto you wall and hide all the cords.
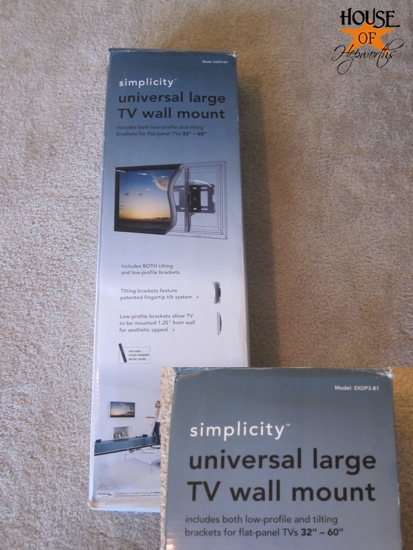
First thing you need to do is buy a mounting kit.
Here is the exact same one we have.
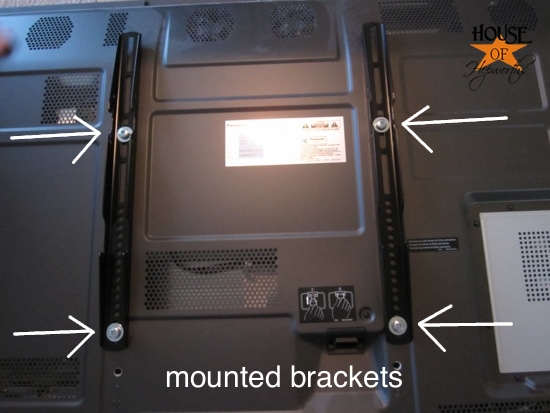
Step 2: Attach brackets to the back of the TV and a large mounting bracket to the wall.
(Dropping a TV power cord through your wall isn’t “to code”. To do this project to code you will need a THIS.)
We laid the TV face down and attached the brackets.


Step 3: Mount your tv bracket to the wall.
Do not be intimidated. This is easy!!
First, locate the studs in the wall. You want the bracket to be bolted directly to the studs.
Once your studs are all located and marked with a pencil on the wall, hold up your bracket, use a level, and use a pencil to mark all the holes where your bolts will go. Now remove the bracket and drill a pilot hole into the center of each of your bolt markings, like this:


Your mounting kit is officially ready to go. Now the real fun begins.
Let’s run those cables through the wall!!
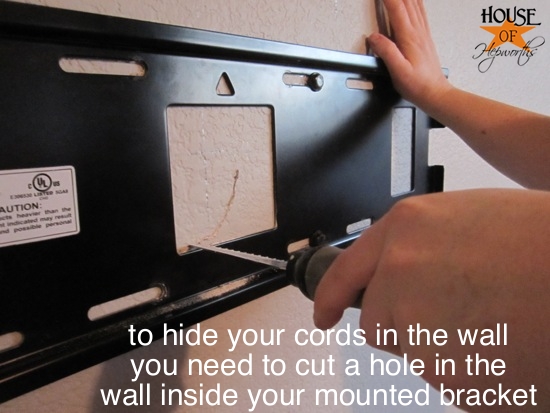
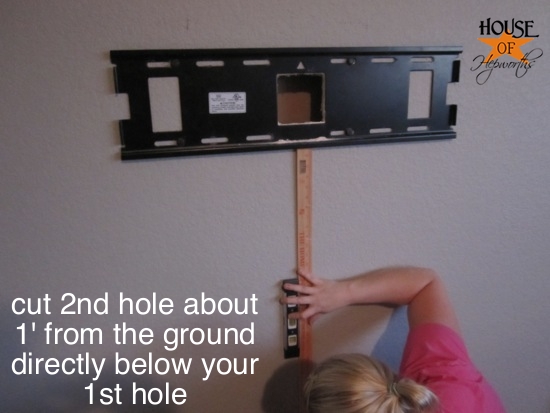
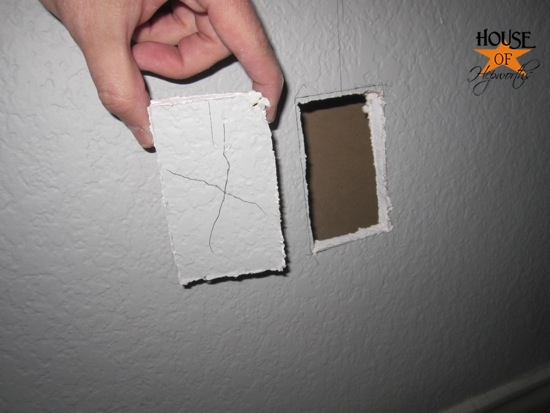
To hide your cords, all you have to do is cut two holes in your sheetrock and drop them through the wall. It’s really easy as pie.
Start by cutting your top hole. Cut it inside the bracket area to make sure it’s well hidden once your TV is mounted.

If you are mounting your TV on an exterior wall (the other side of the wall is the great outdoors) you will probably have to push through insulation to get your cables through the wall.
Unfortunately this does not work on brick or cement walls.
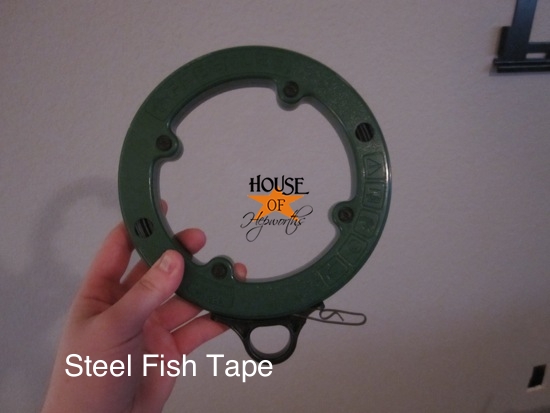
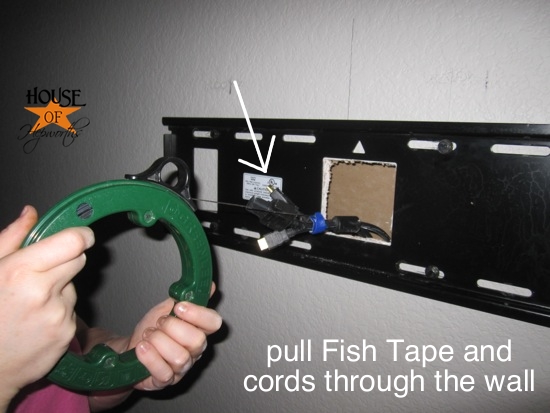
All you need to do now is shove those cords through the wall. But wait! There’s a really easy way to do this. It’s called Steel Fish Tape.
This is Steel Fish Tape:
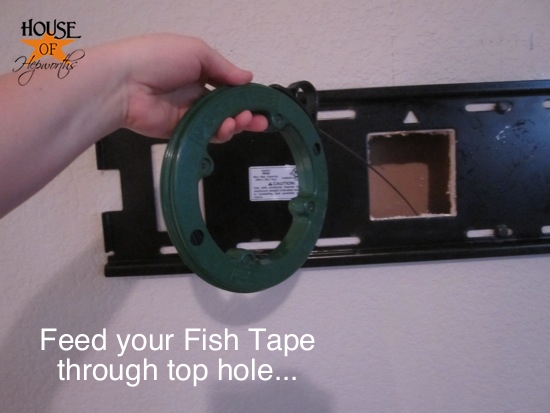
Shove the end of the Fish Tape through the top hole in the wall…

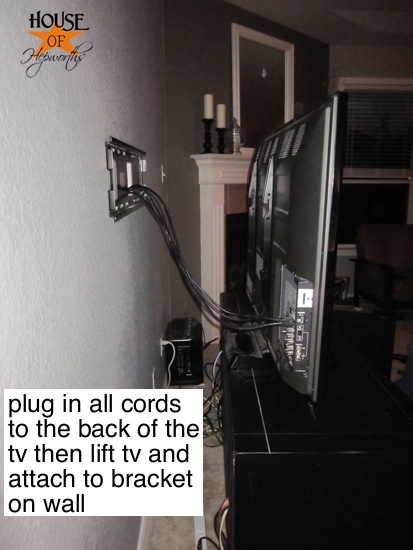
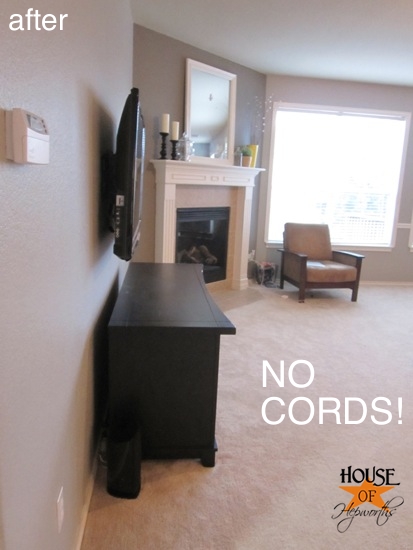
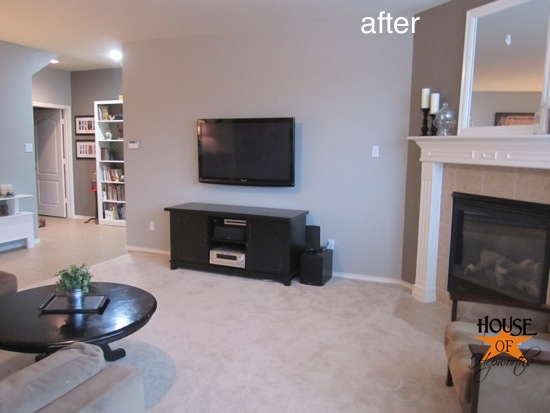
From there, lift the TV up and hook it onto the mounting bracket.
You are done!


To save you from scrolling, here’s the shopping list again:
- Recessed in-wall cable management system
- A small level
- Steel Fish Tape
- Stud Finder
- Tilt Wall Mount bracket for your tv
- A flat-screen TV
Do you have your TV mounted on your wall? Did you do it yourself or hire a professional?

Instagram || Facebook || Pinterest || Youtube
Thanks for reading! Have a wonderful week!
You might also like:
Oh Allison, you’re so clever! 🙂
LOVE the photo tutorial for the fish tape! We’re gonna have to mount the tv soon, our toddler is climbing on her rocking horse and sticking peanut butter hands all over the LED screen. NICE.
http://www.iheartmygluegun.com
Great article! Just FYI. I don’t think it’s a big deal but technically running extension cords inside walls is against building electrical codes. You are supposed to hire an electrician and run romex or flex up through the wall and place an outlet behind the tv that the tv plugs into. Just wanted to mention that in case doing something against codes bothers some folks.
I agree with Garin Woo. If you sell your house you will have to call an electrician to fix this problem you created. This won’t pass an inspection.
Not true this is acceptable method as long as your TV plug is long enough to to go through the bottom hole and plug into outlet. As far as when you sell your home most sellers offer the TV to go with the home.
Wrong. It’s against NEC and a fire hazard. Look up NEC 400.12. Flexible power cords.
Chad is absolutely correct. The only other substitute outside of a fixed installation by code is a UL approved Power Bridge. And that method is area dependent based on local area codes as well. It is a easy installation.
In using the DIY method above is highly risky and if the house burns down have fun trying to get your insurance company to cover any cost.
Also, not to mention insurance will often not pay for damages caused by this in the event of a fire.
No extension cord in the wall. Use an arlington tv bridge kit.
You can also buy power bridges or the kit at lowes where you don’t need to actually have electrical done; it’s done (and certified) for you with the purchase or those items.
Girl… I LOVE YOU!
Pinning and Facebooking. I’ll be using this info soon.
By the way Happy New Year!
Ooh! Now I want to do this! Looks Great!
So…..you know I’m showing my hubby this as soon as he wakes up, right?!
Looks great!
Ellie
We have sets of wide cords (they look like a few single cords fused together?). Do you know if going through the insulation is hard to do? Our TV is mounted on an outside wall already. Could have used your tutorial back then! Thank you!
Not hard at all. With the use of fiberglass glow rods. i do this all day at work.
They forget to tell people about cross studs in the wall blocking the wire from going from the TV to the Floor. Shame on them. Many articles about this and NONE of them mention a cross stud between the studs.
My wall didn’t have cross studs.
They also didn’t show one photo of the appliances [ surround sound ,cable tv,etc ] plugged into the wall power outlet .
I was wondering about where they plugged tv in?
I too was wondering about cross studs. What do you do in that case? I would love to do this but I also move furniture around every six months or so. Guess I could hang pictures over the holes till I move it back.
Our TV is not mounted on the wall…but we will be doing it so thanks for all the encouragement!! You made it look so easy and clean!!!! Wow!!
Hugs
SueAnn
You make it look so easy, I have always wanted to do that!
Awesome job and what a huge difference!!!!
That’s seriously awesome! It looks so much better and you guys make it seem so easy. Thanks for the detailed tutorial!
Mounting our bedroom TV has been on my to-do list for months! I even bought the mounting kit a month ago and still haven’t done it. Maybe now that I’ve seen how easy it is I’ll stop procrastinating…maybe 🙂
Yay! Thanks for posting this – I’ve been wanting to mount my TV on the wall, but was dreading those ugly cords! I had no idea you could run them through the wall – awesome!
I’m stoked about all the other cords I could run through the wall now that I know the secret – mwahahaha!
You did a fabulous job! I wish we could pull this off, but our TV is on the wall above the fireplace. AND, my husband insisted on a mount that we can pull out and turn sided to side. And he was right. It IS awesome, except almost all of the cords feeding to the TV are too short so there’s ugliness ALL OVER the place. It’s sort of horrifying, but once the TV is on, I forget about about it. 🙂
Angie S,
Best Buy sells something called snake skin cord wrap. It is black like the cords and has Velcro the entire length of the wrap so it is so easy to use. You can use it all the way up to the tv as it is flexible. Not the perfect solution but better than what you have!
Or maybe you can just hire an electrician to install a separate outlet right behind where your tv is mounted.
We actually did this in our very first house (hired an electrician to install an outlet). It was a cinch.
You posted this at just the right time for us. The hubs & I were just talking about paying someone to do it for us but now we won’t have too…yay! Thanks for showing how simple it is! I appreciate the time you take to do your tutorials. Smiles~Beth
Whoa, it looks so cleaned up. Even without the cord shots, just from the front, having the tv up and the speakers to the sides looks great.
OMG!!! I’m seriously so jealous! I would love to do this myself but our situation is a little more complicated. Our tv is mounted on our fireplace that is floated away from all the walls. You can walk around the whole thing. (here’s a link so you can see what I’m thing about http://theambitiousprocrastinator.blogspot.com/p/tour-our-home.html )
Btw, who do you call to fish wires through your house anyway?
Nikki @ the ambitious procrastinator
Nikki,
If you turned everything in your room 90 degrees where the long couch is facing the wall instead of the fireplace, you could mount the tv (as in this article) to the wall instead of above the fireplace.
Reese
Thanks for reminding me that I still need to do this! Unfortunately, our wall is an exterior one so we will be dealing with insulation. Great tutorial on the fish tape though…should make things much easier.
This is SO good to know! We’ll be buying and mounting a tv when we move into our new house, so I’ll definitely keep this in mind!
Wow, I want to do this tonight. I must call hubby now! This looks great Allison. The cors bug me too.
well now you make that look so easy….and since i am in the process of designing a new ‘man cave’ for the boy i been living with for 40 years i’ll have to give this a try. i’ll let you know how it goes! but thanks for the post. it was quite timely!!!
LOVE your blog!! I’m noticing your sofa in the pictures and wanted to know if it was from Costco this year? If so, how do you like it. They look to have a similar one. If not, can you tell me where you got it…I’m liking the tufted design and the sides.
Looks great! For just a couple of bucks more, you can dress up the hole that comes out behind the cabinet or shelving that houses your DVD, receiver, DVR, and other components with a low-voltage electrical box like this:
http://amzn.com/B000W09PQI
These are available at Home Depot or Lowes and they just pop right in. They’re the same dimensions as standard electrical boxes, so any plate will work equally well here. (These are great for fixing sloppy cable TV installer hack jobs too!)
When I ran our surround speaker wires through the ceiling and wall, I used these to attach RCA stereo speaker wall plates:
http://amzn.com/B003GSLEKS
This might be a little overkill, but it did make my speaker wires look a little neater behind our TV credenza. And should the unforeseeable day come that we sell the place, these will look much cleaner than gaping holes in the sheetrock.
Wow, I was looking through the comments for just this. Thanks so much!
Your ‘before’ pics look like mine does now! Only add a Wii system, a PS2, a DVD player and the cable digital box UGH!! I can’t wait to get started on this, your step by step made this task seem much less daunting!
Oh, glory, I swear I hear angels singing when I look at the cordless pics! Thank you for a great “you can do it – don’t be scared!” tutorial :o)
Hi there! Loved this post. Wish I would’ve found it a week ago! Ironically I just did a blog post about taking our tv OFF our wall mount bc of the wires!! Totally could’ve just fished them through the wall! Oh well. Guess I’ll remember this technique when we buy a bigger tv and have no other choice than to put it back up on the wall!
We have cords all over the house and I hate them. This is a great idea. I would like more info on the electrical box though. I don’t really want the holes in the walls open. Not quite sure I understand how the boxes work. Thanks
Fab!!! Love the detailed tutorial!!
I am so jealous! My dern walls are made of plaster! We can’t do this! But thanks for sharing! I can pass it along to my sisters who have good old sheetrock!
This is great the only problem is there are a few fire hazards for instance the extension cord in the wall! You did a great job but I think people are better off just leaving this stuff to professionals because no one wants there house to burn down!!! Also the level in the kits is usually never accurate!
Bit picky aren’t you Roxy.
The electrical code says you cannot install flexible wire inside the wall, but it’s no reason for “leaving this stuff to professionals”.
Simply have an electrician install the outlet at TV height and do the rest of your work yourself…you’ll do as good a job as many of the “professionals” out there and you’ll save a lot of money over what the “Professionals” will charge.
Another picky element is “the level in the kits is usually never accurate”…it’s a bubble in water…how pray tell can that fail or be so off as to require something more precise? Don’t believe that, but do believe people rely too much on technology and purpose built tools, rather than common sense. Any level would do as good a job as needed if you take your time. One is more likely to not mark/measure it correctly, than the level not working correctly.
From Tech who uses his noggin for something beside a hat rack.
I’ve also had experience where the level on the tv mount is not accurate. It is installed crooked into the mount, so when the level says it’s level, the mount is actually not.
She’s not being picky.
Actually you can install any wire inside a wall that has a CL2 or CL3 rating. The issue falls under the power cord for the TV as it generally is not CL rated so therefore it is against electrical code to run in a wall. There are products available that allow for a “power extension” to run inside a wall without the need for an electrician.
Need a level. NOT, measure up from the floor how high on both sides and make a line. THAT will be level. Your floor is level…use it.
Also one step they forgot make sure there is no fire brake in your wall (horizontal stud) or you will be in a world of fun
Just remember to make sure the cords are fire rated to go behind walls. Not all HDMI cables can be on the interior!
This is giving me the courage to actually put our tv up on the wall! Those cords are driving me crazy and they are going to go now!!
LOVE your clear explanation and pictures on how to do this. I stumbled upon your blog through Pinterest. So happy I did!!!
what about the power cord…did I miss that part?
Thank you so much for the tutorial. When i first started seeing the tvs being hung up on the walls i always was curious as to how this was done. Now it seems to easy. LOL Eventually we will do this when we get a larger tv for the living room. Thanks again.
I’ve been planning to do this in our living room, but have been terrified at the thought of it! Thank you for making it look so easy! Quite a relief. 🙂
I saw this on pinterest and could not wait to get started. We bought the necessary equipment last weekend. Just as we started to drill a hole for the cords, we thought “fire hazard”? I googled it and everything we read, said no power cord in the wall, especially if it is insulated. We hung the tv but we have about 3 inches of cord 🙁 The solution would be to get an electrician to put a plug behind the t.v.
Didn’t he write in the article about a box or something that you put in the wall to hold the wires? I’m not sure what that was, but he said putting the cord in the wall was not up to code. but if you got one of these things, it would be up to code. He sort of left it up to you whether you wanted to buy the” power bridge cable management kit”. I don’t think you would have to hire an electrician–just get one of those power bridge kits. Anyway, I, too, would be afraid of a fire hazard with the cords unprotected in the wall.
Even without a stud finder, another way to find a stud without making holes you don’t need is to use a powerful magnet. Run it along the walls until it sticks to the head of a nail in the stud. You can ease the situation by knocking on the walls and listening for a hollow or a more solid sound, and run the magnet on the solid-sounding areas.
Yes! I was going to post this- glad you did. This has been my trick for years since I am also to cheap to buy a stud finder.
Your plugs are nailed to a stud. Take the cover off of the plug, and find what size of the box can be pushed back slightly. The unmovable side is where the stud is. Studs are 16″ on center. You now can measure to each stud on the wall.
I find it humorous that you own fish tape, which isn’t all that common, but not a stud finder! Too funny. Your wall certainly looks nice without all the cords, but I don’t know if I could cut two big holes in my wall because I hate the idea of patching things up later!
LOVE what your tv on the wall! This looks so easy, my hubby might actually be able to do it!!
However, you didn’t show what you did to the hole at the bottom…just leave it the way it was or is it covered with something?
This is so funny! My hubs and I just did this same thing last year. There are kits you can get to put the plug ins at the top and bottom in case there is insulation in there too. We have a hollow wall though too. We use fishing weights and drops the cords down through the wall. Same difference right? I love love love it now though. I know when we move we will either have to sell the tv with the house or patch up the holes. No biggy either way!
To bad that I live in a country where houses are made of bricks and cement, cannot make a hole on the wall that eay :)). Anyway, i love your work.
This looks great. Unfortunately it is usually against most building codes (and a fire hazard) to run an electrical power cord inside a wall. You really need to either install a recessed electrical outlet behind your mounting bracket and plug the tv in there or get one of those PowerBridge things they sell at Best Buy for $100. As someone else noted, you also need to make sure that any other cables (primarily HDMI) are in-wall rated.
I love this! I ESPECIALLY LOVE your detailed tutorials. Thanks for sharing
I love this post and know that it will come in handy some day. I am trying to pin it so I can remember it and the source, but for some reason it won’t let me pin any pictures from this post. Are other people having issues with this?
Thank you sooo much! We’re building a house right now and I’ve been agonizing over whether we could do this ourselves or if we should pay the contractors to do it. Now we’re gonna do it ourselves!! Now the real question is…where did you get your couch?? I love it!
good job but you do realize that this is a huge fire hazard and against quite a few building codes lol. Great Job!
There are codes that must be followed when dealing with electrical wires. I install and design custom home theaters and this is not to code. You are not allowed to put the power cord in the wall unless it is an in-wall URL CL3 cable. Otherwise it is considered a fire risk and can start a fire and burn your house down. All wires must be in-wall URL CL3 wires to go in the wall. And not all houses are built to code. Most new houses are off and are not flush so you may have great difficulty finding the studs. It all seems simple but it can be very dangerous for you and your family. It may look nice but so does 3 lbs of makeup. Please call a professional. There are reasons they have professionals, we are not just out to steal your money. We actually study house and electrical codes in order to make it safe for you.
Its sad to see so many people jumping to do this without really reading what you and others have posted…guys if you burn your house down because of this, insurance will NOT cover it! Better to be safe and let the professionals install, otherwise follow all safety regulations.
While the code is intended to provide the safest installation procedures, there is no guarantee the “Professionals” will do the right thing either, plenty who do not.
From a devil’s advocate position, and using some common sense, you have to ask yourself how having the bundle of wires behind the TV stand isn’t a fire issue as well. Perhaps worse off than the in-wall scenario since the in wall cables are not all jumbled together collecting dust together.
I’ve also read how it’s not code to run power & signal lines together because of potential interference, but again in reality, those rules seem to be more relative to long power runs, not the common installation behind a TV stand or the 3′ run inside the wall int his scenario.
I’m not advocating avoiding the CODE which is there for our best interest, but the argument for professional installers is unreasonable. Aside from needing a power outlet mounted behind the TV to avoid power cords in the wall, when you take on a project, you should be informed about what you’re doing, follow the code, and seek assistance when some element is beyond your expertise. Professionals aren’t “just out to steal your money”, haha, but they’re certainly going to promote calling them first for their own financial advantage.
OK, you are right. You don’t have to hire a professional BUT you do need to do it right. The NEC is there for a reason. They didn’t write this section just to make it difficult on you. IT IS A FIRE HAZARD TO TRANSITION THROUGH A HOLE IN THE WALL WITH WIRE THAT IS NOT RATED TO DO SO!!!! IF YOU YOUR HOUSE BURNS DOWN FOR ANY REASON AND YOU HAVE WIRED YOUR TV IN THIS WAY, YOUR INSURANCE WILL NOT COVER THE LOSS OF YOUR HOME!!! Everyone, do yourself a favor. Go to your hardware store and spend the extra $50 for the proper electrical plates and hardware. They sell kits that help you do this right — cheap and easy.
Wow, that looks great! I did not realize it would be so easy to do.
This is BRILLIANT!!!! I HAVE to do this!!!!!!! Thanks so much for the great tutorial!
Lesley
byporchlight.blogspot.com
The reason behind not allowing cords in the wall is that someone might accidentally drive a screw into the cord from the other side of the wall when hanging a picture or could possibly cut or nick the cord with a saw like you used for cutting the sheet rock. It really is a safety issue but shouldn’t be a problem if everyone knows not to work around that area. FYI, I have a cord in my wall too.
Ah, I get it! Thanks for clarifying. I seriously had no idea why on earth it would even matter. But that does make total sense. I will just make sure to not put screws into that section of wall from either side. Thanks for the head’s up!
Oh my goodness…this was so thrown into The Man’s face with a “look at this, just look at this” and DO NOT give me any guff about “I can’t get rid of the cables, blah, blah, blah!” Our plasma will be arriving tomorrow and it will be up on the wall by sundown. I bow to your’s and your husband’s expertise. Oh, and I thank you as well, as probably does my husband; he just doesn’t know it yet 🙂
HAPPY DANCE!!!! I’m
Doing my happy dance because of this. My tv AND Xbox cords are now hidden away from
The world.
That is so amazingly simple! Thanks for sharing!
Thanks for this !
Because we rent putting holes in the wall was a No-No.
But Hubs used to install siding so he has a “break” a giant tool (like 12 ft long) that is used to make even neat folds for corners.
He took a piece of off white almunium and just bent it TWICE and then placed it over all the cords totally enclosing them. It matches our wall color so u don’t even notice it unless you look for it.
Looks great! I want to hang our tv, too. I always find studs by simply knocking on the drywall. You can hear it when you find one. l
I just mounted out bedroom T.V. so it was high up and easy to see (I watch it with my knees in the air so my husband always complains he can’t see.) A neat trick for finding studs without a stud finder is to get a strong magnet and it will stick to the heads of the nails. Hope that is helpful!! Looks great!
This is exactly how my husband did it and he is an electrician! Lol
SERIOUSLY! Great idea….so going to do this. I hate the mess of cords… 🙂
Just a FYI a lot of cables are not in wall rated. The power cord isn’t the only one not up to code for running in a wall. As for laying a plasma flat…well you can lay newer ones flat but must gradually lift it upright. The TV must sit upright for at least 8 hours to allow the gases to settle before turning on. Most big box stores sell a kit to simplify this. Like http://www.bestbuy.com/site/PowerBridge+-+In-Wall+Cable+Management+System/3180939.p?id=1218382975246&skuId=3180939&st=powercord%20in%20wall%20kit&cp=1&lp=7 that. Looks amazing!
Thanks so much!!! I can SOOOOOOO do this!!! =) Can’t wait to do it!!!
I work for a company that sells this exact kind of thing! I’m waiting to have a house or somewhere where I can do this setup:
http://sewelldirect.com/Articulating-LCD-Wall-Mount-.asp
(or this cheaper: http://sewelldirect.com/LCD-Plasma-Wallmount-for-32-60-Bubble-Level.asp_
and this for the wall cutouts:
http://sewelldirect.com/WallBlade-by-Sewell-Recessed-Wall-Plate-Cable-Drop-With-Power.asp
It has a power outlet so you can be up to code! I LOVE how clean it is, now I just need to stop renting a house and I can do this too!!!
Oh and not to advertise the company I work for too much but they also have this option: http://sewelldirect.com/Veranda.asp
which is great if you don’t have a dresser or something under the TV, it looks SUPER clean.
🙂
Great idea but that is a fire hazard
Running wires through an exterior wall with insulation is a MAJOR fire hazard, and you should not condone this. And as for power cords being run through a wall – you aren’t a licensed electrician; it isn’t your call to make about how safe it is. The code is there because someone before you thought it was a good idea, and it turned out not to be. Cords might be unsightly, but for your own safety, please just let the power cords hang free. Is a little bit of ugly (or avoiding a small fee from an electrician) worth a house fire?
And you should really warn your readers to check for romex, phone lines, etc. behind any walls. There’s more than studs to look out for. A really good stud finder will tell you if there’s any physical object behind the wall so that you don’t, you know, electrocute yourself.
Also, it’s a good idea to cover any cables with a small piece of tape or something before pulling it up through a wall, to ensure that dust/sheetrock doesn’t fall into it and bork the cable completely.
I agree. Codes are for safety. Alison’s smug comments that “she gets it” and she is working on a solution, are wishful thinking. Why would she give advice, when she isn’t qualified to evaluate the fire hazard?
I didn’t know I was breaking code when I wrote the tutorial. I didn’t even know there was a code for this. I honestly had no idea I was breaking any rules at all when the tutorial was written. This is the 3rd house I’ve done this to in the last 10 years, so I just assumed it was the right way, considering the directions on the tv mount kit said to do it this way.
You should probably remove this tutorial – you don’t want to be responsible for someone getting shocked when they cut into the wall and slice romex that is already in there they can’t see. Yes, it looks awesome, but that is the reason behind the NEC. If you can’t afford to hire a licensed electrician to add an outlet, they make cord management systems that mount to the surface of the wall that can be painted to blend in…they’re barely noticeable.
Please remove this tutorial. It shouldn’t be encouraged.
This tutorial is fine. It explains how to hang the bracket on the wall and mount the tv on the wall. The only issue is that I ran a power cord through the wall, which I updated MANY times throughout the post letting you know it isn’t to code and then offered a solution for you as well.
Awesome! Thanks for sharing!
Check out these cool corder wall mounts. With this type of mount you can pull the tv away from the wall by two feet and swing it in any direction that you want.
And monoprice.com has the cheapest prices that I have found for mounts.
http://www.monoprice.com/products/subdepartment.asp?c_id=109&cp_id=10828
http://www.monoprice.com/products/product.asp?c_id=108&cp_id=10828&cs_id=1082806&p_id=5921&seq=1&format=2
Nice, detailed tutorial. Some unsolicited advice.
1) Buy a rare earth magnetic stud finder ($5).
2) Put a low voltage electrical box in that hole behind your mounting plate and in the one at the bottom. Cover with a data cable plate.
3) Then either:
a) Get that power cord out of your wall and into a raceway. If your house burns down due to that damn cord you will have voided your insurance and will not be covered…and they’ll be plenty of proof on the internets to show exactly what you did! You can paint raceway to match your wall color.
b) Buy a Datacomm or Powerbridge unit to safely get power to an outlet behind your tv.
c) Get some help from an electrician.
FYI….it is AGAINST HOUSING CODE to run the power cord for your tv, or any electronic direct power cords for the matter, inside your wall.
It is an electrical and FIRE HAZARD!!
There are kits out there to loop an inactive power cord through the wall the gives you a input receptacle up top and a output receptacle down bottom….otherwise get an ELECTRICIAN!!
FYI i am not an electrician, just wanring others.
Power cord through the wall is a fire hazard and not up to code.
Saw this on Pinterest and used your tutorial to mount our tv this evening! Thanks so much! 🙂
Mice don’t necessarily know not to chew the electrical wire in the wall. You can’t assume just because people know not to cut the wire that every living thing in the house knows the same rule.
Just because you don’t see the reason for the safety code doesn’t mean you shouldn’t follow that code precisely.
I love this idea. I came up with something similar because i didn’t want to to see the cord. I used a pvc pipe , cut it in half . primed it, then painted it the color of the walls. I fed all the wire thru the pipe and attached it to the wall. Painting all the hardware. Came out really nice. Your idea is great though. Mine you can see some mechanics was done. But its nice that it at least blends to the wall.
All you people going on about code are incredibly annoying. Clearly she knows she violated code… she said it herself. So she doesn’t 10 responses saying the same thing. Who gives a &$#@ if it is against code? It’s her house she can do what she wants. I did the exact same thing in 4 different rooms in my house.I don’t even acknowledge “rules” that tell me how things can be setup in my own house. The day I call an electrician to do something simple like this is the day I have no use for TV because clearly I am brain dead.
Fire inspector friend of mine says…may be your house…and your voided homeowners policy if that is deemed the source of the fire is yours too…
“Who gives a &$#@ if it is against code? It’s her house she can do what she wants.”
A firefighter friend of mine was killed battling a house fire in a home owned by someone with the same attitude. The fire was caused by a shoddy DIY electrical job. Someone’s “who gives a %$^@” attitude was responsible for his death.
*I* give a $@$#. It doesn’t hurt to do the job right. Just saying.
Manda, I am so sorry about your friend. That is just awful. I definitely do care, and I want to do it the right way. I don’t have an actual plug inside the wall – just a cord. It plugs in on the outside of the wall. I plugged it into the regular outlet, then ran the cable up the wall, where it comes out of the wall again and plugs into the tv. I have read so much about code that I honestly now have no clue if this is to code or not. Some say it is, some say it isn’t. I don’t understand how having the cord inside the wall is any different than it running from the tv to the plug outlet outside the wall. It honestly doesn’t make sense to me. Regardless, I am going to pay an electrician to come out and put this all to code. I want to be safe and as a public blogger I want to set a good example for everyone who reads my blog. Again, I’m really sorry for your loss.
I had no idea it was this easy! I thought you had to pay someone like $500 to come and do this. And I love that “fishing” tool. Thanks for a great post.
Hi, I like it but not sure why you would just put the TV on the wall and leave the big, hulking piece of furniture beneath it. Check out the TV Smart Shelf – http://flatscreenshelving.com – It has a way to help hide the wires as well. 🙂
It’s really individual preference. I personally think the floating shelf thing is hideous and prefer a piece of actual furniture under the television.
I agree with Angie, I have a “big, hulking piece of furniture beneath it” because I like my piece of furniture. If you don’t love it, do it differently. That’s what makes this world awesome – we each have such unique opinions and tastes.
Thanks again for the article.Much thanks again. Will read on…
Off subject completely: what paint colors did you use in your home? I’ve been looking for months for the perfect shade of greyish khaki/taupe and i love your colors!!!!
Ps. Great job with the hidden cords. This will come in handy when i actually get around to painting! 😉
We have cords that I hate looking at, but it is best to follow the building codes when tackling projects like this. The reason it matters is that it can effect people OTHER than you. I.E. your children’s safety in the home or a future family that buys the house. Also, your home insurance provider would have a serious problem with this…as they should since you are taking on unnecessary fire risks. There are kits on Amazon the are $50 to properly deal with the cords in the wall including the electrical ones.
The lack of cords just gave me a tidygasm.
I just want to let you know, that there are actual cord covers you can buy, and paint the same color as your wall. So all you have to do is put it over the cords and attach that piece to the wall. You paint it the same color as your wall is and ta-da, no more cords, no violated codes and no holes in the walls. And it costs little and doesn’t take long to do at all.
I have watched alot of videos and viewed picture tutorials like yours on a variety of subjects and I must say you two did a fabulous job!!! Many are not clear, they are confusing, they leave out pictures etc. Way to go you two.!!!!! We rent and are not allowed to do this for out t.v. and so wish we could. do you have any suggestions on how to get the cables, wires etc. less messy in the back of the console?
🙁 too bad – would never ever work on euopeen walls 🙁 as ours are all brick, concrete etc
I LOVE this tutorial!! Just one question, what would you suggest I do with my Direct TV box? I have been thinking about mounting my TV to the wall, but this one thing is holding me up!!! HELP!!
Buy a small shelf & mount the shelf above the TV to hold the direct TV box & DVD player, etc…
I love it. We are childproofing the house. Currently we have gate by our tv so she doesn’t touch cord mess and pull them.
We end up watching tv like prisoners behind baby gates. This is awsome. Its a clean look. I thought it was wayyyyy harder. Thank you for providing this.
Where is the TV stand from? I love it!
We bought it from a hole-in-the-wall furniture place. They didn’t even have it on the floor – we just looked through their catalogs until we found one we liked and ordered it.
I would like to know, why my husband, THE ELECTRICIAN, didn’t think of this. He keeps telling me we need to rip down walls to do this. I am definitely showing him this TODAY!
Um…I hate to state the obvious…but doesn’t all electricity come into the house thru the walls? Leave it to the “decision maker” to decide we can’t put electical cords in our walls. Good grief! I am right behind ya girl, I would have done it that way anyways, too!
Karen, thank ya mam! 😉 I have hung three tvs on the wall in my life and did it this way every time. It never occurred to me that it wasn’t “to code”. Now that I know I do have plans in the future to hire an electrician to install a plug but it’s low on the list.
That was seriously awesome! Ellen
Solution to all wiring questions google in-wall power extension. You can get them at best buy.
Good tutorial.
Perfect tip. Thanks for letting us know!
The power cord through the wall is a code violation. Not a very good “tutorial”. My husband is an actual professional in the media field.
I appreciate your loathing of power cords…BUT PLEASE GOD NEVER PUT YOUR FLAT PANEL ON IT’S FRONT EVER AGAIN. Just use the stand that comes with the TV.
Jared, is that bad? I had no idea. We even googled beforehand if it was okay to lay our tv flat on the ground, and it seemed fine. It’s plasma, if that matters. Just to be safe though, from now on we’ll just keep it in the upright position. Thanks for the heads up.
I am an electrician and there is nothing wrong, legal, or unsafe about tunneling your cord through
the wall. As an electrican I have installed many TV’s and I would not do this exact thing. I install
a outlet directly behind the TV, but what you did is just fine. I have went through and read many
of these oppinions and I don’t know what people are thinking, I think that they just like making up
things. If you didn’t know, there are cords running through numerous walls in your house!! You
think hanging a picture on the other side of wall is going to hurt? Unless you are using 4″ nails that
is just nuts, and of course you don’t just grap a saw and start going at it, people need a little common
sense. If you had your electrical plug (outlet) inside the wall it would be a code/safety/fire danger but
since you obviously just ran the cord through the wall and plugged it in at standard height you are
just fine. The thought that running a wire through insulation is dangerous, you must live in Florida and
be afraid of the pink stuff, there is no additional danger!!! Common sense please. The plug in is accessable and therefore LEGAL and SAFE. You people keep on mounting your TV’s. Good luck
Zach, really? You have made my day! Woot! Thank you so much for this comment. 🙂
Hey Allison… I can see that you’ve responded to several people’s comments about fire hazard, blah blah. The only thing is: Zach is wrong… It IS a code violation… It’s not too hard to call an inspector or other electricians and just ask. The reason for my comment is to encourage you to delete this blog post entirely until it has specifically outlined in its instructions the certain concerns, as well as removed the instructions that clearly violate code. 🙁 I know you put a lot of work into it but it is being Repinned like crazy on Pinterest and I am reporting it whenever I see it pinned. It’s also one of the first things to pop up if you google how to do it. Please please remove or greatly modify your post. Having people argue about it in the comments is not enough…
Hey, I’m sorry about that… I should have clarified. I know you wrote at least twice that we’d need the extension kit (which was awesome of you to do! and i know theres a tutorial made by that company that tells us how), but your instructions still say to drop the wires behind the wall after drilling holes… If I follow your instructions, it doesn’t say anything about plugging my power cord into the new outlet I created with the extension kit and someone could very easily have no clue how your instructions include installation of the extension kit. 🙂 (prob why people like me and some others still comment…). I know it’s a pain… I’m sorry 🙁
Really, Zach?! You are an idiot! I am an Electrician and you are wrong.
If you don’t know that installing an appliance power cord in an enclosed space is a code violation, you are no electrician.
******Please note*******
This way you are doing this is fine for the low voltage connection.(HDMI/RCA connections)
But the power cord cannot be ran through the wall like this.
This is against UL code and if your house burns down insurance does not have to cover it.
You could mount an electrical box behind the TV and plug it up there, but the 120V wire cannot run through the wall due to it not being rated for that. (Power cords for a TV can get hot).
I worked for Thomas and Betts as a research and development engineer.
We ran through this issue when developing new electrical boxes.
You can lay a plasma on its face if you have soft carpet or blanket. We are a Television repair & service company and do it all the time to service the sets.
Also, most installation companies run the electrical cord down the wall.
We did the same thing, but put the cords through flexible conduit from HD so they weren’t directly in walls. It was a bit of a pain, but well worth the final result.
FYI this wont work on load-bearing walls (walls needed to maintain the structural soundness of the house) because there is a horizontal block in between the studs to keep a fire from moving up the walls too quickly. so you will never be able to fish your cords our of the wall without drilling through the block, which is not fun to do. lol im not trying to be the know-it-all guy on the blog (haha block…get it….lol) just want to help out, sp no one gets confused or disappointed when it doesn’t work.
Great feedback. I didn’t know that!
Makes the use of a “store bought” stud finder more of a recommendation since their cost will likely pay for itself in time alone looking for stud “bridges” as well as studs. Many of the newer stud finders can also differentiate between hollow walls, studs, pipes and electrical wires that may already be running there. So one gets pre-warned about a lot of hidden hazards before cutting into the wall. Just a thought.
You have a beautiful home!!! We do this with our T.V…. but we are still unfortunately left with all the nasty speaker cords that you can’t feed thru… They leave our box then attatch to my husbands 8… EIGHT… speakers… not necessary.
Great idea and pix now question- i lie in a building that is infested and try very hard to close all openings. Cutting a hole this size would be inviting those creatures in. Anything I can do to hide the cords without inviting them in? TIA
Allison,
I was looking at your site and thought your idea was great but found something else that might help you stay to code. I have provided the link if you want to check it out.
http://www.legrand.us/residential/diy-project-corner/diy-tv-inwall.aspx#.UJXpxMWHJLc
Use http://www.powerbridgesolution.com/powerbridgeproducts/totalsolutionkits.html this for your in wall power cord problem
Soooo… where did you plug the bottom of the cords in?
They come out of the wall at the bottom of the wall and plug into the plug outlet.
Awesome idea. Unless you are planning on renting the place or moving out, who cares about code? It’s your house and it’s not like there are code police that come around to make sure that everything is code.
Though, I do see the problem if the cords get hot.
Anyway, awesome idea! I love it!
I love this! My husband bought the cheap thing from Home Depot that you affix to the wall and it’s ‘primed’ so you can match the it to the paint color on your walls. The only problem is he never got around to painting it, of course.
Also, can I just say, I LOVE your home! I daydream about having your simple yet comfortable vibe!
BEWARE! There are several factors to watch out for when wall mounting a TV.
1. The height of the TV- Ideally you should mount the TV at a comfortable height for your neck. If you are looking to mount high like over a fireplace then you’ll find it uncomfortable trying to watch the TV.
2. The type of the TV- Some TV’s are meant to be viewed straight on, this means if you look at the TV from an angle the picture goes dark. Make sure you account for this by buying the appropriate TV or mounting plate that will allow you to tilt the TV.
3. Where to put the TV- Preferably not where sunlight will hinder your viewing. Remember, after mounting a TV by way of cutting holes in the wall for the wires, the TV in most cases stays there. You can’t simply relocate it because you want to change the room around.
4. Other equipment?- Planning on a DVD player of stereo? Where will they go? This depends on the room. A living room will usually be the place these devices go. The best way for these to be used is the way shown at the top of this page. For a bedroom you’ll just need the TV and “maybe” a cable box. But what if you have nowhere to put the cable box? There are a couple of options.This is the easiest way. If you buy a TV with the “cable card” option (check with your local cable co. for availability) then all you’ll need for the TV is an electrical outlet to plug the TV in and the coax cable to connect to the TV.
*
The next option also requires you contact your cable co. You are looking to see if you can get a cable box that’s small enough where you might be able to just rest the box behind the TV. If you can do this you run the risk of the remote control not being able to see the cable box. For this you’ll also need a cable box that works with what’s called an “IR” (infra red) extender. Your cable co. should supply this.
*
The next method is the most expensive but very nice if it’s for you. All the exterior equipment could be located somewhere nearby like in a closet or even on another level of the house. This method usually requires you have an expert do the installation but could be done by yourself if you are tech savvy enough. It would all work the same as far as IR goes. Then you’ll have new universal remote that handles everything. WARNING! 99% of the time when this method is chosen, only the husband either knows how to use it or the only one who cares to use it. The remote itself could be the reason this TV is no longer the the one to watch.
5. The wall- As mentioned already in these postings, an outside wall is not the best choice for mounting the TV. But if it’s a “must do” then your best bet is to hire an electrician. Every house is different. If you cut openings in your wall and just pull the wires through you could be opening yourself up to colder winters and higher heating costs. Most times there are ways for cold outside air to find its way into the wall cavity and ultimately into the room. To avoid this you could purchase a type of wall box that closes the hole and allows you to plug everything into the box which is recessed into the wall.These can be purchased at certain electronics stores or electrical warehouses or even online. Remember to choose the one that allows for all your connections to include an electrical outlet, coax outlet, HDMI outlet, Component outlet (good for a back-up if the HDMI input dies (and they do) and maybe an ethernet outlet (Cat 5) for internet options such as Netflix.
6. TV’s- This is very important. The type of TV you buy and where you buy it will have a big impact on how much you will enjoy your TV.
*
First rule: If it looks like a great deal then in most cases it won’t be.
*
Second rule: Stay away from warehouse type stores such as Walmart, BJ’s, Costco and such. Walmart has the tendancy to sell TV’s that have a brand name on them such as Sony, Panasonic and Samsung (and more brand names) but they are not what they claim them to be. Fact is they are a cheaper knock- off that was made in China. You are being ripped off, swindled and provided with an inferior TV. Also, these TV’s will not be able to be operated by your cable remotes, so if you’d like to have just one remote to operate everything then you can forget about that happening. As for the other stores you’ll get your actual brand names but these TV’s are cheaper for a reason and it’s not because the stores buy in bulk. They are constructed with cheaper parts and fewer inputs. Each one is different but some will ony have enough inputs to connect only one HDMI cable and/or one Component cable. So this means you’ll have no back-up HDMI if the first one dies. If your DVD player uses HDMI then you can’t connect that either. Remember, the fewer inputs on the back of the TV, the fewer things you can hook up to the TV.
*
Stick to a well known store for your TV purchase such as Best Buy or Sears and stick to a well known brand name. If you buy a TV with a name you never heard of because the price looks great then you’re looking for trouble. For instance. “Olevia” has a good picture and seems like a good deal but cable remotes cannot be programmed to it. Some Sylvania’s are the same.
*
Be wary of online TV purchases because you may not know what you’re going to get for available inputs.
*
Try not to buy a TV that does not have buttons on it to operate the TV. If you lose the remote that came with the TV you’re out of luck.
Happy viewing!
thank you for this..think its easier to get a stud finder then to leave a series of nail holes in the wall.
Thank you so much !!! You are very clever , I’m going right now to pick up the tools!
Would love to try this but how do you close a hole that big??I live in an apartment and They’ll not only keep the deposit but charge me extra for this..any tips??
Sure! Try a patch and tutorial like this one: https://www.houseofhepworths.com/2011/03/07/now-you-see-it-now-you-dont-patching-unsightly-holes/
Thanks you for a great step by step on hiding the cords.
Great pictures and easy to understand.
Glad I ran across this post on Pinterest. I saw it when you first posted but forgot about this. I too have procrastinated for a few years on hanging my tv on the wall so now I am off to find my hanging kit I bought so I can hang ours!
Seeing the power cord ran through the wall was scary. Romex cable is meant to be run behind your drywall – which should then wire up to the outlets on each gang box. This is pretty standard/compliant wiring. Even if it’s not as important to follow this standard for internal/non-insulated walls, why would you run the risk when these mounts are cheap and easy DIY projects?
Here’s a pretty good discussion about it:
http://www.amazon.com/review/R3RFZNQ5P938LZ/ref=cm_cr_dp_title?ie=UTF8&ASIN=B001C4BEOY&nodeID=172282&store=electronics
Here are some products I’ve found. No certified electrician required – just buy good products that comply with building code, and install it yourself:
http://www.amazon.com/Arlington-TVBR2505K-Organizer-Recessed-Solution/dp/B006N2U46O/
http://www.amazon.com/PowerBridge-TSPBIW-6-WH-Total-Solution-Management/dp/B003CJTQ3I/
http://www.amazon.com/Datacomm-50-3323-WH-KIT-Panel-Organizer-Solution/dp/B001PB7UVA/
I really like the links you provided in order to do this safely so that it does not go against any codes and will not effect your home owners insurance. I am definitely purchasing something from the safer route.
Noooooo! I was all over this until you sawed a hole in the wall 🙁 I live in the UK and our walls are made out of bricks and plaster and a whole loadda stuff that isn’t saw-through-able. I’m going to have a cup of tea and sulk.
Watch a few episodes of “Holmes on homes” on hgtv to understand the importance of “the code”.
I love this idea, and wish we could do it but our whole living room has brick walls, i hate that!
About the code: I don’t know how it would be done without patching a huge amount of drywall (I’ll leave that to someone else to figure out), but wouldn’t you be able to thread the wires through a conduit and put that behind the wall? In theory, if a faulty wire did cause a fire I think it would be contained in the conduit. Clearly I’m not an electrician so please don’t think poorly of me if this is all wrong!
Soooooooo, what happens when you run into a crossbeam???? Didn’t really think of that :/
I love the pictures, hiding the cables makes it look so much cleaner it’s crazy!
Thanks for the post 🙂
I was doing this but I also have studs in my wall that run horizontal as well as vertical how do I get past these?
Allison: I personally thought this idea was great!!! Code smode. But I was trying to see how you plugged it in. I bet you could turn off the electricity and fish your line through that hole you made in the bottom and fish a new elec line through your hole to the other outlet on the left and hook into that. Of course i’m sure this is not up to code but I’m sure an electrician can figure it out!!!! take care!!!!(:
Ugh, when talking “code” that usually involves permits too. Bleh. Besides, an outlet behind the tv won’t solve the problem of visible cords for the cable box, game systems, etc. They still have to plug into the tv! I think you have a good idea.
We finally did this!!! Got the idea here, but hired a (licensed) electrician to carry it out. We put all of our electronics in a hall closet and ran them separately through their own lines as well. We can access them via remote from both of our main TVs. We are finishing up today and will be very pleased with the results.
THANKS FOR THE IDEA!!!!! Hope you had a Merry Christmas!!
Allison, I love your tutorial and I agree with you in the minimum risks with power cords inside walls but because code regulations (electric 400.8) doing this can end up in loosing your insurance coverage, so before doing this ask your insurance company and check your building code in your area. Will be a shame if for any reason your house catch fire and insurance company denied you for such small thing.
Ok, so, this is so off-topic. But, I love your house? Can you send whoever decorated it to decorate mine? LOL
Allison,
As Paula said, you cannot run flexible power cables through your walls. In the event of a fire, your home will not be covered under your homeowners insurance regardless of whether or not the fire was caused by the wires. You may be able to get away with the A/V cables (HDMI, RCA, etc.) but you should check your local building code as there may be newer regulations regarding low-voltage inwall cables in your area.
If you do not have the time to build to code yourself and really want to do this DIY, the best solution I found is: http://powerbridgesolution.com/
We turned a hall closet into a media center type thing and use remotes to access cable, dvd players, and the computer the houses our cds. I am the one who posted above, and we have an excellent electrician who will not do anything that isn’t tp code do our electrical work. We have no cables visible. Not one.
We just mounted our new tv on the wall, using a bracket we got for $20 at Home Depot. We also got a kit for hiding the cords that came with a circular drill but you could use with a handle to make the holes, some nice little covers for the holes and a little fish wire stick, also for $20. Unfortunately when we got home we realized we couldn’t put the power cord in there so we haven’t bit the bullet with the wall yet, we’ll live with the cables for now. They also had a kit that had a built in outlet so if you can get an electrician to instal that for you then you’re golden.
I am so sorry to say this… but this was fun to read! I sure hope you are looking at all the positive feedbacks and let the negatives roll off your shoulders. Hope you “fix” the problem soon before the “electrician police” comes knocking on your door. First World Problem.
“First world problem” okay, now that was funny! Thanks for the good laugh.
Allison I think you ended up with a great educational discussion. You had an idea that needed some tweaking to be safe and not the cause of a disaster down the road. There are good links and info for readers. Granted a couple of people need to learn how to ‘discuss’ a topic in a way that adds something. This tutorial is wayyyy more benefical than all the pretty vignettes on countertops we see, although in honesty I love those also. Good job and best wishes for the 2013 you want.
Danger of putting electrical cords inside your walls–they start fires. And can burn down your entire house. Your blog is great, but I wish you wouldn’t encourage your readers to do that!
I understand code. But can we all use a little common sense? Go touch your power cord for your TV. Is it remotely hot? No. And comparing this to a home wired incorrectly/illegally is ridiculous, that is a very serious situation. If this make you uncomfortable, don’t do it.
To the poster above, Costco, etc. are selling fake Sonys? That come with Sony warranties? Please. Cheaper parts, definitely. Branded fakes? No. One more thing, 99% of the time the man is the only one that can even control the remote? I set up and programmed our IR remote as well as every single cable remote we’ve ever had, so give me a break.
If you run a TV power cord through your wall like that and it happens to start a house fire, it will actually void your homeowners insurance. There are special kits that you need to use that are okayed by insurance companies, where you aren’t actually running the power cord through the wall, but it’s still hidden. You can buy them from places like Best Buy. I don’t mean to be a Debbie Downer…I just would hate to have a house fire and then the insurance company tells me that nothing is going to be covered.
Or you could simply use a piece of PVC piping inside the wall, and keep it neat in there! It takes no longer then doing this with tape and pulling it through!
Thanks for the tips! We’ve mounted the tv (yay!) but the chords are hideous! Unfortunately, your brilliant idea won’t work exact for us because our tv is above the fire place, but it has given me hope that we can do this ourselves successfully. Thanks again!
Well until America goes totally to pot and starts sending inspectors into my home to see if I’ve run power cords through the wall or not, I’m pretty sure I’m doing this!!
Saw this an KNEW it is EXACTLY what my family room NEEDED! I was amazed how LARGE my family room looked after mounting our TV. THANK YOU!!!
Hey, this is not up to code! (Kidding).
Awesome tutorial – thank you.
Yep… Too easy. What about concrete walls ? :)) 17th floor ? :))
Too bad it is against NEC electrician code to run your TV power cable in the wall. If you do this and something happens to your house *knocks on wood* homeowners will not cover anything. Their are kits on the market call ‘in wall power extensions’ to run power in the wall correctly. If your going to do the job…do it right.
That all works well and good if you have one of those new houses with the cardboard coated chalk walls but our house is 100 years old and has 1/2 inch horsehair and plaster over now nearly petrified wood lath. You can’t even pound in a nail without drilling a hole first. Then there are horizontal studs every couple of feet between the vertical studs so even installing an outlet is tricky. In addition to that there are old steel pipes in the walls from when the house has gas lighting and there is no way of knowing exactly where they are without taking down the whole wall. No mounting a flat screen TV for us 🙁
What happens to the 2nd hole you cut underneath? And why does the tv cord plug in not show?
You do have to be careful though because technically power cables are not rated for fire safety and can not pass through dry wall!!! most of the time you install an outlet behind the tv first to avoid this issue!!
Building codes vary from state to state, and even from county to county. But you may be able to solve the code problem (depending on the code in your area) by putting some insulated conduit in the wall to run the cords through. (I used to run cable as a telephone tech, and I remember having to put in conduits a few times when we had to run through certain portions of wall.)
Also, readers should be warned that on occasion – depending on how old your house is, etc. – there will be horizontal 2×4’s running between the studs in places. It doesn’t happen often, but it can drive you crazy trying to run cords down between the studs if you don’t realize you’re hitting one of these!
Please note that if you run the actual power cord in the wall it voids your homeowner fire insurance. If a fire starts, you will not be covered!!! Please either use a cable channel that sticks to the wall (most are paintable) or hire an electrician to move an outlet!
Omg I love your coffee table and tv stand. .where can I purchase one just like it? And thanks for your awesome blog!
This may be a dumb question but where do I put the flat panel in wall management system? Do I install in the rectangle cut out!
I wish I could have that kind of wall in my home! In Portugal all houses are made with bricks and to do that I have to really make a huge mess! 🙁
I think installing something like this in that way is considered an electrical fire hazard and must done by someone certified… Because the cords are loose behind the wall. I called an inspector when trying to do it to my house to see what his thoughts were and I believe he said if your house is to be inspected it would not be passed up to code if you hide electronic cords freely behind a wall like that. Because getting it done by a professional was too expensive, what I did was buy one of those cord concealing paintable tracks (?) that you can stick onto the wall and cut it to size and that’s how I hid my cords.
This is great, however I rent my house so I will not be cutting holes in the wall, I will want my deposit back thank you very much. But good instructions non the less. If I mount my TV, the cords are just going to have to be shown.
Thanks so much for posting this! I always thought it would be a massive undertaking to run cords through the wall. I, like you, have minor anxiety attacks when I see the cord “nest” or “hive” growing around our electronics. Pinning this now, so I remember how next time we need to mount a TV!
Love it! Looks so clean and sharp. If I had a tv that’s what I’d want too!
Relieved…spelled correctly…you know the rule “I before e except after c or…”
Lol this has nothing to do with the tv mounting but I really like your wall color. Could you tell what is it?
Just be careful because it is against housing regulations to run cords through the wall. So just make sure you aren’t having a city inspector or land lord walk through your home anytime soon.
Consider which AC power outlet to plug your new HDTV into. DO NOT RUN THE TV POWER CORD OR AN EXTENSION CORD INSIDE YOUR WALL. Really, it’s against all building and the National Electric Code (NEC) if you do. Either hire an electrician to install an outlet up on the wall, or if you’re handy, you can install a special designed outlet yourself.
Enjoy voiding your home owners insurance with that fantastic installation of a power cord and non in wall rated HDMI cables inside your wall.
In case anyone was curious, Best Buy would do this same job, with everything in wall certified for right around $400, including wall mount and cables, o not to mention you don’t have to worry about not hitting dead center of your 1.5″ wide studs. Hope your tv doesn’t fall off the wall. Enjoy
Awesome, thank you so much for this
Seriously??? what a dumb “solution”… go a head make a hole in the wall, so you wont be able to move the tv from there, boring living room looking exactly the same all the time, seriously why would you want break the wall to have it repaired
Having read this I believed it was really informative.
I appreciate you spending some time and energy to put this information together.
I once again find myself personally spending a lot of time
both reading and posting comments. But so what, it was still worth it!
My only question is where is the after photo of the bottom of the wall? Is it a special type of plug outlet that goes on the bottom or something?
What paint did u use here? I love the color!
OMG, it’s so nice, but I’m writing because I literally LOL’D hearing you read this in my head! LOLOLOLOL!!!!! Good job, btw!
We are mounting our television this weekend. I wonder how to do this if you don’t go straight down. Our television will be in sheet rock/studs above our fireplace. So we are running the cords to the side of the fireplace and over to some shelves that will hold all of our components. My dad is actually a home inspector and has electrical experience as well, and he is taking care of it for us. I just can’t wrap my head around how he is going to do it. I wish my situation was as easy to solve as yours! Also I don’t think people are grasping at all that you said you don’t have any power cords behind the wall. Not really sure how someone takes the time to put that much effort into arguing about what you are doing wrong, but doesn’t put in effort into actually reading the post. Thanks for this.
Rachel, this is tricky. I see no solution around it other than drilling holes through each stud. For me, it would have to include cutting sheetrock at every stud, but maybe your dad knows of some special tool that allows you to drill holes in studs without cutting the sheetrock. Please come back once he is done and let us all know how he did it! I’m very curious!
what about the the power cord for the TV that isn’t fire proof? what is being used to ensure proper fire codes?
This is why I edited the post a year ago and added all the disclaimers and the link to the device about 5x that you can order on amazon. If you purchase that device it makes it to code and fireproof.
Cords has always been problem as they just bring the hell around the tv.Your way of explaining with pics is really a good effort.Your post is really nice and worth sharing.Recently what I have tried is ceiling tv mount.Its seems amazing watching tv without any hanging cords.
I just wanna say that I love your blog a lot. (And what better post to comment on than the one with so many negative nancy’s?) I came across it today and read 23 pages instead of studying for my college algebra test (eh, who needs it?) keep up the good work!
Note that the above guide doesn’t include a home theater system. I’d love to see a way to completely hide wires with a full blown home theater system.
Just wanted to say this was one of the best blog entries I’ve read in a long time. Not to say it wasn’t a challenge, but that’s the nature of the beast. Very appreciative of your go-back suggesting the Power Bridge which turned out to be an excellent suggestion that saved me boatloads of grief trying to figure out how to run power to the tv keeping the wiring generally hidden.
Well done…now update that TV ASAP!
So this is what a helpful wife looks like. I’ll have to show that to my wife before starting project. Thx for the instruction.
This looks great! Awesome tutorial! We did his years ago and I’m so glad we did because it looks so nice! Keep up the great work!
If you guy have a 23-32 inch flat screen tv the wall mounts on ebay are 20 bucks including shipping.. they dont tilt or move i got one and some togglers.. im cutting a hole in my walla since my tv wont be to far from the electrical input and imma use electrical tape
Thank you for the blog and tutorial. Thank you also to everyone who added positive comments on how to complete this project to code making it fire safe. I completed it today and will have my son help me fish the cords tomorrow when I purchase longer, “ok to put in the wall” HDMI cords.
Maybe I’m wrong but I think this not to NEC code. It’s essentially an extension cord behind the wall-you can’t do that. If your house burns down…I think the insurance company is going to have an opening to deny you your claim.
Thanks! so helpful Ive been wanting to this forever!
Ok..what about over a fireplace and with cable box/DVD/etc. boxes? Probably need to wiggle it around the side to the other walls?
THERE IS A HUGE PROBLEM WITH DOING THIS!!!! LOW VOLTAGE AND ELECTRICAL WIRING SHOULD NEVER BE RAN TOGETHER. THIS WILL FRY YOUR ELECTRONICS! The correct way to do this would be to pay an electrician to put a plug up high on your wall and running the low voltage(tv wires) through flex conduit in the wall. Also, if there are cross blocks in your wall…then the conduit or the blogged (not recommended) way will not work. Seriously, it is not worth frying all your equipment. In this case, pay an AV integrator and electrician to do your work.
you have made my night with this advice. The husband and I have gotten over so many fights over those stupid cords!!!
That is genius! Thank you for posting this.
Just curious, what is that paint color on your walls? I love it.
It’s Bedford Gray by Martha Stewart.
Without the need to house tubes or accommodate
a labyrinth of wires, they can be created to provide power for the smallest of electronic
devices. There are many numerous methods of coating such as organic coating, oxide coating and the plating method that many manufacturers use.
Deliver A Presentation, most performers from the witout a doubt throughout-deal through the development of awful excessiveness amount the actual malfunction stacking wire small business, even worse.
how do i convince my husband he wants to do this?…do you have a Tutorial for this very important step?..
I hate wall mounted TVs. They’re not for me. I constantly mess with, change and add cords for whatever reason. It’s such a hassle having to blindly try to attach cords. I’ve tried it, never again.
Ah! the benefits of not having brick walls.. literally anyone can do this. Such a neat idea!
I love your blog.. very nice colors & theme.
Did you design this website yourself or did you hire someone to do it for
you? Plz reply as I’m looking to design my own blog and would like to know where u got this from.
many thanks
Cheryl, you could’ve at least taken the effort to scroll to the bottom of the page. The theme name is stated at the bottom right of the page.
what happened to the Powerbridge Total Solution strip that was mentioned at the start of this article? How was it used, what was it used for?
If you want your TV hung up to code, you need to install one of those. We didn’t, and the tutorial wasn’t to code so I updated the post with a solution to make it to code.
Very Nice! though that is the way to go I’m not so sure that would work for me, My TV is going on an exterior wall thus the insulation so it might or might not work.
As for as the console, I think I would go even a step further and replace it with floating shelves opening up more floor space.
Randy, you might also have some fire stops in your wall if it’s an external wall. Keep an eye out for those and maybe try a stud finder before you start cutting holes. I love the idea of the floating shelves!
Thanks for the step-by-step directions! Very helpful! I do have a few questions:
1. Did you also fish through your other cables such as from the DVD player?
2. I am wondering about the holes one has to make in the walls. I know this sounds crazy, but would the holes be a good access point for mice maybe?
Thanks!
I fished through all the cables that need to plug into the TV. Not sure about the mice…
It probably depends upon your local codes, but in some walls making holes like this might be illegal and void your insurance because the sheetrock is meant to be a firestop, and cutting holes in it, allows a fire to jump into the wall immediately, and not a half hour later, as was intended. Im not saying that is the case, but it might be worth checking out first.
Hey,
Fantastic job! I enjoyed watching the tutorial with pictures. It was nice! I didn’t have any fishtape though, so I improvised. I took a thin piece of wire (same kind of wire used to install an alarm system), and I tied a small weight on the end. I dropped that through the hold and it ran all the way down to the bottom with no problems.
I did have my holes cut directly next to the stud… so the stud sort of guided my weight down without getting lost in the abyss, :]. Fantastic job though, it looks awesome!
Love the step by step, but couldn’t stop admiring the couch. Where did you guys get it?
I dont know hey, this wall must be american but our house and all the ones I know of… the walls cant be cut. They are pretty solid concrete.
I’m sorry the mounting won’t work for you. That’s a bummer!
In some countries we have real walls made of brick and concrete, so this isn’t helpful at all. 🙁
We do have real walls in Germany. So its not possible to do it your way…
Only one problem. How to hide the wires going to my surround sound speakers. I also don’t think my apartment manager would like me cutting holes in the wall…
Hi House of Hepworths! I am redoing a bedroom into a workout room and stumbled upon your hanging the tv. Such great information and how to steps. Then I saw your fabulous white hall table in the pics. Where did you get that? It would be perfect for my spa like workout room.
Thanks.
Pamela
That used to be a headboard! https://www.houseofhepworths.com/2011/09/22/you-turned-a-headboard-into-what-project-23-done/
Hi There,
Love the idea, but what if it is a solid brick wall we have in our country.
Regards,
Robyn
Unfortunately this won’t work with walls that are brick or plaster. You have to have drywall walls.
Cutting holes in the sheet rock is not ideal. I’ll live with my cords, thank you. Maybe try to find some white cords to blend in with the wall better. I also don’t understand why people are crazy about mounting their TVs to the walls. It just places them a foot or three farther away from the viewer. So all the money you waste on buying a 65″ TV instead of a 55″ is wasted because you’re viewing from farther away!
Can you please explain how you got the power outlet from the top to actually have power. Did you have to hire an electrician?
It would be really awesome if there were pictures up close of the wall after the installation. I would like to see where the cords run to when they come out of the bottom of the wall, and how they sealed up the wall at the bottom with the cords come out of the bottom hole.
Unfortunately, we have moved from this house so I can’t take any new pictures. I used this type of electrical box:
http://www.amazon.com/gp/product/B003JQL0S8/ref=as_li_tl?ie=UTF8&camp=1789&creative=390957&creativeASIN=B003JQL0S8&linkCode=as2&tag=housofhepw-20&linkId=HHYZLZ7ROSNHOWBF
And then used this type of plate cover for the wires coming out:
http://www.amazon.com/gp/product/B0032FO27M/ref=as_li_tl?ie=UTF8&camp=1789&creative=390957&creativeASIN=B0032FO27M&linkCode=as2&tag=housofhepw-20&linkId=O7KBPH2BQYZZ5OCB
I hope this helps!
Dude, you’re break local safety regs. The power must not be behind the tv. it has to be outsourced from the wall and a new pock socket must be installed.
I live on the west side of the country and they build differently than the Midwest. When my dad and I were hanging my flat screen we drilled into the main water line for the house, not thinking it was on the other side of the wall. A stream of water comes streaming out and causing trouble for the next 12 hours. Got the pipe fixed and tv hung. Be careful what is on the other side of your wall.
This is one of the better tutorials I have seen on the subject. I don’t know why anyone would NOT mount their tv! It saves so much room. Thanks for sharing the cable tips, those are definitely a hassel. I got my mount from Discount TV Wall Mounts because they are super cheap compared to anywhere else I looked because they do free shipping. I was curious so I looked to see a price comparison with the mount you got from amazon and found that you can get one from these guys for almost half the price. Just thought you might want to include this in your article to give your readers some options: https://www.discounttvwallmounts.com/tilting-mounts-for-32-60-lcd-plasma-tvs-120b.html
Thank you for posting this. Another kit that works well for installing the receptacle is a LeGrand kit on Amazon. It has round receptacles and comes with flexible sticks for fishing wires and a hole saw you can attach to your drill. Makes the drywall work a (messy) snap!
Thank you so much for this! I will definitely be doing this soon. I also want to add a sound bar, I will just make an extra whole for it using your method. 🙂
Good tutorial thanks and when you move your going to take that TV with you and repair the two segments of gib board as long as you know to keep an eye on the cables in the wall while your living there what the problem?
Leaving an opening in the wall will allow insect movement from wall cavity to living area.
Within the top 10 of the favorite articles, thankyou!
Great idea, if you have stud walls. But if you live here in the UK, its very rare to have walls that aren’t brick or concrete. Therefore this method does not work!
I do not even know the way I stopped up here, however I
believed this submit used to be good. I do not understand who you are however
certainly you are going to a famous blogger
in the event you are not already. Cheers!
Between the top hole and the bottom hole, usually there is an horizontal piece of 2 by 4 nailed between the studs which makes it much more complicated than this to pass wires thru the wall!
Sometimes. Depends on the builder.
Simply want to say your article is as surprising. The clarity in your post is just nice and i can assume
you are knowledgeable in this subject. Fine along
with your permission allow me to grasp your feed to keep updated with drawing
close post. Thank you one million and please continue the enjoyable work.
This is not the proper way to conceal wiring for your TV. HDMI cords MUST ALWAYS be rated CL2 or CL3 in order to be run in the wall. It is NEVER acceptable, nor is is safe to run a power cord for your TV through the wall, regardless of insulation or no.
To save yourself a fire hazard, hire a professional, or buy a pre packaged kit that is rated for this purpose.
You should take part in a contest for one of the most useful websites online.
I am going to recommend this website!
Wow, thank you! Tell your friends 😉
Thank you so much Allison for the DIY tutorial. This by far the most straight forward and easy DIY installion I’ve come across. You’ve made it very simple to follow the tutorial and not make it complicated for anyone to do it theirselves. I really appreciate you sharing this to the public. Love the pics that went with the step by step process.
Thanks so much!
Wow! Perfect explanation. Thank you so much!!
This is some really good information about how to hook up your cable to a wall mounted the TV. I liked that you had pictures of what you need to do. I might want to have an expert help me because I worry about doing it wrong.
Great!!! Thanks for sharing this blog. I really enjoy reading this blog.
great tutorial, but laying a flat screen on its face is a bad idea