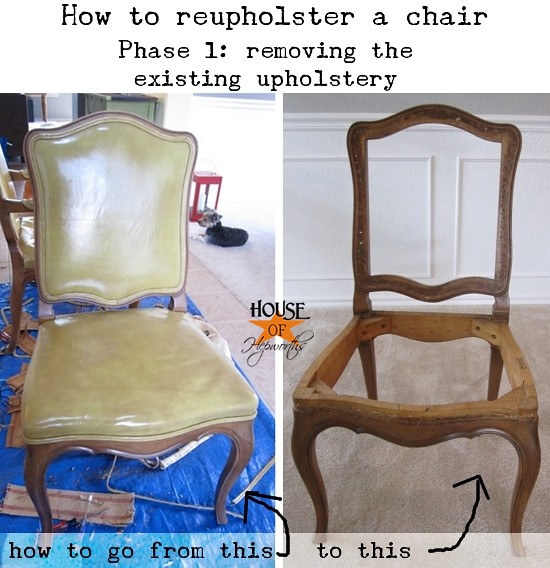
Do you want to upholster something and just don’t know where to start? Here’s the first tutorial in a step-by-step series on upholstering wooden dining chairs.
Today I’m finally going to tackle phase 1 of my dining chairs upholstery project! Yippie!!
I’ve got a long way to go before I can check the finished chairs off my to-do list, but at least I can say that every chair has been stripped to it’s birthday suit and is ready for a makeover.
Removing the old upholstery on these chairs was quite the project. In fact, it was such an ordeal that I wished on multiple occasions that I had never bought the table and chairs in the first place. But I know it was such a great deal, and it’s going to look so freaking fab once I’m finally done with all of it. I’ve already finished the table, and now the chairs are almost half-finished.
Shall we get down to it then?
Disclaimer: Upholstering is very specific to each individual project, so just because I did it this way does not mean it’s the only right way or that you have to follow these exact steps when tackling your own chairs. Also, I have never done this before, so I may not have even done it the right way. Just sayin’. I’m just here to share my experience, not to claim I’m an expert or anything.
Note: These dining chairs have springs in the seat instead of a wooden seat that can easily be removed. Here’s how to remove the upholstery and all the springs as well.
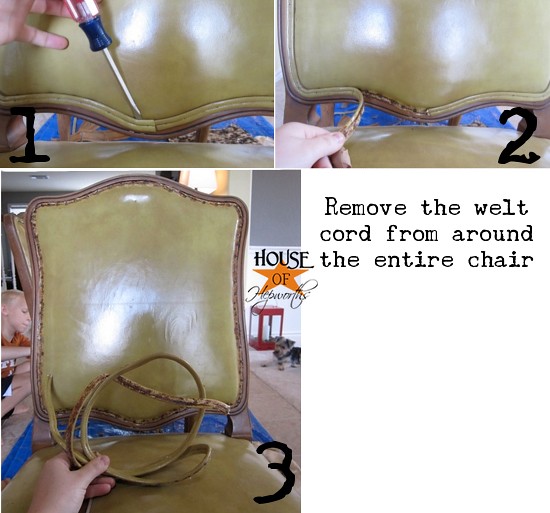
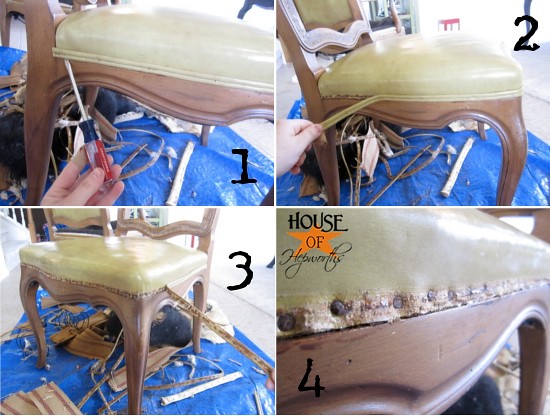
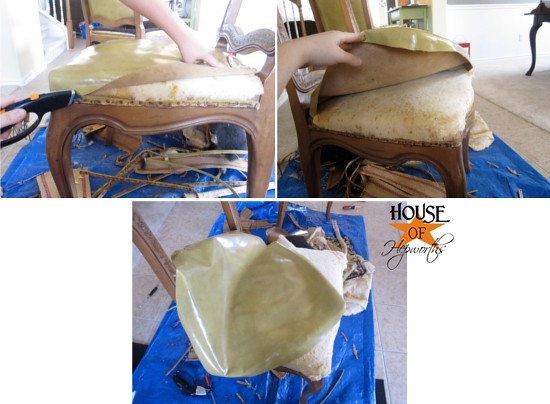
To begin the process of removing the upholstery from a dining chair, let’s start on the easiest part; the back of the chair. First you have to get rid of the welt cord. It’s usually just glued on, so get a screwdriver or something to pry under it and rip that crap off.
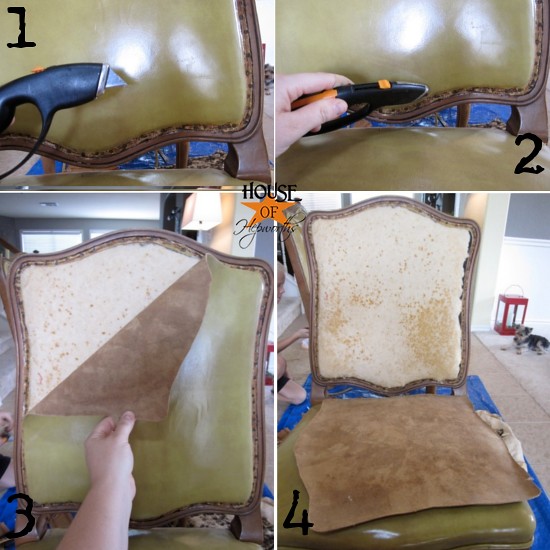
Next you are going to need to take the fabric or leather off. I tackled TEN chairs, so trust me when I say cutting the leather off first is the easiest way to go. Just cut around the inside edge of the leather, then peel the leather off. This will leave a strip of nails that will need to be removed in a minute.
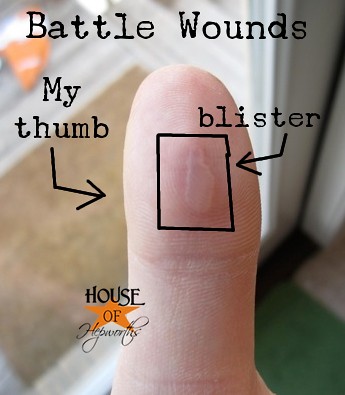
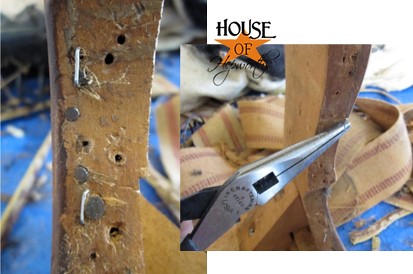
Okay so now remove the last little strip of leather that is held on with nails. Don’t underestimate these little things though. They are mean and deadly! You will probably get huge blisters on your hands from all the prying you will do to get these buggers out.
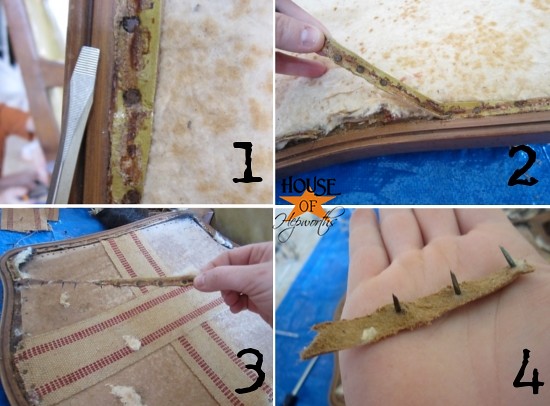
See! Blisters!! I removed the upholstery over several weeks. When the blister finally healed, I ended up getting a 2nd, then a 3rd one.
Once you get all the nails out, you need to take the rest of the batting and innards stuff off the back of the chair.
More nail prying time! Yay! At least these nails are half the size of those big honkin’ ones that wanted to kill me. Just get your screwdriver up under there and pry the back piece of leather off the chair.
You should be sweating now. And to think, you aren’t even half finished yet. Seriously. This is loads of fun. Trust me. I did TEN chairs.
Okay, so now remove that welt cord again from the seat of the chair. Just pull it off and throw it right in the trash.
And now, again, like you did above, cut the leather around the entire perimeter and remove it. You are welcome to try to remove the leather without cutting it first. No seriously. Try. I dare you. You have been forewarned though.
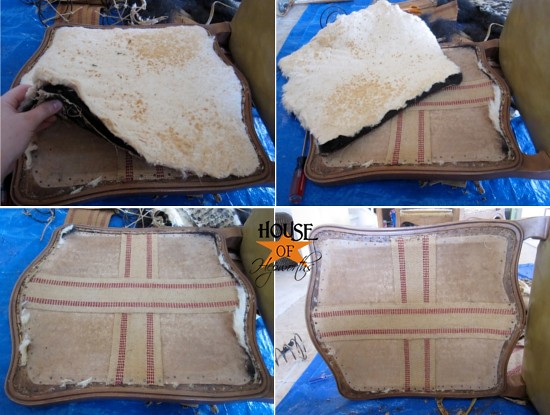
Now the real fun begins. Start peeling back all the layers off stuff inside your chair. There should be a few layers, and the deeper you dig, the more disgusting it gets. Good times.
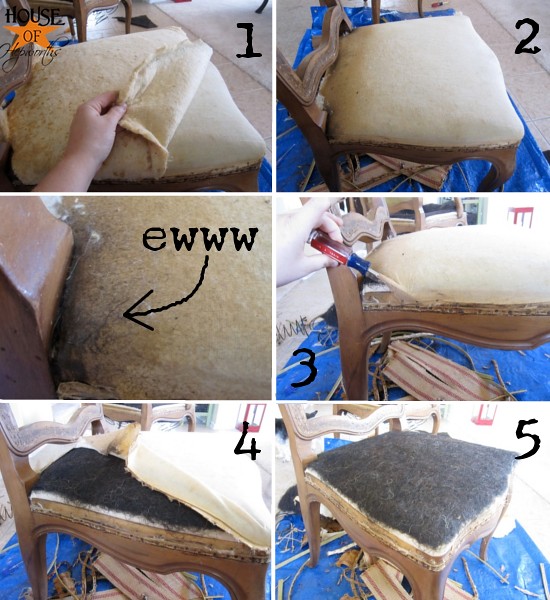
That black stuffing part is the best. It gets everywhere and is just so completely loaded with dust. I probably got lung cancer from taking these chairs apart. While you are removing the black stuffing part that feels like horse hair (it may be, who knows!), it is sewn into the next layer under it, so you will need to locate the jute holding it down and snip it as you go.
If you are going to remove your edge roll (like I did), now is as good a time as any to take it off. I was going to keep it, but it was so gross that I decided to just remove it as well.
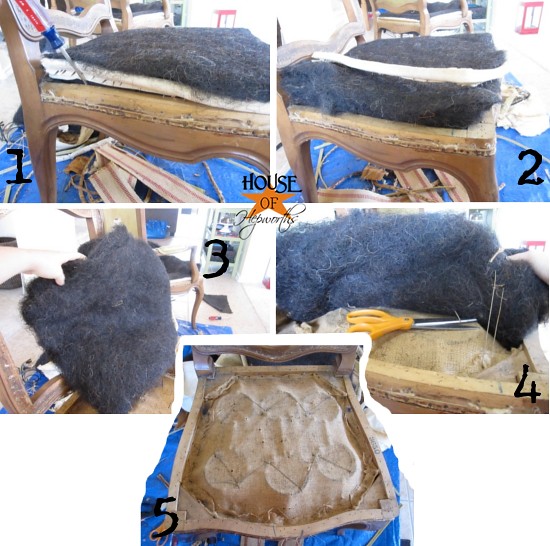
More layers. They never end, people. Never.
Cut the jute holding the next layer and start peeling all the burlap off.
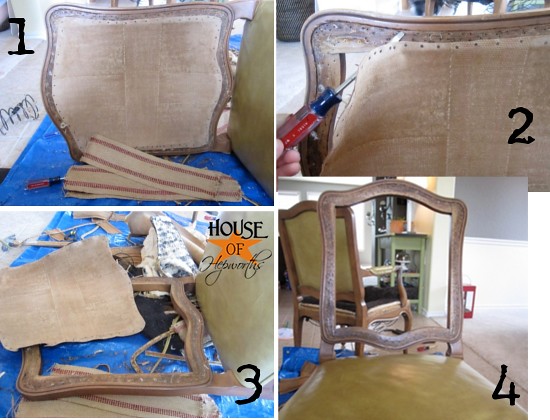
Springs! We are finally to the springs. It’s only been more than an hour by this point. But wait. Check out the layer of grime and dirt on these things.
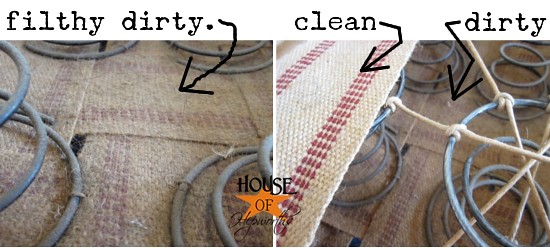
Barf. I think I just threw up a little in my mouth after looking at that.
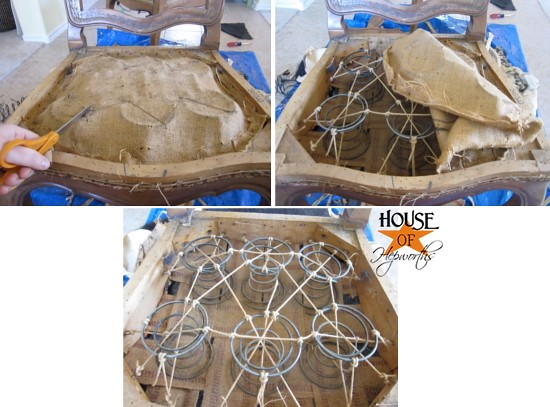
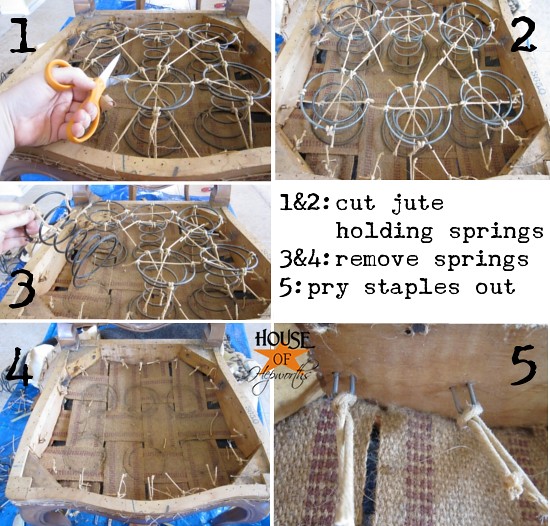
Go get yourself a good pair of scissors and cut all the jute holding all the springs together. And once you cut all the jute (twine?!), remove the springs. Grab a screwdriver or something and pry out all those huge staples that were holding the jute.
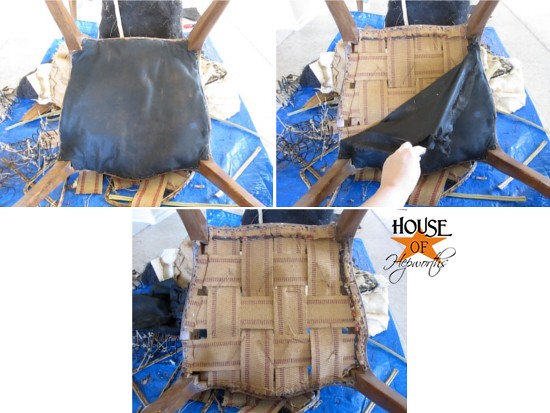
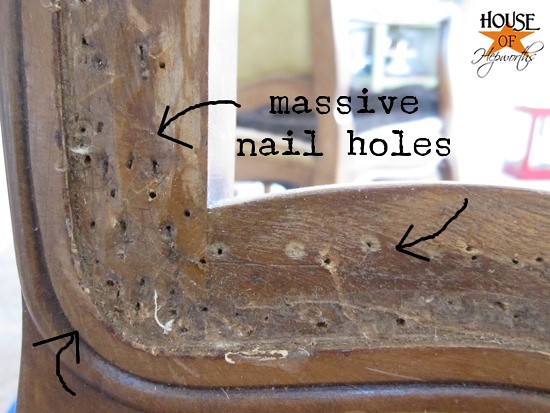
Now it’s time to flip the chair over and give it a good beating. Rip that black fabric stuff off the bottom and start prying out even more huge nails to free up the jute webbing.
The nails really are as huge and scary as they look.
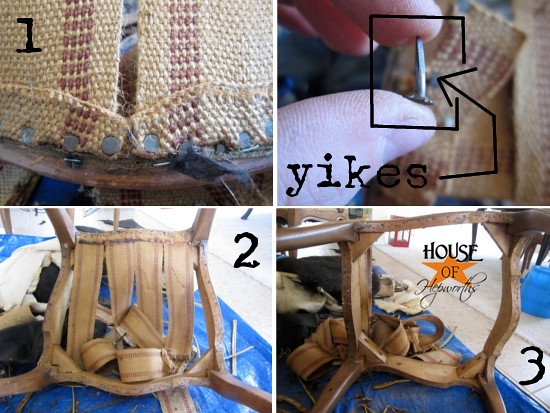
Now spend another 45 minutes of your life that you will never get back removing the remainder of nails and staples covering the chair from head-to-toe. There are most definitely real-for-real upholstery tools you can buy to do a better job, but I’m cheap so I just toughed it out with a flat-head screwdriver and a good pair of needle-nose pliers.
After TWO FREAKING HOURS you will finish ONE chair, & you will have a pile of trash that looks about like this:
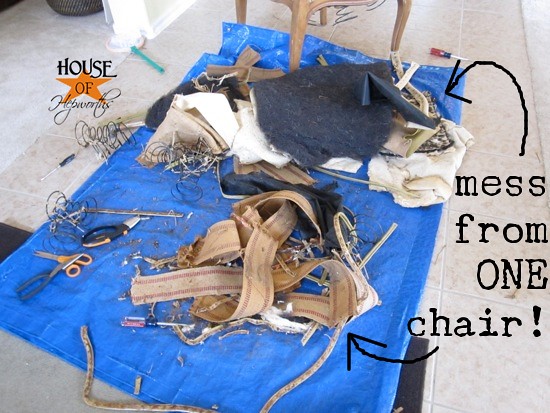
Now times that by ten and that is what I had to endure. Did you get that?! I spent about 20 hours total taking apart the 10 chairs. It was painful. It was brutal. And I’m so happy I’m done.
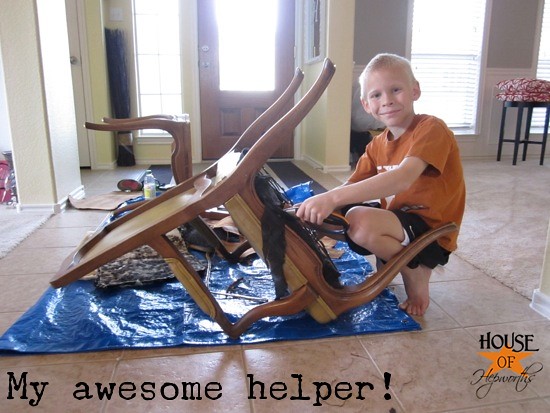
Fortunately I do have this adorable boy that was more than willing to help out; but only if he was allowed to use a screwdriver and the knife cutter thing-a-ma-jig. Boys. He was a great helper too!
Here’s what our piano room looked like mid-chaos. I am totally finished with the upholstery removal now though. This was a few months ago.
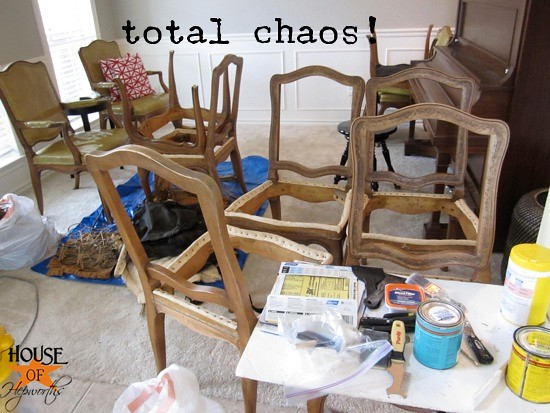
Unfortunately the chairs now look like they were in the middle of a battle field. I’m not worried though. The new upholstery should cover all the previous nail damage just fine.
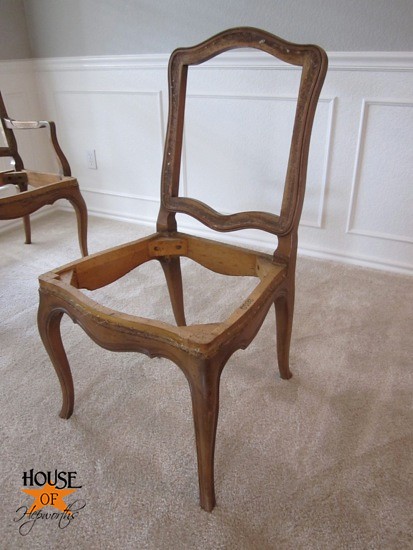
Here are six of the 10 chairs, ready and waiting for phase 2: paint! And then phase 3: new upholstery!! The other 4 chairs I drug out of the room for the photo, but trust me, all 10 are finished.

I haven’t even started phase 2 or 3 yet, so it may be awhile before I make another chair update. Let’s hope not though. I want these things done!
And for those that missed it, here’s the finished table and the how-to tutorial for stripping and staining:
Before:

After:

Have a great day!! Come back tonight because I’ve got an exciting giveaway! I’ll give you a hint: It’s the brand new model, cuts vinyl and everything else under the sun, and rhymes with Pillowette Famio. 🙂
Whoa. That chair disassembly looked like a bear. Looking forward to the next two phases.
Awesome
Beautiful work
Your job is done dude
All I can say keep up and don’t waste your talent and skill and by the way very helpful tips because there is a dining set coming up this Saturday for me to start
Cheers
Your blog is one of my favorites to read because you always have such great detail that goes with each post. I admire people who have the bravery to tackle projects like this. I think I’d be too overwhelmed, not to mention lazy. Great job!
Well, I’m in the middle of doing one chair and it is driving me nuts, so I can’t imagine doing ten of them! There were enough staples in my one chair to hold ten chairs together! I can’t wait to see your finished product! I’ve got the back of my chair to do, and actually seeing how yours was put together will help me (mine didn’t have the burlapy strips, but I bought some to use and wasn’t quite sure how I wanted to do it.
I love your sense of humor in the midst of these projects! What a job. Just keep telling yourself how much you’d be paying a professional… Looking forward to seeing how they turn out. Eventually.
You are AWESOME!!!!!!!!!!!
OMG she started the chairs! OMG she started the chairs! Sorry, that’s just what played through my head when I saw the post.
That looks like a massive project. I bet you will LOVE the finished product though, especially when you look at your before and after shots. Nothing like working hard for something you want. You’re inspiring!
Thanks for the information. I can’t wait for the next installment.
Allison –
You are my hero. You are truely amazing. What a task. I am in awe. You are a brave gal and I can’t wait to see how the chairs turn out. Great tutorial! I also hate those little uholstery nails. They are buggers to put it nicely.
Stacey of Embacng Change
I just found your blog from Oh My Crafts Facebook post. I have now subscribed. What fun posts you have!
I love how real you keep it with upholstering!
It is either horse or hog hair. Unless it feels rubbery, then it’s synthetic horse/hog hair. 🙂 But if it’s the real thing it’s a sign of a good quality piece of furniture!
I found your blog todayad have enjoyed it. I’d also like to win a Cameo.
I am so anxious to see the next phase, have you put your chairs back together yet?
No, I am still avoiding finishing the chairs. I just need to suck it up and do it. Ugh.
Hello Allison,
Just wanted to see if you will be posting about the other steps. I am in the middle of doing the same to my chairs and this post was so helpful–I sure hope the others come soon 🙂 Thank you.
Robin
I love your blog! You’re such an inspiration and I know this is a little late but I’ve just got caught up on this remodel of yours and saw those white shelves in the dining room….where did you get those??
What a job!
Question?? Will you be reusing the springs? We have Jacobean revival charis that we want to reupholster in leather. My husband wans to nix the springs and use a dense foam instead.
This is our first project like this. and this set is precious to me. Is there a choice?
Well done. Enjoy the step by step comments.
Wow! So glad I found this! I have only tackled one of the 6 chairs I bought to update my dining room and thought I was in over my head! I see now that the process is a giant mess & not so discouraged! The seats on my chairs are fairly new memory foam & are glued down. I was thinking of leaving the seat cushions in tact. Is that okay or will there be no way to really stretch the fabric properly over the cushion since the edges are glued to the chair?