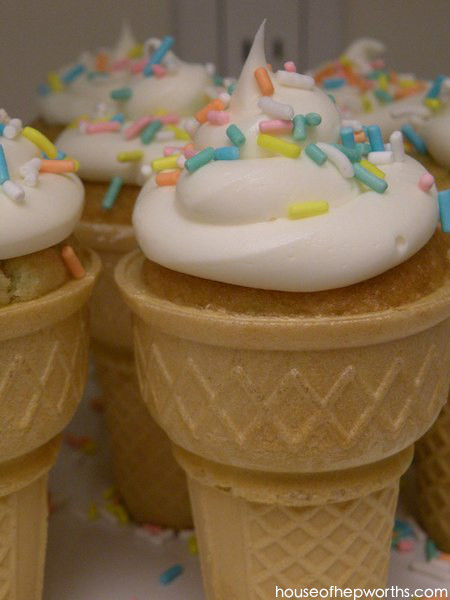
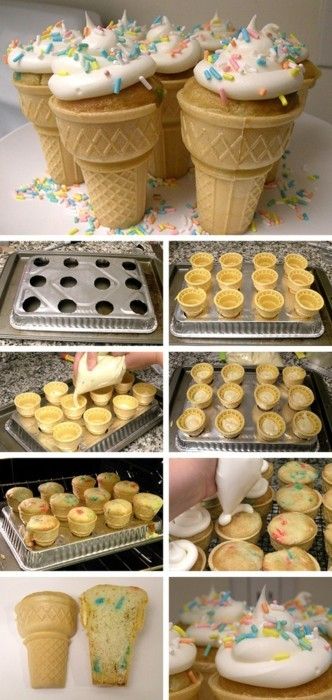
Today I’m sharing how to make Ice Cream Cone Cupcakes with a custom baking pan. Ice Cream Cone Cupcakes are really easy to make, so adorable, and a great for kids birthday parties. This post contains affiliate links.
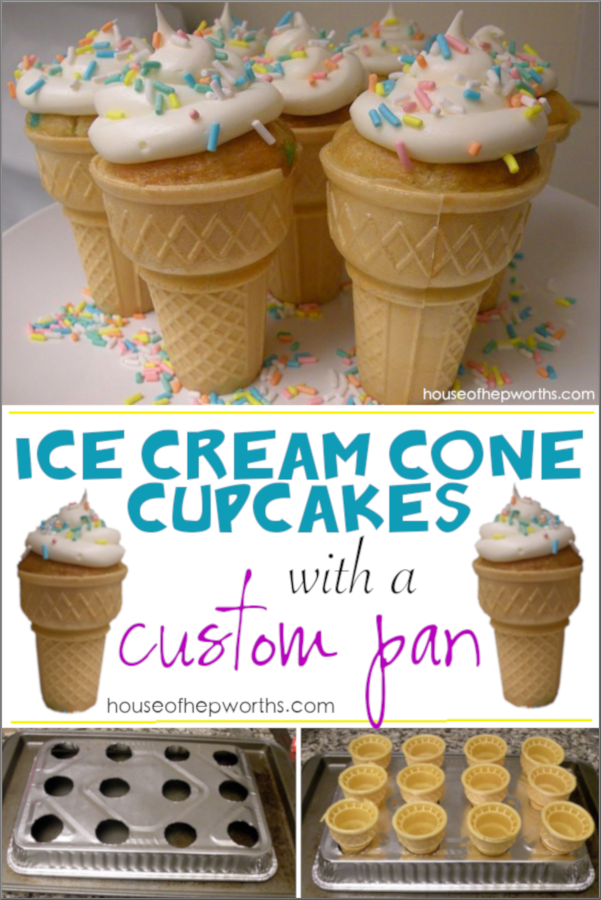
Part 1: Making Ice Cream Cone Cupcakes
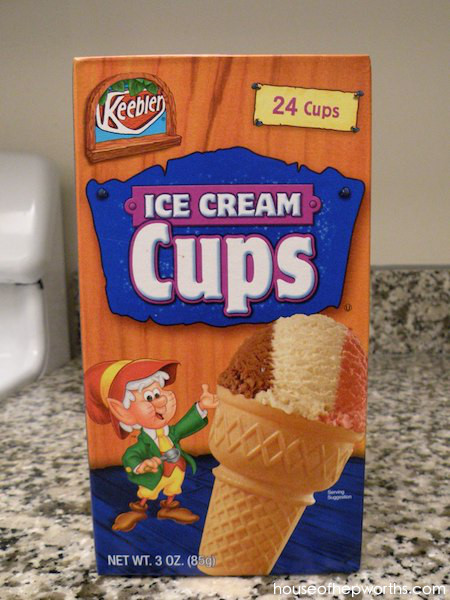
To make your ice cream cone cupcakes, gather your supplies. I prefer to use a box cake mix (my favorite is Funfetti) and basic ice cream cones.
Shopping List:
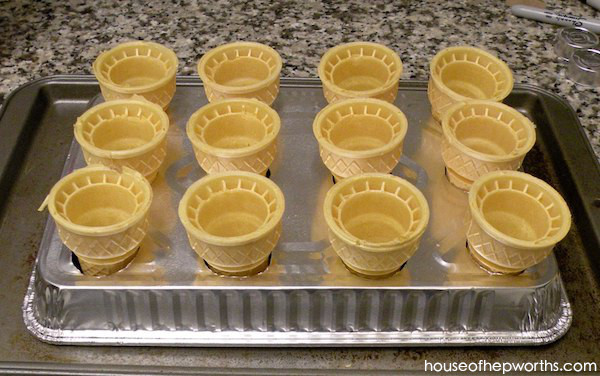
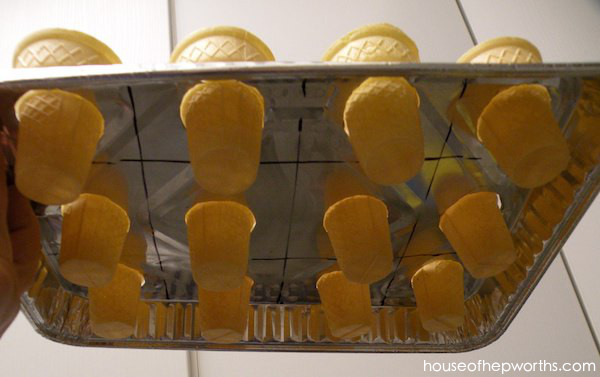
Step 1: Line your ice cream cones into your custom baking pan
Start by adding your cones into your custom baking pan (see below for custom baking pan tutorial). Make sure you use your custom pan on top of a cookie sheet. If you don’t have a custom baking pan, tightly line your cones in a cake pan.
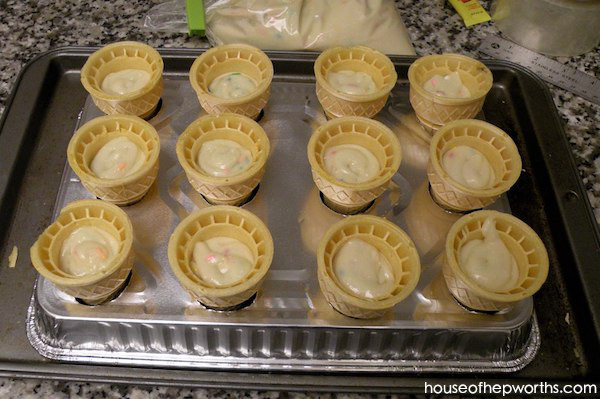
Step 2: Fill the cones with batter
For me, the easiest way to fill cones with batter is to put all your batter in a large gallon-size Ziploc bag, snip the corner, and squeeze the batter into the cones. Check out this tutorial for more details.

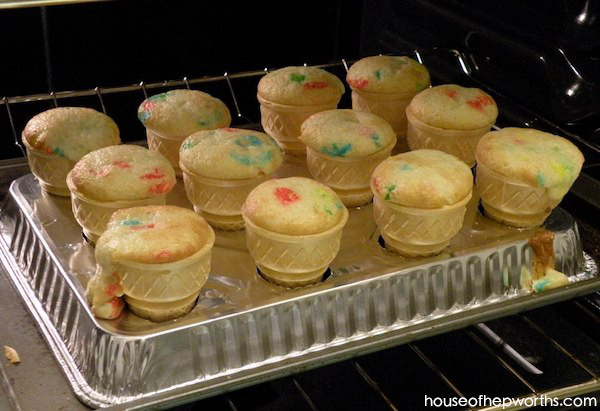
Step 3: Bake your ice cream cone cupcakes
Following the directions on the box cake mix, bake the ice cream cone cupcakes as if you are baking cupcakes. The bakes times and temperature are the same.
Part 2: Frosting tips for your Ice Cream Cone Cupcakes
For frosting cupcakes, I prefer to use the same technique I used for filling the cones with batter. It’s cheaper than buying a decorator set, easier to clean up, and the frosting swirl looks really cute.
Shopping List:
Step 1: Fill Ziploc with frosting
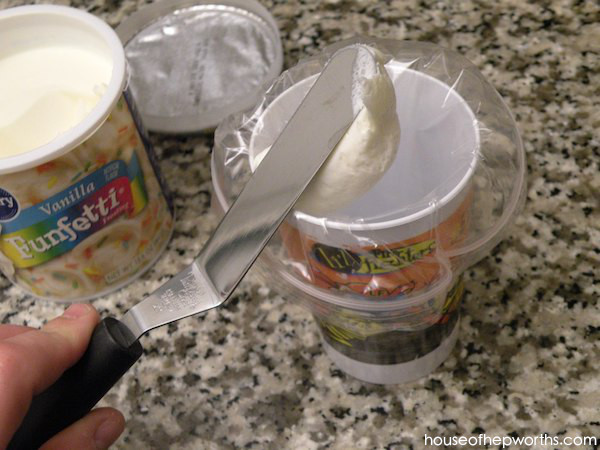
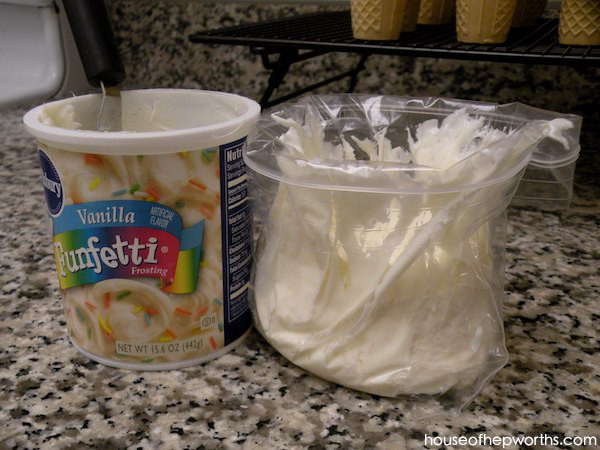
Fill a Ziploc quart-sized bag with icing. I am an “easy” baker, which means I like to buy box cake mixes and premade frosting.
Major tip: use a REAL Ziploc brand bag. Generic zip bags tend to be thinner and will explode. Also, I’ve personally found that the generic brands all leave a plastic flavor on your food.
The easiest way to fill the bag is to put the bag inside a cup and wrap the edges of the bag over the cup (like putting in a trashcan liner). Then just take a icing spatula and scoop the icing into the bag.
Step 2: Close your bag
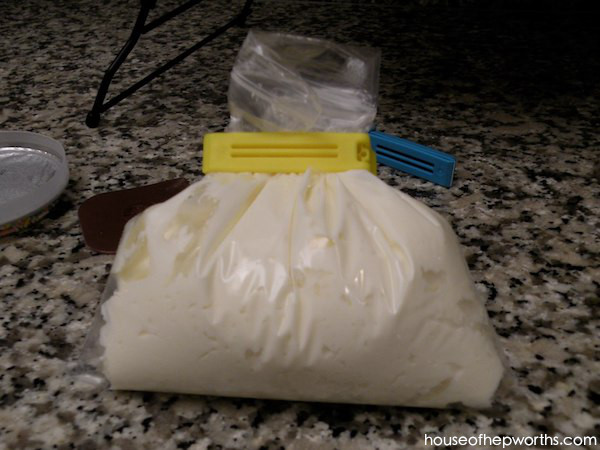
When the bag is full, take it out of the cup and zip it up.
Step 3: Reinforce your bag
Small bag clips are a great way to reinforce your frosting bag. Add a small bag clip to tightly hold the frosting in the bag. It also ensures your Ziploc doesn’t pop open.
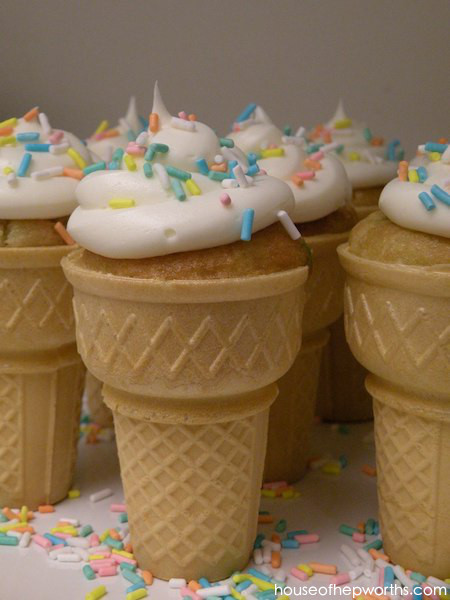
Step 4: Frost your ice cream cone cupcakes
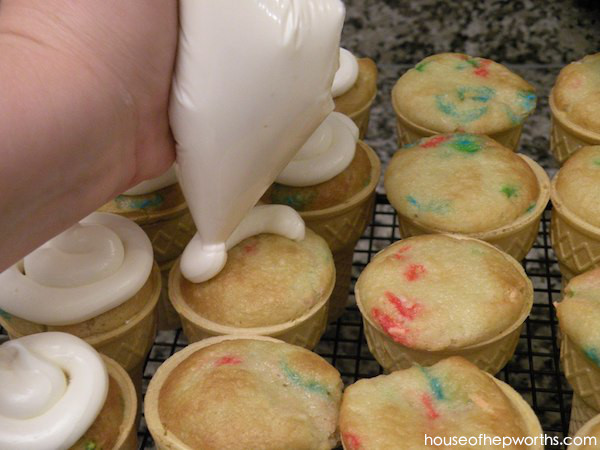
Take your frosting bag and snip off a tiny corner of the bag. Congratulations. You have just made a DIY frosting bag. Now it’s time to pipe your frosting!
I LOVE the look of this piping technique way more than any piping tip you can buy. Start on the outside edge of the cupcake, slowly squeeze the frosting in a spiral motion towards the center. It should take about 3 full rotations.
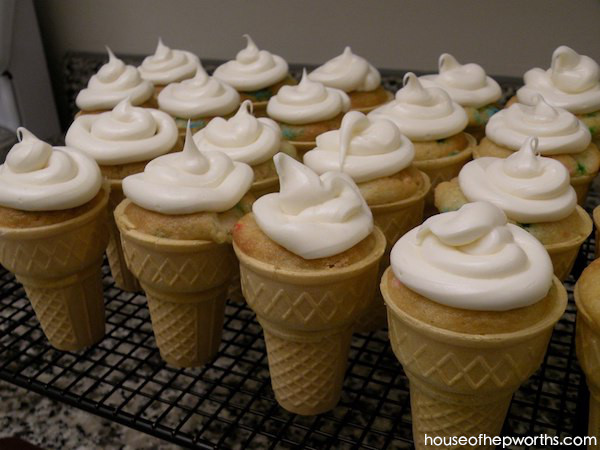
Step 5: Add sprinkles!
While the frosting is still wet, add sprinkles. If you wait too long the frosting will dry on top and your sprinkles won’t stick.
Part 3: Creating a custom pan for your Ice Cream Cone Cupcakes
Having a custom pan to hold your ice cream cone cupcakes while they bake is not necessary, it just makes baking them a whole lot easier. Order a pre-made one here.
Shopping List:
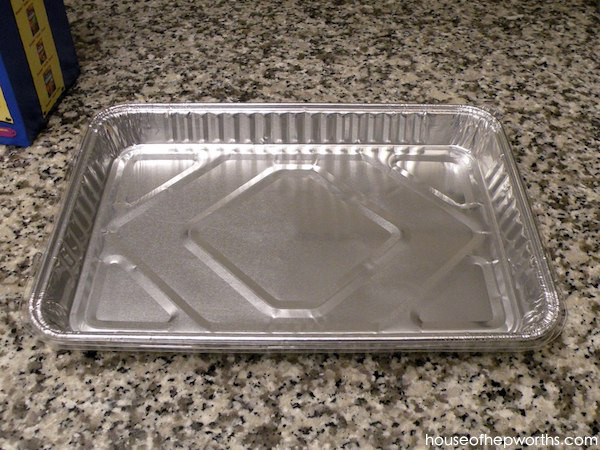
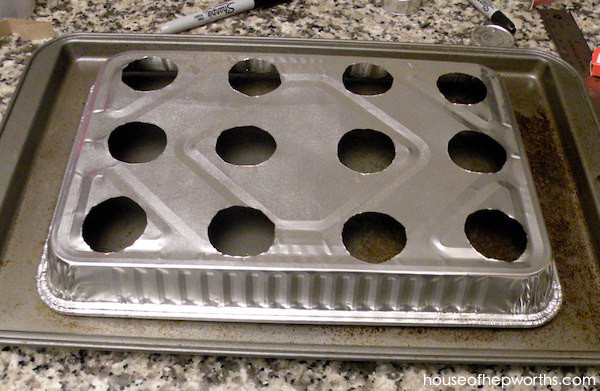
Step 1: Start with an inexpensive disposable tin cake pan.
I found this inexpensive tin pan from the dollar store. It’s going to be the frame for my awesome one-of-a-kind cupcake cone baker.
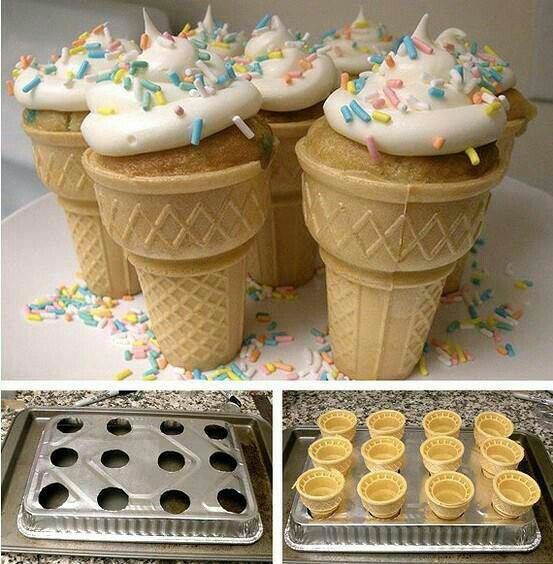
Step 2: Measure and cut circles for your ice cream cones.
Using a permanent marker, measure out a 3 x 4 grid. Trace around the base of an ice cream cone in the center of each square. Next, cut out each circle with an X-acto knife on a cutting board. The tin is very thin and easy to cut.
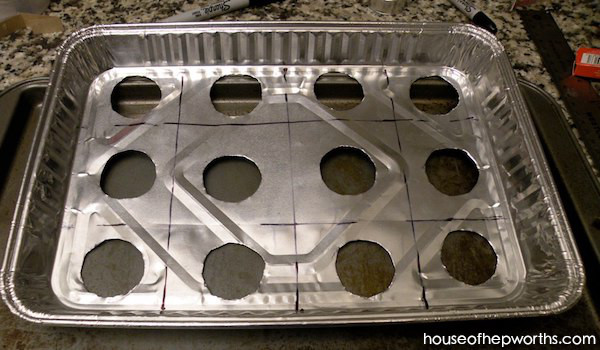
Step 3: Add ice cream cones.
Step 4: Bake ice cream cone cupcakes.
Following the tutorial above “Part 1: Making Ice Cream Cone Cupcakes”, you are now ready to bake cupcake cones.

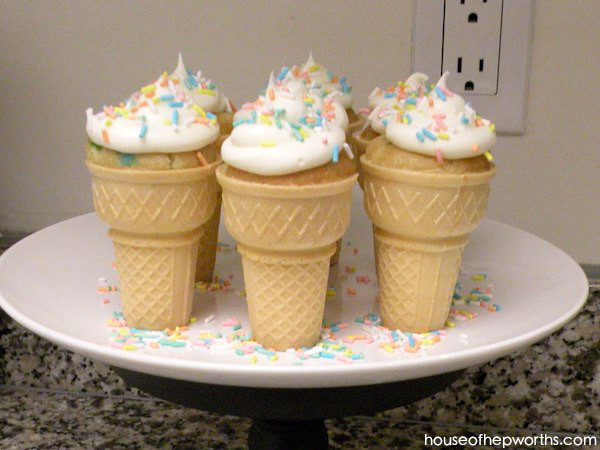
Part 4:Enjoying your Ice Cream Cone Cupcakes
My kids beg for “cupcake cones”. They would rather me make these for their birthday parties than buy a cake.
An easy shopping list:
- Ice Cream Cones – mini, regular, and jumbo
- Funfetti cake mix
- Funfetti frosting
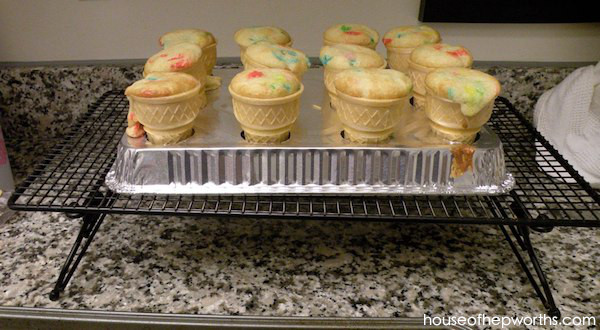
- cooling rack
- Ziploc quart-sized bags
- Icing spreader
- bag clips
- disposable cake pan
- OR pre-made ice cream cone cupcakes baking pan
- permanent marker
- X-acto knife
There you have it! Three great tutorials for Ice Cream Cone Cupcakes in one easy post; Making Ice Cream Cone Cupcakes, Frosting tips for your Ice Cream Cone Cupcakes, and Creating a custom pan for your Ice Cream Cone Cupcakes.
- Easy trick for filling cupcakes
- Petite Valentine’s Day Cupcake Cones
- Poop emoji chocolate Cupcake Cones
- Cupcake Cones, version 1
Ice Cream Cone Cupcakes are one of my favorite treats to bake. They are my go-to when I want to bake something sweet and soft and have the perfect amount of sweetness, softness, and texture and are always the hit of any party or event. Cupcake Cones can also be made in a variety of flavors.

Instagram || Facebook || Pinterest || Youtube
*This post contains affiliate links
I think you are a genious! So that’s all that matters! LOL 😆 I REALLY didn’t know there was a pan and I LOve your idea…and beside that it’s a buck and you could probably reuse it! SO WAY TO GO!
had a go last week again and they were fab. Couldn’t believe you could cook a cone but you can and thanks. Didn’t get to ice them as family demolished the lot before I had the time. Thank you for the simple yet amazing idea.
Love this idea! Wish I still had little ones in the house so I could do this today. Maybe this summer? Your post was fun and funny!
😛 😛 Your idea rocks…I will pretend someone else didn’t come up with it years ago!
And your cakes turned out beautiful and I love the way you iced them
Super cute for sure!!
Hugs
SueAnn
We made these when I was little, though I don’t think we had a special pan. I like your homemade version!
I still think you’re a genius for coming up with that idea, and super sweet for sharing it with us! I think I will make some patriotic themed ones for Father’s Day or for the 4th! Thanks again! ~Sam
Allison, Even if someone has already produced this idea…I still think you are a genius! I love this idea..both the pan and the cupcakes in a cone and put it on my “fun” list for things to do when my grand-daughter visits in a couple of weeks. She will think I am way more fun then the grandma she lives close too…hehe. 😆
I remember those from childhood too great idea for the pan!!
Thanks for linking up @PonyTails&FishScales and sharing this awesome idea!!!!
terelauritsen.blogspot.com
Thanks so much for the awesome recipe! These are way cute, and I really would like to try to make them. Sorry someone else already made them up. 😥 Thanks again!!
I had to laugh at your ‘invention’… I was making pans like that 20 years ago for children’s parties, ‘cupcake cakes’…lol
Yours look ‘yummy’…
Sandy
http://thewondersofdoing.blogspot.com/
I didn’t know there was a pan you could buy already… I would have just thought you were a genius! 💡 I’ve tried these and wondered how to keep the cones from tipping, great idea 🙂 I agree that we’ll just give you the credit for being brilliant!
What a great idea! I’ll definitely use it and save money. 🙂 Thanks for sharing!
You totally made me laugh out loud! Love this post and those cupcakes!
It’s an awesome idea and those look so freakin’ adorable!
That looks so awesome and i am going to try thus sometime! 😆
These are so cool. Sorry about the billions you lost! My grandkids are visiting next week and I am making these for them. Thanks,
xo, Sherry
Oh my you are funny. Have you received a funniest blog award yet? If not, you should. Maybe I’ll invent one if there isn’t one.
😛 Oh my I love it!! And Icing in a tub already made??? How cool is that!!! And what a time saver. Hopefully we will get something like that here soon too!!!
I made these last year and just stuck then in 2 muffin tins! Uncreative! I’ve had tons of ideas, I too am waiting to make my next gazillion dollars…
Maybe it had already been invented….but never have I seen such precise instructions! I had no desire to make these before….but after your easy to follow instructions I may just make them for Kindergarden! Thanks!!!
Way too cute! I may borrow the idea.
Love the cupcake cones and your clever pan!
Oh, this brings back such memories! My oldest son turned 20 last September and on his first birthday I made these very same ice cream cone cupcakes…I even used the rainbow batter. Unfortunately, I did not have your clever baking pan. That would have made it much easier. These are so cute! Maybe I’ll make them again for his 21st! 😉
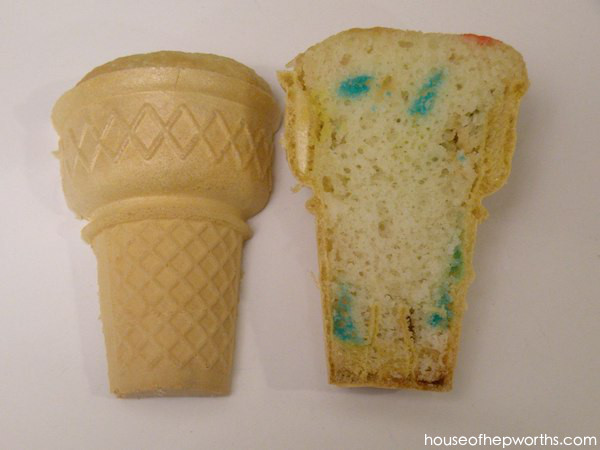
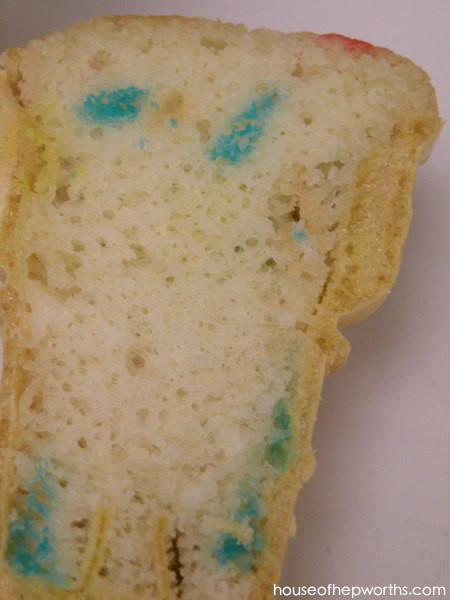
that was cute- fun and adorable all rolled into one fun sweet cone- The fact that you cut it open and took photographs is really the icing on my cake, uh, cone.
Love it- It is my monkeys birthday soon and I will show him these tomorrow- I think he is going to LOVE them.
Thank you for sharing-
They are super cute and very yummy looking!
That pan is genius! Seriously such a good idea!
Love it!
Seriously…saw your first post with the cones…better this time. 🙂
I have made these for my oldest years ago…and they are a hit….I have a birthday in a few weeks, and I maight do it again! Love the pan too!
Allison – seriously, I wish you were here at my house every day to make me laugh. I LOVE your almost original idea. I myself have never heard of that ice cream cake cone idea. Does that count? I think your’re original. . . by the way, your camera is amazing whatever you used to take those pics of the ice cream cones.
Oh my gosh, these are just precious! And your pan is perfect – I cannot wait to try this!! Thanks so much for the great directions and adorable pictures!!! 😀
I have seen these before but I handed seen the pan before. Great idea!
Sorry, that should be hadn’t seen. I guess I should proof read:)
Cute idea! And ohmygosh, you crack me up! 🙂 This post really had me laughing. Love it.
~Chelsea
Aww sorry about missing out on the millioins : ( this is a great idea. thank you sooo much for sharing this as my daughters bday is coming up in less than 2 weeks and I doing this!!! cheers ~
Stacey
What an awesome post and project! Not only is your idea fun, but you’re so witty. I’ll definitely have to keep this in mind for future use!
I made these for Savannah’s 5th birthday 11 years ago, and I wish I’d had your pan idea. I wasted a lot of foil getting the cones anchored in muffin tins. So whether you make a fortune or not, I still think the design is brilliant.
Oh my gosh those look soooo yummy! Awesome idea!
I read this post last night, and made them tonight 🙂 They are Delicious!!!!! They are so cute, and taste yummy.. Thanks for the great idea.. I will be makin these often, and they are sooo easy to make too!!
Such a great idea! I would have bought your prototype on HSN 🙂
ok… so a guy “crushing” on another guy is called a “bro-mance” so whats it called when a chick “crushes” on another chick? lol!
I am totally in love with your website! You are so much fun, and have FANTASTIC ideas… This weekend, I’m going to have my niece and two nephews come to spend the night… i think I know what we’re going to do!! hehe!! yay! an excuse for me to fake-bake! yay!
much loves!
-Jessica
I featured you @PonyTails&FishScales! Thanks for linking up and grab an I ROCK button from my blog!
terelauritsen.blogspot.com
This is a wonderful post! Great job! I host a Tuesday Tastes Party and would love to have you over sometime!
Happy Day~
Jasey @ Crazy Daisy
http://www.crazyjayzplace.blogspot.com
I think my post was lost–maybe? If this double posts I am so sorry!
What a amazing post! Great job! I host a Tuesday Tastes Party and would love to have you over!
Happy Day,
Jasey @ Crazy Daisy
crazyjayzplace.blogspot.com
My best friend’s mom made these for his birthday every year when we were kids- they were so fantastic, we talked about them all year until the next birthday! And no messy cake cutting and cleanup- which I appreciate only now as a grown up!
I love this post! If I ever get around to making these cupcake cones (and I will!), I’m using your idea and saving myself $20. 🙂 I’m glad you showed a cross-section of the cupcake! I find it very intriguing. I take it the cone stays nice and crispy, too?
These are ADORABLE!
And I totally agree that everything looks better with sprinkles….LOL.
Thank you for linking up this week!
I hate when my great inventions have already been invented by someone else! But for a buck, yours truly is a great invention! Very cute!
Those look delicious! And very cute to say the least! I will have to try some for my next party! Thanks for linking up!
Great post! Super cute and so easy. I’d love to make these in the future!
Fabulicious instructions to an old fav post! You’ve actually encouraged me to try this! Love your zip lock bag tip too! Easy and frugal how to tips… just my kind!
Thanks for linking up to SNS!
Donna
http://funkyjunkinteriors.blogspot.com/
I used to make these when my boys were little ! What fun !!!! Thanks for reminding me – I may need to take a stroll down memory lane…..
gena
http://www.thehouseonlavenderhill.blogspot.com
💡 bright idea…I have never seen the “invented pan” so I was impressed by YOUR idea!!
So stinkin cute! My 3 year old would love this!
Oh goodness you have made me laugh so hard this morning. Loved your post!!! I haven’t seen the pans but I know exactly what you mean by thinking you have the greatest idea since slice bread only to find out someone else thought of it already. Love your idea much better, the amount of times I will make ice cream cone cupcakes I’ll just make one for a buck. That would be great for transporting them also. I had isuues taking them to school one time, lol. That’s another topic altogether. 😆 Thank you for giving me a great laugh today!
Great Idea Allison! Your cupcakes look yummy!! Thanks so much for joining the Sunday Showcase Party! I greatly appreciate it! I’ll be featuring these in a post today. Stop by and grab a featured button if you like. Hope you have a wonderful week! ~ Stephanie Lynn
My mom made those when I was a kid. I’ve got to make some for my kids. LOVE the way you did the frosting. Makes it really look like an ice cream cone.
Love your pan idea! I’ve made these once before but will definitely try them your way next time. Too cute!
Ok, so I thought your cupcake baker pan was an original too! I’ve never seen one before. Great pictures! 😉
That is so cute! What a great cupcake treat. Everyone would love it!
Have a great week!
Sherry
Hey, sweetie, it’s still BRILLIANT and CLEVER, even if someone else thought of it first!
And it’s also very GENEROUS of you to share it, too — I sent this to two of my sisters, who will love and use it — so here’s a very big thank you!
xxxs and ooos from beautiful Cape Cod,
Jude at
dolcecapecod dot blogspot.com
Perfect! Your tutorial is great! And the cupcakes look amazing too!
Thanks so much for linking up to Cupcake Tuesday! Please visit me at my new blog, It’s A Blog Party, and link up your cooking or baking posts today!
http://itsablogparty.com/
~Liz
What a clever idea! I don’t have children, but I bet I know a few adults who would love to eat an ice cream cone cupcake. Thank you for sharing this terrific idea with all the hints for success. ~ Sarah
Those are super sweet! I am definatly going to try those this summer!! I also dont make anything that doesnt come from a box!! It hasnt failed me yet! haha
I had a question: How many does one box of cake mix make?
I think it’s a great idea…much better than spending $20 + shipping for the ones I’ve found online!
Thank you for this tutorial! I so appreciate it. My daughter has wanted ice cream cupcakes (as she calls them) for her b-day party. I was going to have to wing it but not anymore with your amazing tutorial. Thanks!
I bought cupcake liners and all of the stuff to make rainbow cupcakes. Then I thought about doing rainbow cupcakes in ice cream cones but driving back to the grocery on a Saturday while all of the insane shoppers were still there made me think I should stick to the liners I have. Next time!
This is so awesome I’m bookmarking it! My son’s party is coming up soon and I was wondering about an alternative to cake. Thanks so much!
This is really a clever idea to bake nice and cute little cupcakes. I surely will make them. They look so summerly. And I love your smilies. What a fun.
😯 😛 😆 😆
Greetings, Johanna
Those look YUMMY! I will have to try it!
Oh, I have to try those for my soon-to-3-year-old’s birthday next month!
So totally Awesome!
Well, I’ve never heard of it, so it’s original to me! What a fantastic idea.
Genious! I love cupcakes in cones…no paper left over, and totally adorable! Perfect for school birthdays also! Kudos! 😛
Genius! I love cupcakes in cones…no paper left over, and totally adorable! Perfect for school birthdays also! Kudos! 😛
Okay! Those are way to cute!
Loved all your tips and tricks to make it easier for us!!!
I will have to try this and am bookmarking it!!
Thanks for linking up to Bird Crafts Party!!
Hugs,
Bird
Great tips and tricks!! Love the result!!
Thanks for linking up!
Bird
Following your blog is making me a better person.
Thank you for participating the Creative Therapy session at Life in the Pitts!
I am featuring this, too. And then I’m gonna go home and make some.
http://lanieree.blogspot.com/2010/06/featuring-you_11.html
That batter-in-the-bag technique is one of those brilliant, “duh, why didn’t I ever think of that” ideas!
Thanks for linking up to the Mad Skills party!
This was an awesome cheap DIY pan. Thanks!
Very Clever! Those cupcakes look yummy!
Thanks for sharing @ Anything Related!
{Rebekah}
These are AMAZING! Would love to feature you in my monthly round robin “Get Crafty”. Next theme is “ManMade” and I reckon icecream fits the bill!
Here is last “Nature” Get Crafty as a reference. http://redtedart.wordpress.com/2010/06/01/get-crafty-june-2010-inspired-by-nature/
If you are interested, leave me a comment or send me an email and DO grab a button 😉
M x
These are super cute!
Thanks for linking up!
~Liz
So smart! I LOVE this idea and it would have come in handy after my last baking experience!
Someone gave me your link in a comment on my site! Genius!
Thanks for linking up to Tot Tuesdays! Another clever idea I’ll have to remember when the time comes! 🙂
wow these look so cool. I am at a friends 30th birthday party over the weekend and I absolutley HAVE to make her some of these.
Thanks for the tip about making your own tray too.
Great idea!! The ice cream cone cupcake pans are kind of expensive, so I will definitely give your way a try the next time I make these! (And, it will be perfect to transport them in, too!) And, I love your tip about putting the bag into a cup to fill it with frosting. Good thinkin’! And, yes, the ice cream cone cupcakes look delicious and adorable!
LOVE IT! and your super nice pampered chef cooling rack. i’m a consultant.. I can’t help but notice!
Awesome!!
It’s An Original Idea To Me Because I Only Seen People Use Cupcakes Pans Before And I Am Going To Make One Like You Did And Use It At Christmas Time So Thanks For The Ideas !!!
I’ve been poking around the blog archives and gotta say — you are soooooo clever. Love every idea I’ve seen.
You are like the most lolarious Gourmet Cupcake-in-a-Cone-from-a–damn-box-wanna-make-something-of-it blogger in the history of forever. ILU x 10000. I’m going to stalk your RSS feed now.
What fantasticness!!! All your tips are so helpful, and hey, at least we can all make our own pans for free or (.99) now!! Very cool. I love the pic of the cone you cut in half. Thanks for sharing!
I used these for PTA bake sales when my boys were little 45 years ago. They always sold right away. I’ve used them many times. Loved your pictures and ingenuity! I just used cupcake pans.
Grandma Lee
These look awesome, definitely something I may try. But why do you need a stand for the cones? Don’t they have flat bottoms and can just stand up themselves?
@ Rose, They try to tip over in the oven while the cake is still wet dough and they make a huge mess!
I’ve been wanting to try ice cream cone cupcakes. This morning I accidently found your site—and there they were! Thank you so much for the info as well as directions for making a special pan to hold the cones for baking. Can’t wait to try making them. They are SO CUTE!
Love your ice cream cone cakes. I’ve been looking for a recipe for them for ages. Also think the pan idea is great! Can’t wait to make my own. They look so cute and yummy. Thanks.
You are welcome Teddi! Let me know how yours turn out. Be forewarned, these things are really yummy and you may end up eating them all yourself.
I love this idea … might just make them for my son’s upcoming party. He’d love them!
So I stumbled upon this blog post earlier today, and was simply charmed by it. Later I went to Walmart for a quick browse of sweets and such for an upcoming V-Day party for some friends and saw that Wilton has a cupcake pan out that is this exactly! It make cupcakes in the shape of ice cream cones! Then you can proceed to top with frosting or ice cream or both! I think I still like your idea better, but I felt the need to re-find this post and tell you, for incase you need a slight change every once and a while…
Look soooo yummy! Awesome idea!
Ooo, I’m so going to have to do this. I could see doing it with some chocolate cake batter with maybe some chocolate chips to be reminiscent of putting a little chocolate syrup in the bottom of an ice cream cone before filling it with ice cream, mmm.
I love it. Thankssss a lot.
very original!! GENIUS =)
couldn’t you just put less batter in them?
Love this! If you have time….please come link up sometime! http://adiamondinthestuff.blogspot.com/2011/06/time-to-shine-link-party-no-23.html
these look awesome and I just pinned them on pinterest. yum!!
they remind me of my childhood!
Wow… you make it look so easy! Thanks for this fabulous tip, Allison… I would never have thought to use a foil dish in this way! I found you through Pinterest – initially it was the stolen images that caught my eye but I saw your comments under the pin and followed your link. I am definitely keen to give credit where credit is due, so I pinned directly from your blog!! Thanks again for enlightening so many of us to such a useful tip! 🙂 Hx
I just pinned this but gave you a HUGE shout out …..I cant stand a THIEF!!!
You rock my socks!
Just saw this on your page and laughed. I’m 48 and my mom used to make these when I was a kid. However, she didn’t have the cool cone holder that you do. She used to open the oven – put the jelly-roll pan on the rack – put the filled cones on it – and v*e*r*y slowly push the rack back into the oven. LOL
These were always a HUGE hit at the school bake sales.
Such a great idea – I never would have thought of anything like this & I’m so trying this for my step-daughter’s birthday in a couple of weeks!! Your post made me laugh 🙂 Was definitely FUN to read!!
love these! great post-I have made these and put candy in the bottom and just stuck a cupcake on top but this and the pans are genius!! Also a great way to transport the cake cones. love it
OK. Here’s another thousand dollars idea. What about inventing a carrier that will hold the cones and keep them from tipping over when taking them on the road.
Making these today for a three year olds birthday love love love this idea! I was wondering how I could get my cones to stand better without buying the actual pan and you just solved my problem!
Thank you so much! As a frugal mom, this is awesome! I was just freaking out about how to make and transport these kinds of cakes to my kid’s party. Thank you, thank you, thank you!
This is such a cute idea, can’t wait to make this for my girlie! One question though, where do I find the pan with the wholes?
LOL…holes even!
This is soooooo cool! Trying this now!
Thanks for the great tip for baking Cupcakes in a Cone – I posted an easy tip for transporting them!
http://www.alittlebitofthisandthat.com/cupcakes-in-a-cone/
So excited my son got these for his Birthday Treat!
I just came across your blog. Love this idea. Got to thinking… you could use it to transport them as well. Put them into he lid of a copy paper box, pan and all…no spillage on the way to the party! Lov, love, love this!
I love the idea of the cupcake cones, and your zip lock bag batter filling and icing bag! My friend actually made these cupcake cones and when they were cooled, she took a straw and poked it down the middle and took out a little cake, before she iced the cupcakes, she filled the straw hole with icing, so they get a little icing all the way down. I love your blog!!!
OMG, I’m sitting here giggling at your commentary. Hilarious. Thanks for posting this, I’ll be making this for my daughters school birthday celebration tomorrow. That is, if I don’t eat them all tonight.
I found you because you commented on the berry here:
http://theberry.com/2011/06/09/morning-coffee-38-photos-4/
Sorry your idea was passed around without your permission, but I’m glad you uploaded it 🙂 and I’m glad you caught it and idenitifed yourself-
your work is great 🙂
Cheers!
I saw a pan to bake these, but your idea is soooo much better (and cheaper) thank you for your great idea.
Greetings Alison
I have just discovered the cupcake in the cone from watching a lifestyle program with my girls, here in Australia, mate! I call them my “Coney Island Cupcakes” but the icing the program did was really hard [do not do when you have PMT]. Anyway, I found you after I took my coney island cupcakes to a friends place. She just sent me your url link. Just had to write and say how much sheer happiness I got from reading your hilariously funny website. You write like I talk. Love, love, love YOU, the icing and the pa prototype. I shall make one just like yours, in your honour and think of you everytime I use it! Cheers, Lisa Dx ps: you don’t really need all those zillions of dollars; you are “rich” in SO many other ways.x
Thank you so much! Ruined a batch yesterday when most fell over UGH. But this is perfect! Off to the dollar store LOL! ~Karin
I remember making these when I was a kid. In fact, I submitted the “recipe” for our school’s cookbook! Thank you for a new, modern twist on an old favorite. My three girls will love making these!!
AMAZING! This idea is genius! The cupcakes baked perfectly in the pan and it was easy to transport!
I tried making these with chocolate cake mix and the bottoms of my cones burned. 🙁 Have you done it with chocolate before and has this ever happened. What did I do wrong?
What a great idea. You did a wonderful job. They are sooooo cute!!!!!!!!!!!!!!!!!!
if you make these the night before a party will they get soggy? also when i tried these they were delicious yet seemed a little dry any ideas on what i could use to fix that? i thought about chocolate but it will harden so now i am stumped. thanks!
This was very useful and easy to do! I love the step by step pictures for idiot like me! 🙂 Thank you!
How fun…and perfect for the domestically challenged like me! My friends are all “Hostesses of the Year” so it would be cool to show up with something novel! I would like to do something similar but with pie crust/filling…anybody have any ideas about that?
I loved your tutorial- its a wonderful idea!made these many times and they do fall over and make you want to scream! Wish I had known about this idea! Love the way you word your comments! Fun is the key word- can never use it too much! Thank you!
Kay
I was convinced I came up with the idea of Ice cream cone cupcakes I had my mom write up a submission with pictures of ones I had her make and sent them to that pbs tv show Zoom back in like 2000.I must have been like 10.
First off – who cares if someone else made one? The world is full of repeats – many of whom make good money, it all depends on marketing and marketing this idea would be FUN.
Second – You CAN invest in a 4 pack of couplers ($4 at WalMart) and four tips (roughly $4 – give or take) AND NEVER BLOW OUT A ZIPLOC AGAIN!
lastly – I am a cupcake baker. pretty party maker. for a living. And didn’t now about those clippies at IKEA! So thank you!!!! I have just recently started offering a DYO version of my parties and I have tried twisties, tape, yarn, ribbon… nothing has worked! Making the trip to IKEA tomorrow 🙂
Good idea!!!!
I will be your follower!!
bye
Thank you, thank you, thank you!!! I am making cupcake cones today for a bake sale that is TOMORROW and my friend advised me about the tipping hazard. I frantically searched on-line for the cupcake cone pan-praying to find a store that carries it. No luck. No time to have it shipped. Then, I found your tutorial – and your genius solution to my dilemma. I have never posted a comment on anything before, but I just had to say thank you for sharing your idea!!
Any ideas for a cute display with these?
Someone may have come up with the idea years ago but I need it today! Cheat Castaic? Works perfect for me. I am going to make cupcakes for my three year old nieces birthday. I made Tierras out of royal icing and so now I was looking for something fun to put them on. I knew I wanted to do ice cream cone cupcakes but was concerned about the pan. Thanks for making Aunt B still the favorite aunt!
I wish I saw this earlier ….. I promise my daughters kindergarten class microphone cupcakes (cupcakes in ice cream cones) for rock star day. Yea right …. nope. As most Moms I wait until 7 pm at night to start this project. Right now I have cake batter all over my oven and the cupcake cones in the trash. So I will absolutely use YOUR METHOD for ROUND TWO after I get back from the store buying all this stuff all over again. SO HAPPY I FOUND THIS.
That is so funny! I just thought I had the exactly same original idea! Then I thought, I’ll just google it to make sure, and there you were! Lol. Not to mention the actual pan ;). Still pure genius if you ask me x
You may think your aluminum DIY cupcake cone pan was a waste of time, But Girl, in my book, you’re a genius! I have wanted to make these for my grand kids for a long time, but it is useless to do it in a cupcake pan, because they just fall over and make a mess. And I won’t pay the now $19 plus S&H for the rack. This might not make you a thousand-aire, but it’s worth a thousand bucks to me. Thanks for thinking it through and posting it. =)
Well thank ya!
Well I think your idea is a great one and it don’t break the bank plus you don’t have to find a place to store those that are on the market especially if you don’t plan to make them often.
True! I actually still have this cheap flimsy pan. I’ve used it for 3 years. Best dollar I ever spent. 🙂
THANK YOU!!! I am sooo making these for my daughter’s birthday in a couple of weeks. Not ordering a cake this year!!
Brilliant idea. I don’t want to spend a fortune on pans that I will only use once or twice. Thank you.
What a great idea in making these pans. Too bad I spent quite a bit of money on those pans already. Since I don’t like bringing the actual pans out. This would be a good idea to use as a serving tray when I have to transport it
Totally cool! I’ve placed the cones in cupcake pans but it requires great skill placing the pan in the oven. I would place the baked cone-cakes in a make shift holder which consisted of a box lid with holes cut out then covered in foil. This is perfect! Makes baking a breeze and presentation nicer and more sanitary. Thank you so much for sharing!!!
I googled , Pan for baking cupcakes in an ice cream cone, & halleluha I came across your awesome idea of making your own pan. Gazillions of money will be saved! The $ store will most likely have a run on cheapo aluminium pans. Your idea has to be a real boost to the economy! I have the pointy end kind of cones, but I am determined to make & bake cupcakes in a cone! Love it! CLEVER beyond words.
goodness gracious!!! yummo!
I HAD to respond to this one. LOVED “I thought I had an original idea ice cream cone cupcake”…Ideas leave and pop back up years later. I’m going to admit something. Over 40+ years ago, my mother made these for my birthday party. I remember it because they (parents) wanted me to have a birthday that included cake and ice cream. We were at a swimming pool….Let’s just say back then, ice cream and swimming pools were frowned upon. So, Mom came up with this one. Honestly, I don’t think SHE came up with it, but she made it for my birthday party. And here 40+ years later….I remember it fondly. Thank you for sharing this.
hello,
This is such a cute idea!! I am going to have to try this for some valentines decorations!
How far in advance can these be prepared? 3 days?
THANK YOU!! Thank you for saving me money on a fancy do-the-same-as-the-cheap-version pan, and thank you for making me laugh. Educational, economical and entertaining – who could want more? Thank goodness Wal-mart was out of the cupcake cone baking rack I wanted to buy. Can’t wait to try your version – my foil pan is cut out and ready to go.
Haha that is awesome. Yes, I’m glad I could save you money. Also, if you just use a baking pan and line the cupcake cones in the pan, and are very careful not to tip them, you can get away without the fancy pan at all.
oh, these are looking so Beafulfil..!
Thank you! For this Great!!!Aweeeesome!!! Fantabulous!!! Diy Pan Idea bcuz I was Minutes Away from buying a Ice Cream Cupcake Pan and how do you Stop your Cones from Melting Down like Butter Right after I Add my Box Cake Batter Which Is Never Runny♀️ And Thanks Again For Your Diy Pan
#AweeesomeTutorial
#BestStepByStepTutorialEver
Thank you! For this Great!!! Aweeeesome!!! Fantabulous!!! Diy Pan Idea bcuz I was Minutes Away from buying a Ice Cream Cupcake Pan and how do you Stop your Cones from Melting Down like Butter Right after I Add my Box Cake Batter Which Is Never To Watery Well Thanks Again For Your Diy Pan
#AweeesomeTutorial
#BestStepByStepTutorialEver
Could you please tell me what’s the best way to cover these for transport so the frosting and sprinkles don’t get mooshed/ smashed? Thank you.
Wow! Great Information about delicious cap cake boxes with unique styles which really helpful for me.